
Peanut Butter Lunch Lady Bars

There is a specific kind of magic found in peanut butter lunch lady bars that few modern desserts can replicate. For many of us, the mere sight of these thick, chewy squares brings back an instant flood of memories—the clatter of plastic trays, the hum of the school cafeteria, and the anticipation of that one special day of the week when these treats appeared. This classic school cafeteria dessert is defined by its soft, dense peanut butter cookie base and a signature layer of rich chocolate frosting that melts into the warm dough just enough to create a seamless, fudgy bond. It is a humble dessert, yet it remains a powerhouse of flavor that balances salty nuttiness with deep cocoa sweetness.
Making these at home allows you to capture that same nostalgia while elevating the quality of the ingredients. Unlike many overly complex modern pastries, these sheet pan bars rely on pantry staples and a straightforward baking method that guarantees a crowd-pleasing result. Whether you are looking to recreate a childhood favorite or you simply need a reliable, high-yield dessert for a potluck or family gathering, this recipe delivers a texture that is simultaneously sturdy enough to hold and soft enough to melt in your mouth. In the following guide, we will walk through the essential techniques for achieving that iconic “lunch lady” texture and the secrets to a perfectly glossy chocolate finish.
Why You’ll Love This Recipe
- Pure Nostalgia: These bars capture the exact flavor profile of authentic nostalgic recipes from decades of American school lunch programs, offering a comforting trip down memory lane.
- Crowd-Sized Yield: Baked in a standard jelly roll pan or large baking sheet, one batch produces enough thick, satisfying squares to feed a large family or a neighborhood gathering.
- Perfect Texture Balance: The base provides a soft, cookie-like chew that isn’t too crumbly, providing the ideal foundation for the decadent creamy chocolate frosting on top.
- Simple Pantry Staples: You likely already have every ingredient needed in your kitchen, making this an accessible project for any day of the week without a special trip to the store.
Ingredients You’ll Need
The success of these bars lies in the ratio of fat to flour, ensuring the base remains tender rather than dry. By understanding the role of each component, you can ensure your bars turn out exactly like the ones you remember from the cafeteria line.
- Creamy Peanut Butter: This is the heart of the recipe. A standard commercial brand works best here because the stabilizers keep the dough from separating, resulting in a consistent, smooth texture in every bite.
- Unsalted Butter: Using real butter adds a richness and depth of flavor that margarine simply cannot match. It also contributes to the “melt-in-your-mouth” quality of the cookie base.
- Granulated and Brown Sugar: The combination of these two sugars provides the perfect level of sweetness while the molasses in the brown sugar ensures the bars stay moist and chewy.
- All-Purpose Flour: This provides the structural framework for the bars. Be sure to measure it carefully to avoid a heavy or bready base.
- Eggs: Acting as the primary binder, eggs provide lift and moisture, helping the bars transition from a simple dough to a soft, cake-like cookie.
- Vanilla Extract: A splash of high-quality vanilla enhances the nuttiness of the peanut butter and rounds out the sweetness of the chocolate topping.
- Cocoa Powder and Powdered Sugar: These form the base of the frosting. When combined with melted butter and milk, they create a fudge-like layer that sets beautifully.
Variations and Smart Swaps
The No-Bake Swap: If you prefer a denser, candy-like bar, you can transform these into no-bake peanut butter treats by replacing the flour and eggs with crushed graham cracker crumbs. This version is more reminiscent of a chocolate peanut butter cup but still captures the schoolyard spirit.
Crunchy Texture Variation: While the classic version uses smooth peanut butter, substituting half of it for the crunchy variety adds a delightful textural contrast. The small bits of roasted peanuts throughout the base provide a salty pop that pairs excellently with the sweet frosting.
Dark Chocolate Upgrade: For a more “adult” version of this childhood classic, swap the traditional cocoa powder frosting for a dark chocolate ganache. Use a high-percentage cocoa chocolate and a touch of sea salt on top to balance the sugar levels of the base.
Gluten-Free Adaptation: You can easily make these bars gluten-free by using a high-quality 1-to-1 gluten-free flour blend. Since the peanut butter provides so much moisture and structure, the texture remains remarkably similar to the original wheat-based version.
How to Make Peanut Butter Lunch Lady Bars
Step 1: Cream the Fats and Sugars
Start by beating your softened butter together with the granulated sugar and brown sugar until the mixture is light and fluffy. This process, known as creaming, incorporates air into the fat which helps the bars achieve a soft, rather than dense, consistency. Once the mixture is aerated, add in the creamy peanut butter and continue to beat until the color lightens slightly and the texture is completely uniform. This stage is crucial for ensuring the peanut flavor is evenly distributed throughout every square.
Step 2: Incorporate Liquid Ingredients and Dry Goods
Add the eggs one at a time, beating well after each addition to ensure they are fully emulsified into the fats. Stir in the vanilla extract, then gradually add the dry ingredients, including the flour, baking soda, and a pinch of salt. Mix only until the flour streaks disappear. Over-mixing at this stage can develop too much gluten, which would turn your tender bars into something tough and rubbery. The dough should be thick, sticky, and highly aromatic.
Step 3: Press and Bake the Base
Transfer the dough to a well-greased sheet pan. Use a spatula or your lightly floured hands to press the dough into an even layer, reaching all the way to the corners. Bake in a preheated oven until the edges are just beginning to turn a light golden brown. It is vital to avoid over-baking; the center should still look slightly soft. These bars will continue to set as they cool, and pulling them out early ensures they maintain that iconic fudge-like chewiness that defines peanut butter lunch lady bars.
Step 4: Prepare the Chocolate Frosting
While the bars are in their final minutes of baking, whisk together the melted butter, cocoa powder, powdered sugar, and a splash of milk in a medium bowl. The goal is a glossy, pourable consistency that is thick enough to hold its shape but thin enough to spread easily. If the frosting feels too stiff, add milk a teaspoon at a time. The heat from the freshly baked base will help the frosting glide over the surface, creating a perfectly smooth finish.
Step 5: Frost and Set the Bars
Immediately after removing the pan from the oven, pour the frosting over the warm peanut butter base. Use an offset spatula to spread it to the edges. The residual heat from the bars will slightly melt the bottom of the frosting, effectively “gluing” the two layers together so they don’t separate when sliced. Let the pan sit at room temperature for at least an hour, or in the refrigerator for 30 minutes, to allow the chocolate layer to firm up before you attempt to cut them into squares.
Pro Tips for Success
- Tip: Use a standard 18×13-inch half-sheet pan for thinner bars, or a 15×10-inch jelly roll pan if you prefer a thicker, more substantial peanut butter layer.
- Tip: Always frost the bars while they are still warm. This is the secret to getting that professional, glass-like sheen on the chocolate topping.
- Tip: For perfectly clean edges when slicing, wipe your knife clean with a warm, damp cloth between every single cut. This prevents the chocolate from dragging into the peanut butter base.
- Tip: If you find the dough too sticky to spread in the pan, place a piece of parchment paper over the top and use a rolling pin or a flat-bottomed measuring cup to press it down evenly.
- Tip: Avoid “natural” peanut butters that require stirring. The oil separation in those products can lead to greasy bars that don’t hold their shape at room temperature.
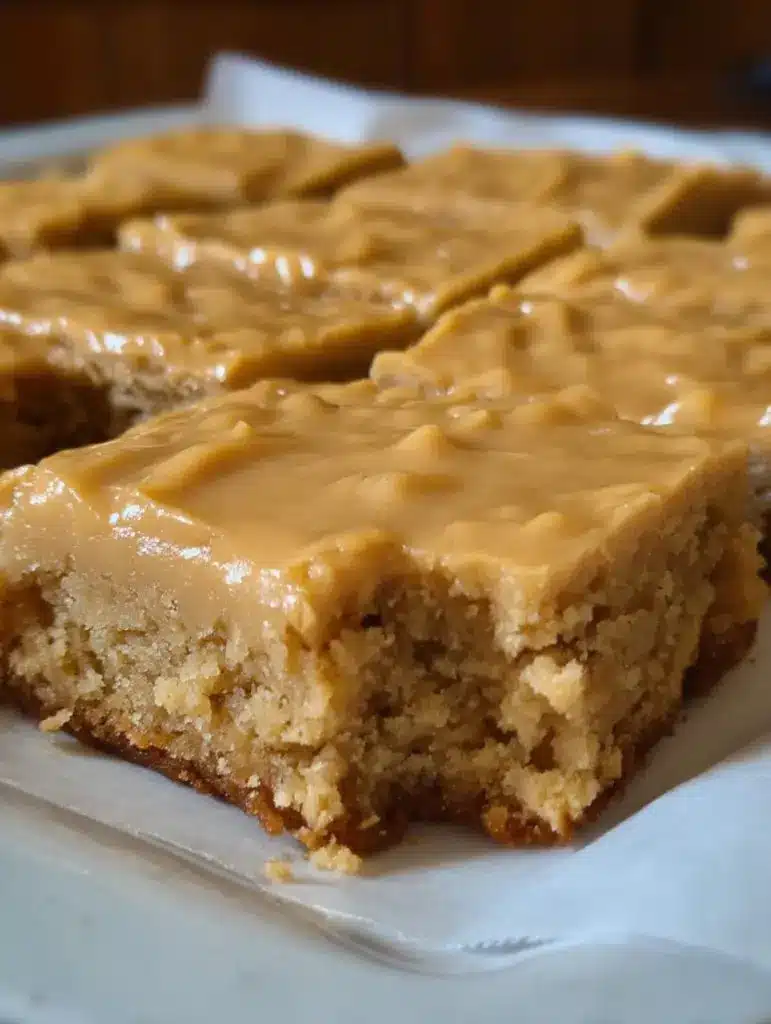
How to Serve Peanut Butter Lunch Lady Bars
When it comes to serving peanut butter lunch lady bars, simplicity is your best friend. In the spirit of the classic school cafeteria dessert, these are best enjoyed at room temperature with a tall, cold glass of milk. The milk helps cut through the richness of the peanut butter and the sugar of the frosting, creating a balanced snack experience.
If you are serving these at a party, consider cutting them into smaller “two-bite” squares. Because they are so rich, a smaller portion is often more than enough to satisfy a sweet tooth. For a more plated dessert, you can serve a square slightly warmed with a scoop of vanilla bean ice cream on top, though purists will argue that they are perfect exactly as they come out of the pan. Garnishing with a tiny sprinkle of flaky sea salt can also help accentuate the chocolate and peanut flavors for a more modern gourmet touch.
Storage and Make-Ahead
Storing Leftovers
These bars store exceptionally well, making them ideal for meal prepping snacks for the week. Keep them in an airtight container at room temperature for up to three days. If your kitchen is particularly warm, it is better to store them in the refrigerator to prevent the chocolate frosting from becoming too soft or sticky. When refrigerated, they will stay fresh for up to a week.
Freezing
You can freeze peanut butter lunch lady bars for up to three months. To do this, wrap individual squares in plastic wrap and then place them all in a heavy-duty freezer bag. This allows you to pull out a single treat whenever the craving strikes. To thaw, simply leave a bar on the counter for about 20 minutes, and it will return to its original soft texture.
Making It Ahead
Because the flavor of the peanut butter actually deepens and the texture settles after a few hours, these are an excellent make-ahead dessert. You can bake and frost the entire sheet pan the night before your event. Just cover the pan tightly with foil once it has cooled completely, and slice them right before you are ready to serve.
Final Thoughts
The enduring popularity of peanut butter lunch lady bars is a testament to the fact that some flavors are truly timeless. By combining the salty, roasted notes of peanut butter with a fudge-like chocolate topping, this recipe hits every sensory note required for a satisfying dessert. It is a reminder that you don’t need exotic ingredients or complicated techniques to create something that people will talk about for years. Whether you are sharing these with those who remember the original school version or introducing a new generation to this classic school cafeteria dessert, these sheet pan bars are guaranteed to be a highlight of your baking repertoire. Take your time with the creaming process, don’t over-bake the base, and enjoy the blissful simplicity of this American kitchen staple.
Frequently Asked Questions
Can I use natural peanut butter in this recipe?
While you can technically use natural peanut butter, it is generally discouraged for this specific recipe. Natural varieties that require stirring often lack the emulsifiers found in brands like Jif or Skippy. This can result in a base that is overly oily or a texture that is crumbly rather than chewy. For the most authentic “lunch lady” experience, stick to standard creamy peanut butter.
Why did my chocolate frosting crack when I cut the bars?
Cracking usually happens if the frosting has become too cold and brittle or if the ratio of butter to sugar is off. To prevent this, ensure you add the milk as directed to keep the frosting supple. Additionally, slicing the bars while they are at room temperature—rather than straight from the fridge—will allow the knife to glide through the chocolate layer without shattering it.
Can I make these bars in a 9×13-inch pan?
Yes, you can use a 9×13-inch pan, but your bars will be significantly thicker than the traditional version. If you choose this route, you will need to increase the baking time by several minutes to ensure the center is fully cooked. Keep a close eye on the edges to make sure they don’t get too dark while the middle finishes setting.
How do I know when the base is done baking?
The bars are done when the edges are a very light golden brown and have slightly pulled away from the sides of the pan. The center should still look a bit soft and “underdone.” If you wait until the entire top is browned, the bars will be hard and crunchy once they cool, losing that signature soft chew that makes them famous.
Do I have to use a stand mixer for this recipe?
While a stand mixer makes the creaming of the butter and sugar much easier, you can certainly make these with a hand mixer or even by hand with a sturdy wooden spoon and some elbow grease. The key is ensuring that the butter and sugars are whipped until pale and fluffy before adding the other ingredients to ensure the proper aeration for a soft base.
Peanut Butter Lunch Lady Bars

A nostalgic school cafeteria classic! These chewy bars combine a peanut butter oat base with a smooth peanut butter layer and a rich chocolate frosting for the ultimate treat.
- 1 cup unsalted butter, softened
- 1 cup granulated sugar
- 1 cup light brown sugar, packed
- 1 cup creamy peanut butter
- 2 large eggs
- 1 tsp vanilla extract
- 2 cups all-purpose flour
- 1 tsp baking soda
- 1/2 tsp salt
- 1 cup quick-cooking oats
- For the Topping:
- 1/2 cup creamy peanut butter
- 1 1/2 cups chocolate frosting
- 1Preheat your oven to 350°F (175°C) and grease a 9x13 inch baking pan with non-stick spray or butter.
- 2In a large mixing bowl, cream together the softened butter, granulated sugar, and brown sugar until light and fluffy.
- 3Add 1 cup of peanut butter, eggs, and vanilla extract, beating until well combined.
- 4In a separate bowl, whisk together the flour, baking soda, and salt.
- 5Gradually add the dry ingredients to the wet ingredients, then fold in the quick oats until a thick dough forms.
- 6Press the dough evenly into the prepared baking pan.
- 7Bake for 20 to 25 minutes, or until the edges are lightly golden. Do not overbake; they should remain soft.
- 8Immediately after removing from the oven, dollop the remaining 1/2 cup of peanut butter over the hot bars. Let it sit for 2 minutes to melt, then spread it evenly over the surface.
- 9Allow the bars to cool completely in the pan to room temperature.
- 10Once cooled, spread the chocolate frosting over the peanut butter layer. Slice into 24 squares and serve.
Keywords: peanut butter bars, lunch lady recipes, school cafeteria bars, chocolate peanut butter dessert, oatmeal bars


