
Lemon Crumb Bars

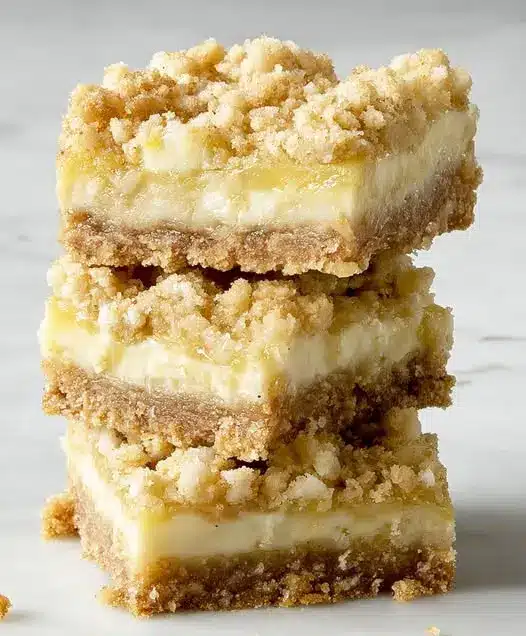
There is something remarkably nostalgic and satisfying about a easy lemon crumb bar recipe. It strikes that perfect balance between a sophisticated dessert and a cozy, homemade treat that feels right at home on any kitchen counter. Imagine a buttery, shortbread-like base topped with a silky, tart lemon filling that is finished with a golden, crunchy crumble. These bars offer a bright pop of citrus that cleanses the palate, making them an ideal choice for afternoon tea, summer potlucks, or a simple weekend project that fills your kitchen with the scent of fresh lemons.
What makes this specific approach so appealing is its accessibility. You don’t need advanced pastry skills or specialized equipment to achieve a professional-grade result. By focusing on the quality of your citrus and the texture of your crumble, you can create a refreshing summer dessert that rivals any bakery offering. It’s all about the layers—crispy, creamy, and zesty—coming together in one cohesive, delicious bite.
Why You’ll Love This Recipe
- Perfect Texture Contrast: This recipe delivers a wonderful play between the crisp, buttery crumble and the smooth, custardy lemon center.
- Pantry Staples: Most of the ingredients are likely already in your kitchen, requiring only a few fresh lemons to bring the whole dish to life.
- Crowd-Pleasing Flavor: The zesty lemon bars offer a balanced sweetness that appeals to both children and adults who prefer a more refined, tart finish.
- Excellent Portability: Once cooled and set, these bars are sturdy enough to be packed for picnics, bake sales, or lunchboxes without falling apart.
Ingredients You’ll Need
To achieve the best results, selecting high-quality ingredients is essential. Each component plays a specific role in ensuring the bars are structurally sound while remaining tender and flavorful.
- All-Purpose Flour: This provides the structural foundation for both the base and the crumble topping, ensuring the bars hold their shape.
- Unsalted Butter: Using butter creates that signature melt-in-your-mouth quality and a rich flavor that complements the sharp citrus notes.
- Granulated Sugar: Sugar sweetens the crust and balances the acidity of the lemon juice in the filling.
- Fresh Lemons: You will use both the juice and the zest. Freshly squeezed juice is non-negotiable for that authentic, vibrant citrus punch.
- Large Eggs: These act as the thickening agent for the lemon layer, helping it set into a creamy, stable custard during the baking process.
- Old-Fashioned Oats: If included in your crumble, these add a rustic heartiness and an extra layer of crunch to the oatmeal crumble topping.
- Vanilla Extract: A small amount of vanilla rounds out the flavors, adding a subtle warmth that prevents the lemon from being too sharp.
- Salt: A pinch of salt is crucial to enhance the butteriness of the crust and make the lemon flavor truly stand out.
Variations and Smart Swaps
- Berry Lemon Twist: You can easily fold fresh blueberries or raspberries into the lemon filling before adding the crumble for a burst of color and extra sweetness.
- Gluten-Free Option: Substitute the all-purpose flour with a high-quality 1-to-1 gluten-free baking blend to make this recipe accessible for those with dietary restrictions.
- Citrus Medley: Replace half of the lemon juice with lime or Meyer lemon juice for a more complex, multi-layered citrus profile.
- Nutty Crumble: Add a handful of sliced almonds or chopped pecans to the oatmeal crumble topping for added protein and a deeper, toasted flavor.
How to Make This Easy Lemon Crumb Bar Recipe
Step 1: Prepare the Baking Pan and Preheat
Before mixing any ingredients, preheat your oven to the temperature specified in your recipe card. Line your baking pan with parchment paper, leaving a slight overhang on the sides. This “sling” method is vital because it allows you to lift the bars out cleanly once they have cooled, preventing the delicate lemon layer from sticking to the edges of the pan.
Step 2: Create the Buttery Crust and Crumble
In a large mixing bowl, combine your dry ingredients with cold, cubed butter. Use a pastry cutter or your fingers to work the butter into the flour until the mixture resembles coarse crumbs. A key tip here is to keep the butter cold; this ensures that as it melts in the oven, it creates tiny air pockets that result in a flaky, crisp texture rather than a greasy one. Press about two-thirds of this mixture firmly into the bottom of your prepared pan.
Step 3: Blind Bake the Base
Place the bottom crust into the oven for a short initial bake. This “blind baking” step is essential to prevent a soggy bottom. By partially cooking the crust before adding the liquid lemon filling, you create a sturdy barrier that remains crisp even after the bars are fully assembled. Bake until the edges are just barely starting to turn a pale golden brown.
Step 4: Whisk the Zesty Lemon Filling
While the crust is in the oven, whisk together your eggs, sugar, lemon juice, and zest. Ensure the mixture is smooth and well-combined. You want to see the bright flecks of zest distributed evenly throughout the liquid. If you prefer a thicker filling, some recipes call for a small amount of flour or cornstarch to be whisked in at this stage to provide extra stability.
Step 5: Assemble and Final Bake
Pour the lemon mixture over the warm, pre-baked crust. Carefully sprinkle the remaining crumble mixture over the top, ensuring even coverage but leaving some gaps so the bright yellow filling can peek through. Return the pan to the oven and bake until the center is set and the oatmeal crumble topping is a beautiful golden brown. The filling should have a slight jiggle but should not be liquid.
Pro Tips for Success
- Use Room Temperature Eggs: This helps the eggs incorporate more smoothly into the sugar and lemon juice, resulting in a more uniform and silkier filling texture.
- Zest Before Juicing: It is much easier to zest a firm, whole lemon than a squeezed one. Always grate the yellow skin (avoiding the bitter white pith) before cutting the fruit in half.
- Don’t Rush the Cooling: This is perhaps the most important tip. The lemon filling continues to set as it cools. For the cleanest slices, let the bars cool completely at room temperature and then refrigerate them for at least two hours before cutting.
- Wipe the Knife: To get those perfect, bakery-style squares, wipe your knife with a damp cloth between every single cut. This prevents the filling from smearing onto the crust of the next bar.
How to Serve Your Lemon Bars
When it comes to serving this easy lemon crumb bar recipe, presentation can be as simple or as elegant as you like. For a classic look, a light dusting of powdered sugar just before serving adds a touch of sweetness and hides any minor imperfections in the crumble. If you are serving these as a plated dessert, a dollop of homemade whipped cream or a small scoop of vanilla bean ice cream balances the tartness of the lemon beautifully.
For a summer garden party, consider garnishing the plate with a few fresh mint leaves or extra lemon wedges. These bars also pair wonderfully with a cold glass of iced tea or a hot cup of Earl Grey, as the bergamot notes in the tea naturally highlight the citrus in the dessert. Because they are so vibrant, they look stunning on a simple white ceramic platter or a rustic wooden board.
Storage and Make-Ahead
Storing Leftovers
Because the filling contains eggs and dairy, these bars should be stored in the refrigerator. Place them in an airtight container with layers of parchment paper between them to prevent sticking. They will stay fresh and delicious for up to 4 or 5 days, though the crust may soften slightly over time.
Freezing Instructions
This refreshing summer dessert freezes remarkably well. Wrap individual bars tightly in plastic wrap and then place them in a freezer-safe bag. They can be frozen for up to three months. To enjoy, simply thaw a bar in the refrigerator overnight or at room temperature for about 30 minutes.
Final Thoughts
Baking a easy lemon crumb bar recipe is a rewarding experience that yields high results for relatively low effort. Whether you are a seasoned baker or a beginner, the combination of a buttery crust and a tart, zesty filling is always a winning formula. These bars bring a bit of sunshine into any occasion and are sure to become a requested favorite in your household. Take your time with the citrus prep, let them chill properly, and enjoy the bright, crisp flavors of a truly classic American treat.
Frequently Asked Questions
Can I use bottled lemon juice instead of fresh?
While you can technically use bottled juice, it is highly discouraged for this recipe. Bottled juice often has a metallic or overly acidic aftertaste and lacks the vibrant, floral notes of fresh lemons. Since lemon is the primary flavor, using fresh fruit and its zest makes a significant difference in the final quality of your zesty lemon bars.
Why did my lemon filling turn out runny?
A runny filling usually happens for one of two reasons: the bars weren’t baked long enough, or they weren’t allowed to cool completely. The eggs in the filling need time to coagulate and set. If the bars are still jiggly in the center after the recommended bake time, give them a few more minutes. Additionally, the filling only fully firms up once it has been chilled in the refrigerator.
Can I make the crumble topping without oats?
Yes, you can. While an oatmeal crumble topping adds a nice texture, you can create a simple shortbread crumble by using just flour, sugar, and butter. The result will be slightly more delicate and sandy in texture, which is equally delicious. Simply follow the same process of cutting the butter into the dry ingredients until clumps form.
How do I prevent the crust from getting soggy?
The best way to prevent a soggy bottom is to ensure you blind bake the crust before adding the lemon filling. This creates a firm, cooked layer that acts as a moisture barrier. Additionally, make sure you don’t underbake the base; it should be slightly golden and firm to the touch before the liquid is poured over it.
Can I make these bars ahead of time?
Absolutely! In fact, these bars are often better the next day because the flavors have had more time to meld and the filling has completely set. You can easily make them 24 hours in advance. Just keep them covered in the refrigerator until you are ready to slice and serve them.
Lemon Crumb Bars

These Lemon Crumb Bars feature a zesty, creamy lemon filling layered between a buttery shortbread crust and a crunchy crumble topping. They are the perfect balance of sweet and tart.
- 2 cups all-purpose flour
- 1/2 cup granulated sugar
- 3/4 cup unsalted butter, melted
- 1/4 tsp salt
- 1 can (14 oz) sweetened condensed milk
- 1/2 cup fresh lemon juice
- 1 tbsp lemon zest
- 1 large egg yolk
- 1Preheat your oven to 350°F (175°C) and grease or line an 8x8 inch baking pan with parchment paper.
- 2In a medium bowl, stir together the flour, granulated sugar, salt, and melted butter until a crumbly dough forms.
- 3Press approximately two-thirds of the crumb mixture into the bottom of the prepared pan to form a crust. Bake for 10-12 minutes.
- 4While the crust bakes, whisk together the sweetened condensed milk, lemon juice, lemon zest, and egg yolk in a separate bowl until smooth.
- 5Pour the lemon filling over the warm crust.
- 6Sprinkle the remaining crumb mixture evenly over the top of the lemon layer.
- 7Bake for an additional 20-25 minutes, or until the edges are lightly golden and the center is set.
- 8Allow the bars to cool completely in the pan before slicing into squares.
Keywords: lemon bars, lemon crumb bars, dessert recipe, citrus bars, easy baking


