
Chocolate Mousse Pie

Finding the perfect balance between a rich, decadent truffle and a light, airy cloud is the hallmark of the best chocolate mousse pie recipe. Unlike heavier fudge pies that can feel overwhelming after a few bites, a true mousse pie offers a sophisticated, melt-in-your-mouth experience that highlights the nuances of high-quality cocoa. This dessert is a showstopper for dinner parties and holiday gatherings, providing a luxurious finish to any meal without the density of a traditional flour-based cake.
Creating a silky chocolate filling requires a bit of patience and a gentle touch, but the result is undeniably worth the effort. By focusing on the temperature of your ingredients and the technique used to incorporate air into the mixture, you can achieve a professional-grade dessert right in your own kitchen. This guide will walk you through the nuances of building a homemade chocolate mousse that holds its shape beautifully while remaining incredibly light and velvety.
Why This Recipe Is a Keeper
- The Ultimate Texture: This pie avoids the rubbery consistency of gelatin-heavy recipes, relying instead on the natural structure of whipped cream and tempered eggs for a silky chocolate filling.
- Make-Ahead Convenience: Because the mousse needs several hours to set in the refrigerator, it is the perfect dessert for entertaining that you can finish well before your guests arrive.
- Deep Chocolate Profile: By using a high percentage of cocoa, this no-bake chocolate pie offers a sophisticated flavor that isn’t masked by excessive sugar.
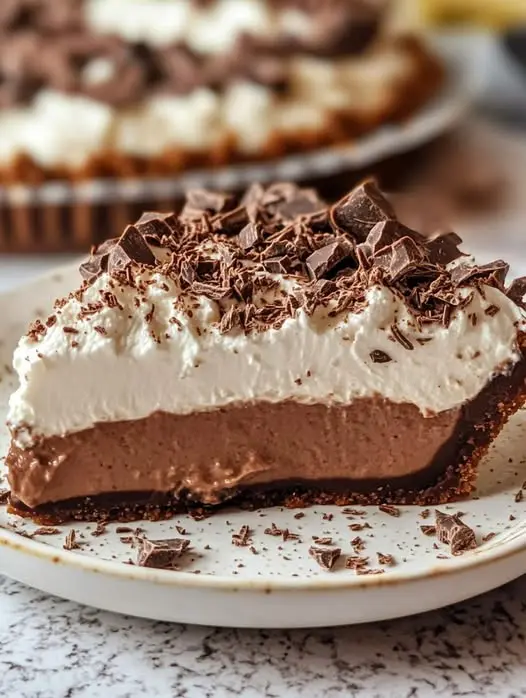
- Stunning Presentation: With its dark, dramatic filling and contrasting snowy-white whipped cream topping, this pie looks like it came straight from a high-end French patisserie.
Ingredients You’ll Need
The quality of your ingredients directly impacts the final flavor of your best chocolate mousse pie recipe. Since there is no baking involved for the filling, every note of the chocolate and cream will be front and center.
- High-Quality Semi-Sweet Chocolate: Choose a bar with at least 60% cacao. Avoid chocolate chips if possible, as they contain stabilizers that can prevent the mousse from reaching peak silkiness.
- Heavy Whipping Cream: This provides the necessary volume and fat content. Ensure it is very cold before whipping to achieve the most stable peaks for your homemade chocolate mousse.
- Egg Yolks: These add a custard-like richness and help emulsify the fats, ensuring the pie is stable enough to slice cleanly.
- Chocolate Sandwich Cookies: Ground into a fine crumb, these create a sturdy, crunchy base that provides a textural contrast to the soft mousse.
- Unsalted Butter: This acts as the glue for your crust, providing a rich, savory backbone to the sweet chocolate.
- Pure Vanilla Extract: A splash of high-quality vanilla enhances the floral and earthy notes of the cocoa beans.
Variations and Smart Swaps
While the classic version is hard to beat, you can easily adapt this no-bake chocolate pie to suit different palates or seasonal themes.
- Mocha Mousse Pie: Dissolve a teaspoon of espresso powder into the melted chocolate to deepen the flavor and add a sophisticated coffee kick.
- Peppermint Crunch: Fold crushed candy canes into the whipped cream topping and add a drop of peppermint extract to the filling for a perfect winter holiday variation.
- Peanut Butter Swirl: Gently marble a few tablespoons of warmed, creamy peanut butter into the mousse before it sets for a classic flavor pairing.
- Graham Cracker Base: If you find a double-chocolate experience too intense, swap the cookie crust for a traditional graham cracker crust to add a hint of honey and cinnamon.
How to Make the Best Chocolate Mousse Pie Recipe
Step 1: Prepare the Crunchy Cookie Base
Start by pulsing your chocolate cookies in a food processor until they reach the consistency of fine sand. Mix these crumbs with melted butter until the mixture feels like wet sand. Press the mixture firmly into the bottom and up the sides of your pie dish. Chilling the crust while you prepare the filling is essential for a clean slice later, as it allows the butter to solidify and lock the crumbs in place.
Step 2: Melt the Chocolate Gently
To avoid scorching, melt your chopped chocolate using a double boiler or in short bursts in the microwave at 50% power. Stir frequently until the mixture is completely smooth and glossy. It is crucial to let the chocolate cool slightly before proceeding; if it is too hot, it will deflate the whipped cream, but if it is too cold, it will create grainy flecks in your silky chocolate filling.
Step 3: Temper the Egg Yolks
Combine the egg yolks with a portion of the sugar and cook them gently over a water bath, whisking constantly. This step “cooks” the eggs for safety while creating a thick, pale yellow base that adds incredible structure to the mousse. Slowly drizzling the warm chocolate into the egg mixture—a process known as tempering—prevents the eggs from curdling and ensures a uniform texture.
Step 4: Whip the Cream to Soft Peaks
In a chilled bowl, beat the heavy cream until it holds a soft peak. You want the cream to be thick enough to hold its shape but still have a bit of “slump” when the whisk is lifted. Over-whipping the cream at this stage can lead to a grainy mousse. The air trapped in these bubbles is what gives the homemade chocolate mousse its signature lightness.
Step 5: Fold with a Gentle Hand
Using a large silicone spatula, gently fold the whipped cream into the chocolate mixture in three separate additions. The first addition can be stirred in to lighten the base, but the subsequent additions must be folded using a “cut and turn” motion. This preserves the air bubbles you worked so hard to create, ensuring the best chocolate mousse pie recipe results in a light, ethereal filling rather than a dense ganache.
Step 6: The Long Chill
Pour the mousse into your prepared crust and smooth the top with an offset spatula. The pie needs at least 4 to 6 hours—ideally overnight—to fully set. During this time, the fats in the chocolate and cream will firm up, creating a stable dessert that can be sliced into beautiful, sharp wedges without losing its shape.
Pro Tips for Success
- Tip: Use a warm, dry knife to slice the pie. Dip your knife in hot water and wipe it clean between every single cut for those professional-looking, clean edges.
- Tip: Ensure your mixing bowls are completely grease-free. Even a tiny amount of residual oil can prevent your cream from whipping to its full potential.
- Tip: Bloom your cocoa. If the recipe calls for any cocoa powder, mixing it with a tablespoon of hot water before adding it to the chocolate can intensify the flavor significantly.
- Tip: Don’t rush the cooling. If you add the whipped cream to chocolate that is still significantly above room temperature, the cream will melt into a puddle.
Troubleshooting Common Problems
Why Is My Mousse Gritty?
Grittiness usually happens if the melted chocolate was too cold when it was combined with the egg yolks or the cream. This causes the chocolate to solidify into tiny bits. To fix this next time, ensure your chocolate is warm to the touch (around 110°F) before folding in the other components.
Why Didn’t My Pie Set?
If the pie remains runny after six hours, the cream may not have been whipped enough, or the egg yolks weren’t cooked to the proper thickness. Ensure your cream reaches medium peaks and your yolk mixture is thick enough to coat the back of a spoon before you begin the folding process.
How to Serve This Decadent Dessert
When you are ready to serve the best chocolate mousse pie recipe, presentation is key. A generous layer of stabilized whipped cream on top provides a beautiful color contrast and helps balance the intensity of the dark chocolate.
Garnishes
To elevate the look, use a vegetable peeler to create large chocolate curls from a room-temperature chocolate bar. A light dusting of Dutch-processed cocoa powder or a few fresh raspberries can also add a touch of elegance and a pop of acidity to cut through the richness.
Serving Temperature
This pie is best served cold, directly from the refrigerator. If it sits out at room temperature for too long, the mousse will begin to soften. For the best experience, keep the pie chilled until the moment you are ready to plate and serve your guests.
Storage and Make-Ahead
Storing Leftovers
Store any remaining slices in an airtight container in the refrigerator for up to 4 days. To prevent the mousse from absorbing refrigerator odors, you can press a piece of plastic wrap directly onto the exposed surface of the mousse.
Freezing Instructions
This pie freezes surprisingly well! Wrap the entire pie (or individual slices) tightly in plastic wrap followed by a layer of aluminum foil. It will stay fresh for up to 2 months. Thaw in the refrigerator for several hours before serving to maintain the silky chocolate filling texture.
Final Thoughts
Mastering the best chocolate mousse pie recipe is a rewarding milestone for any home baker. It teaches the essential skills of tempering and folding, resulting in a dessert that is far superior to any store-bought alternative. Whether you are celebrating a special occasion or simply want to treat your family to a decadent holiday dessert, this pie delivers a professional-level experience with every spoonful. With its rich flavor and cloud-like consistency, it is sure to become a requested favorite in your recipe rotation.
Frequently Asked Questions
Can I make this pie without eggs?
While the egg yolks provide a specific richness and stability, you can make a simplified version using just chocolate and stabilized whipped cream. However, the texture will be slightly less “custard-like” and may not hold its shape as firmly for long periods at room temperature.
What is the best chocolate to use?
For the most balanced flavor, use a semi-sweet chocolate bar with 60% to 70% cacao. Avoid “candy melts” or standard chocolate chips, as they contain paraffin and other stabilizers that interfere with the melting process and the final mouthfeel of the homemade chocolate mousse.
How do I prevent my crust from crumbling?
The key to a sturdy cookie crust is ensuring every crumb is coated in butter and pressing the mixture firmly into the pan. Use the bottom of a flat measuring cup to pack the crumbs tightly. Chilling the crust for at least 30 minutes before adding the filling is also vital for success.
Can I use milk chocolate instead of dark?
You can, but milk chocolate has a much higher sugar and milk solid content. This will result in a much sweeter pie that may be slightly softer. If using milk chocolate, you may want to reduce the added sugar in the egg yolk base to prevent the dessert from becoming cloying.
Do I have to use a double boiler?
While a double boiler is the safest way to melt chocolate without burning it, you can use a microwave. Use 20-second intervals and stir thoroughly between each one. Stop as soon as most of the chocolate is melted; the residual heat will melt the remaining small pieces as you stir.
Decadent Chocolate Mousse Pie

A luxurious and airy chocolate mousse pie made with a crunchy chocolate cookie crust and topped with homemade whipped cream. This no-bake dessert is perfect for special occasions or a simple weekend treat.
- 1 1/2 cups crushed chocolate sandwich cookies
- 5 tablespoons unsalted butter, melted
- 1 1/4 cups semi-sweet chocolate chips
- 2 cups heavy whipping cream, divided
- 2 tablespoons granulated sugar
- 1 teaspoon pure vanilla extract
- 1/8 teaspoon salt
- 1In a medium bowl, combine cookie crumbs and melted butter. Press the mixture into a 9-inch pie dish and chill in the refrigerator for 20 minutes.
- 2In a microwave-safe bowl, combine chocolate chips and 1/2 cup of the heavy cream. Heat in 30-second intervals, stirring until completely smooth. Let cool to room temperature.
- 3In a large bowl, beat the remaining 1 1/2 cups heavy cream, sugar, vanilla, and salt until stiff peaks form.
- 4Gently fold 1/3 of the whipped cream into the cooled chocolate mixture until combined.
- 5Carefully fold in the remaining whipped cream until no white streaks remain.
- 6Spoon the mousse into the crust and smooth the top. Chill for at least 4 hours or overnight.
Keywords: chocolate mousse pie, no-bake dessert, chocolate pie, oreo crust, whipped cream dessert


