
Chocolate Peanut Butter Truffles

There is perhaps no combination in the confectionery world as iconic as the marriage of salty peanut butter and rich, velvety chocolate. These easy chocolate peanut butter truffles offer the ultimate indulgence for anyone who craves that classic duo but wants a dessert that requires zero time in the oven. Unlike traditional truffles that rely on a complex chocolate ganache, these treats use a fudge-like peanut butter base that is both stable and incredibly creamy, making them a staple for holiday platters, gift-giving, or a simple weekend project.
The beauty of this no-bake dessert lies in its accessibility; you likely already have the handful of ingredients needed sitting in your pantry right now. By mastering a few simple techniques for melting chocolate and chilling the dough, you can produce professional-quality homemade candy that rivals anything found in a high-end chocolate shop.
Why You’ll Love This Recipe
- Minimal Effort, High Reward: You don’t need to be a pastry chef to master these. With no baking involved, the most “technical” part is simply melting chocolate and rolling dough into uniform spheres.
- Perfect Texture Balance: These truffles strike the ideal balance between a dense, melt-in-your-mouth peanut butter center and a crisp, snappy chocolate shell that provides a satisfying structural contrast.
- Incredible Versatility: Whether you want to top them with flaky sea salt, crushed nuts, or a decorative drizzle, this recipe serves as a perfect canvas for your own creative finishing touches.
- Excellent Make-Ahead Option: Because they store so well in the refrigerator or freezer, these easy chocolate peanut butter truffles are a stress-free option for busy hostesses who want to prep their sweets days in advance.
Ingredients You’ll Need
To achieve the best results, selecting the right components is key. Since there are so few ingredients in this easy chocolate peanut butter truffles recipe, the quality of each one will shine through in the final bite.
- Creamy Peanut Butter: Standard commercial creamy peanut butter works best here. Avoid “natural” varieties that separate, as the excess oil can prevent the truffle centers from setting properly.
- Unsalted Butter: Softened butter acts as the binding agent that transforms the peanut butter into a workable dough. It adds a rich, silken mouthfeel that makes the centers feel like true fudge.
- Powdered Sugar: Also known as confectioners’ sugar, this provides sweetness and structure. It absorbs the moisture from the butter and peanut butter, allowing you to roll the mixture into tidy balls.
- Semi-Sweet Chocolate: This provides a classic flavor profile that isn’t overly sugary. You can use high-quality chocolate chips or chopped chocolate bars, depending on your preference for melting ease.
- Coconut Oil or Shortening: A small amount added to the melting chocolate helps create a smoother consistency for dipping and gives the finished shell a beautiful, professional-looking gloss.
- Vanilla Extract: A splash of pure vanilla enhances the nutty notes of the peanut butter and rounds out the sweetness of the sugar for a more complex flavor profile.
Variations and Smart Swaps
The Crunchy Twist: If you prefer a bit of texture inside your truffles, swap the creamy peanut butter for a crunchy variety. This adds tiny bits of roasted peanuts throughout the center, reminiscent of a classic candy bar.
White Chocolate Coating: For a sweeter, creamier aesthetic, dip the peanut butter centers into melted white chocolate. This creates a striking visual contrast and pairs beautifully with a dark chocolate drizzle on top.
Dark Chocolate and Sea Salt: To elevate this no-bake dessert for a more sophisticated palate, use 70% dark chocolate for the coating and immediately sprinkle the tops with a pinch of flaky Maldon sea salt while the chocolate is still wet.
Festive Toppings: Customize your easy chocolate peanut butter truffles for the holidays by rolling the wet chocolate shells in crushed candy canes, festive sprinkles, or finely chopped toasted pecans.
How to Make Easy Chocolate Peanut Butter Truffles
Step 1: Cream the Peanut Butter and Butter
Start by combining your softened unsalted butter and creamy peanut butter in a large mixing bowl. Using a hand mixer or a stand mixer fitted with the paddle attachment, beat the two together until the mixture is completely smooth and pale in color. This step is crucial because it ensures the fats are fully emulsified, which prevents the truffles from feeling greasy or separating later on. If your butter is too cold, you may end up with small lumps, so ensure it has reached true room temperature before beginning.
Step 2: Incorporate the Sweetener and Flavorings
Gradually add the powdered sugar to the bowl, along with the vanilla extract and a pinch of salt if desired. It is best to add the sugar in stages to avoid a “sugar cloud” in your kitchen. Mix on low speed until the sugar is fully incorporated and a thick, pliable dough forms. The consistency should be similar to playdough—firm enough to hold its shape but soft enough to roll easily. If the mixture feels too sticky to handle, you can add an extra tablespoon of powdered sugar at a time until the desired texture is achieved.
Step 3: Shape and Chill the Centers
Line a baking sheet with parchment paper or a silicone mat. Using a small cookie scoop or a tablespoon, portion out the dough and roll it between your palms to create smooth, even spheres. Place the balls on the prepared baking sheet, ensuring they aren’t touching. Once all the dough is rolled, place the sheet in the refrigerator for at least 30 to 60 minutes. Chilling the centers is a non-negotiable step; it firms up the butter, making the truffles much easier to dip into the warm chocolate without melting or losing their round shape.
Step 4: Melt the Chocolate and Dip
Place your chocolate chips and a teaspoon of coconut oil in a microwave-safe bowl. Heat in 30-second increments, stirring thoroughly between each burst, until the chocolate is glossy and completely liquid. Using a fork or a specialized dipping tool, drop one chilled peanut butter ball into the chocolate at a time. Roll it to coat, then lift it out, tapping the fork gently against the side of the bowl to let the excess chocolate drip off. Carefully slide the coated truffle back onto the parchment paper to set.
Pro Tips for Success
- Tip: Sift your powdered sugar before adding it to the peanut butter. This removes any stubborn clumps and ensures the interior of your easy chocolate peanut butter truffles is perfectly smooth and professional.
- Tip: Keep the centers cold while dipping. If you are making a large batch, take only half of the peanut butter balls out of the fridge at a time. If they get too warm, they will soften and potentially fall apart in the warm chocolate.
- Tip: Use a toothpick or a fork to lift the truffles out of the chocolate. If using a fork, you can gently slide the truffle onto the parchment using a second toothpick to avoid leaving large marks in the coating.
- Tip: If the chocolate begins to thicken or seize during the dipping process, pop it back into the microwave for 10-15 seconds and stir in another half-teaspoon of coconut oil to restore its fluid consistency.
How to Serve Easy Chocolate Peanut Butter Truffles
Presentation is half the fun when it comes to homemade candy. For a classic look, place each finished truffle into a mini paper cupcake liner. This not only makes them look like they came from a professional confectionery but also makes them much easier for guests to grab from a dessert tower or platter without getting chocolate on their fingers.
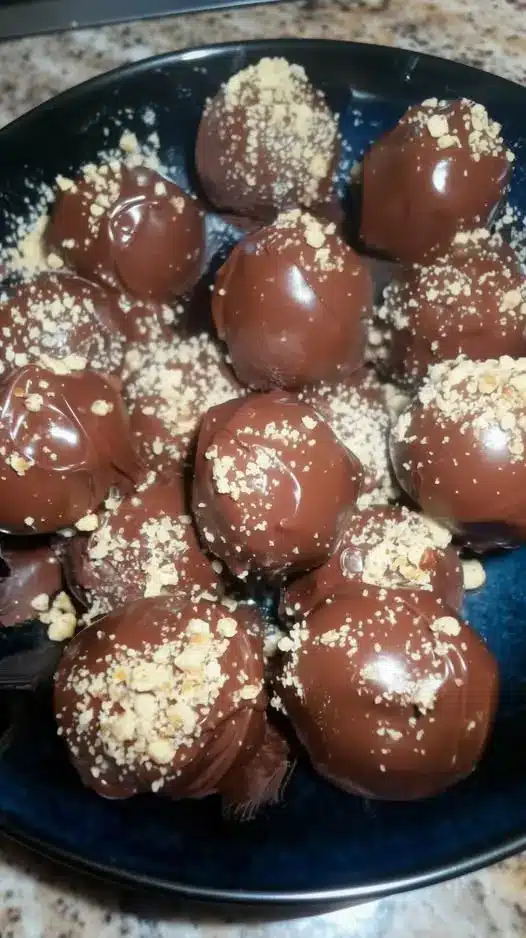
These truffles make a fantastic addition to a holiday cookie box or a dessert charcuterie board. Pair them with fresh strawberries, salty pretzels, and dried apricots for a well-rounded snack plate. If you are serving them at a party, keep them in the refrigerator until about 15 minutes before serving; this ensures the chocolate stays crisp while the centers reach their ideal creamy consistency.
Storage and Make-Ahead
Storing Leftovers
To keep your easy chocolate peanut butter truffles fresh, store them in an airtight container in the refrigerator. Use layers of parchment paper or wax paper to separate the truffles so they don’t stick together. They will remain delicious for up to two weeks when kept chilled.
Freezing
These truffles freeze beautifully. Place the set truffles in a freezer-safe bag or container with as much air removed as possible. They can be frozen for up to three months. To serve, simply move them to the fridge the night before or let them sit at room temperature for about 30 minutes.
Making It Ahead
You can easily prepare the peanut butter centers 1-2 days in advance. Simply roll them into balls and keep them on a covered tray in the fridge. When you are ready to finish the recipe, just melt your chocolate and proceed with the dipping step.
Final Thoughts
Making easy chocolate peanut butter truffles is a rewarding way to satisfy a sweet tooth with minimal kitchen equipment and time. These bite-sized treats prove that you don’t need a long list of ingredients to create something truly memorable. By focusing on the quality of your chocolate and ensuring the centers are properly chilled, you’ll produce a batch of homemade candy that your friends and family will request year after year. Enjoy the process of dipping and decorating, and most importantly, enjoy every rich, nutty bite of this no-bake dessert.
Frequently Asked Questions
Why is my peanut butter mixture too soft to roll?
This usually happens if the butter was too warm or if you used a natural peanut butter that was very oily. If the dough is too soft, simply place the entire bowl in the refrigerator for 20-30 minutes to firm up. If it is still too sticky after chilling, add an additional 1/4 cup of powdered sugar to help absorb the excess moisture.
Can I use milk chocolate instead of semi-sweet?
Absolutely. Milk chocolate will result in a much sweeter truffle that is very kid-friendly. Because milk chocolate has a lower melting point and more dairy, it may be slightly thinner when melted, so you might need to be extra careful when dipping to ensure a thick enough coating.
How do I prevent the chocolate from cracking?
Chocolate often cracks when it is subjected to extreme temperature changes. To avoid this, don’t put your freshly dipped truffles directly into the freezer. Let them set at room temperature or in the refrigerator. Additionally, the small amount of coconut oil or shortening added to the chocolate helps give it some flexibility, which prevents it from becoming too brittle.
What is the best way to melt the chocolate without a microwave?
You can use a double boiler method. Place a heat-proof glass bowl over a pot of gently simmering water, ensuring the bottom of the bowl does not touch the water. Stir the chocolate constantly until melted. This method provides more even heat and reduces the risk of scorching the chocolate compared to the microwave.
Can I make these vegan?
Yes, these easy chocolate peanut butter truffles can be adapted by using a vegan butter substitute and ensuring your chocolate chips are dairy-free. Most high-quality dark chocolates are naturally vegan, but always check the label for milk solids or whey if you have strict dietary requirements.