
Chocolate Peanut Butter Cup Cake

There is perhaps no duo in the confectionery world more iconic than the marriage of deep, dark cocoa and salty-sweet nut butter. This chocolate peanut butter cup cake is the ultimate celebration of that partnership, featuring layers of incredibly moist sponge, a velvety frosting that tastes like the inside of a candy bar, and a luxurious chocolate ganache drip. It is a showstopper of a dessert that manages to be both sophisticated enough for a dinner party and approachable enough for a weekend baking project at home.
What sets this moist chocolate layer cake apart is the balance of textures. You have the soft, tender crumb of the cake contrasted with the dense, creamy weight of the peanut butter buttercream. By using high-quality cocoa and a few specific techniques, we ensure the chocolate flavor is robust enough to stand up to the richness of the peanut butter, creating a decadent chocolate cake recipe that remains the gold standard for celebrations.
Why This Recipe Is a Keeper
- The Perfect Texture: The cake layers are exceptionally tender and moist, thanks to a specific mixing method that ensures the crumb stays soft even after being refrigerated.
- Balanced Sweetness: While this is a rich dessert, the saltiness from the peanut butter cuts through the sugar, preventing the homemade peanut butter dessert from feeling cloying.
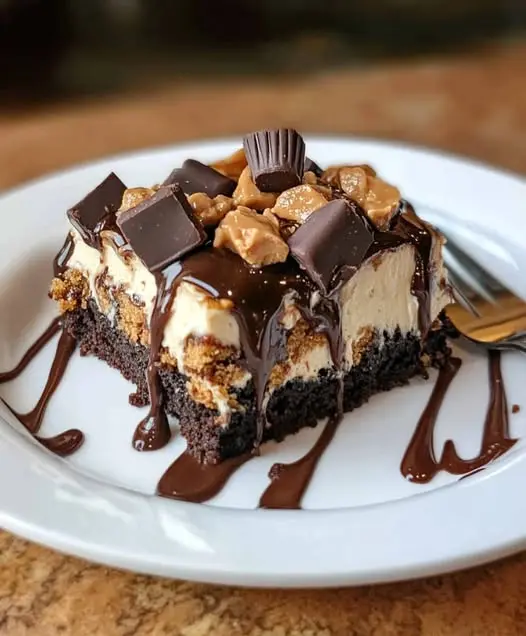
- High Visual Impact: Between the dark ganache drip and the mountain of chopped peanut butter cups on top, this cake looks like it came straight from a high-end bakery.
- Reliable Results: The steps are designed to be foolproof, focusing on temperature control and ingredient stability so your frosting never breaks and your cake never sinks.
Ingredients You’ll Need
To achieve that signature bakery-style finish, each ingredient plays a specific role in the structure and flavor profile of the cake. High-quality fats and acidity are the secrets to the perfect crumb.
- Dutch-Processed Cocoa Powder: This provides a deeper, darker color and a smoother chocolate flavor than natural cocoa. It reacts beautifully with the leavening agents to create a lift.
- Buttermilk: The acidity in buttermilk breaks down gluten strands, resulting in a more tender cake. It also provides a subtle tang that balances the richness of the creamy peanut butter frosting.
- Boiling Water: Adding hot water to the batter “blooms” the cocoa powder, releasing trapped flavor molecules and ensuring the chocolate taste is intense throughout.
- Creamy Peanut Butter: For the frosting, a standard commercial creamy peanut butter works best. Natural varieties that separate can cause the buttercream to become oily or grainy.
- Powdered Sugar: Finely sifted sugar is essential for a frosting that is light, airy, and completely smooth on the palate.
- Heavy Whipping Cream: This is used both in the ganache for a silky pour and in the frosting to add a cloud-like volume.
- Peanut Butter Cups: Chopped candies are used both between the layers for a surprise crunch and on top for the final decorative touch.
Easy Ways to Change It Up
The Nut-Free Swap: If you need to avoid peanuts but love the flavor profile, sunflower seed butter is an excellent 1:1 replacement that maintains the creamy texture and salty kick.
Chocolate Variation: For an even more intense experience, you can swap the milk chocolate peanut butter cups for dark chocolate versions and use a bittersweet chocolate for the ganache drip.
Sheet Cake Style: If a tall layer cake feels too intimidating, this recipe can be baked in a 9×13-inch pan. Simply spread the frosting over the top and pour the ganache in a marbled pattern for an easy potluck win.
How to Make This Chocolate Peanut Butter Cup Cake
Step 1: Sift and Combine the Dry Ingredients
Begin by whisking together your flour, cocoa powder, sugar, and leavening agents in a large bowl. Sifting the cocoa powder is a non-negotiable step here, as cocoa is prone to stubborn lumps that won’t break down during the mixing process. Ensuring a uniform dry mixture is the first step toward a consistent, professional crumb structure in your moist chocolate layer cake.
Step 2: Emulsify the Wet Ingredients
Combine the eggs, buttermilk, oil, and vanilla. The oil in this recipe is crucial; while butter adds flavor, oil keeps the cake moist even when stored in the fridge. Whisk these until they are fully incorporated before adding them to the dry ingredients. You want to see a thick, smooth paste begin to form before you move on to the temperature-sensitive steps.
Step 3: Bloom the Cocoa with Boiling Water
Slowly stream the boiling water into the batter while whisking constantly. The batter will become very thin, which is exactly what you want. This high-temperature liquid dissolves the cocoa completely and activates the leavening agents. This “thin” batter allows air bubbles to rise easily during baking, creating a light, airy texture that isn’t weighed down by its own richness.
Step 4: Bake to Perfection
Divide the batter evenly between prepared cake pans and bake until a toothpick comes out with just a few moist crumbs attached. Avoid overbaking, as chocolate cakes can dry out quickly once the internal temperature passes a certain point. Let the cakes cool in the pans for about ten minutes before transferring them to a wire rack. They must be completely cool to the touch before you even think about frosting them.
Step 5: Whip the Peanut Butter Frosting
Beat the butter and peanut butter together until the mixture is pale and extremely fluffy. Gradually add the powdered sugar and a splash of heavy cream. The goal is a creamy peanut butter frosting that holds its shape but feels light. If it feels too stiff, add a teaspoon of cream at a time; if it feels too soft, a bit more sugar will provide the necessary structure for stacking the layers.
Step 6: Assemble and Drip
Stack your layers with a generous amount of frosting and a handful of chopped peanut butter cups in between. Apply a thin “crumb coat” of frosting to the outside and chill the cake for 20 minutes. This anchors any loose crumbs. Finally, apply the decorative layer of frosting and pour the warm ganache over the edges to create those beautiful, tempting drips. Top with the remaining candies while the ganache is still slightly tacky.
Tips for the Best Results
- Room Temperature Ingredients: Ensure your eggs, buttermilk, and butter are all at room temperature to create a seamless emulsion. Cold ingredients can cause the batter to curdle.
- Don’t Overmix: Once you add the flour, mix only until the white streaks disappear. Overworking the gluten will result in a tough, bread-like cake rather than a tender dessert.
- The Crumb Coat is Key: Don’t skip the initial thin layer of frosting. It acts as a primer, ensuring your final layer of creamy peanut butter frosting is perfectly clean and free of chocolate specks.
- Master the Drip: Ensure your ganache has cooled slightly before pouring. If it’s too hot, it will melt the frosting; if it’s too cold, it won’t run down the sides of the cake.
Troubleshooting Common Problems
Why Did My Cake Sink in the Middle?
A sinking cake is usually the result of underbaking or opening the oven door too early in the process. The structure needs time to set before it can withstand a rush of cool air. Use a kitchen timer and only check for doneness once the minimum baking time has elapsed.
Why Is My Frosting Grainy?
Graininess usually happens if the powdered sugar wasn’t sifted or if the butter wasn’t beaten long enough before the sugar was added. You can often fix this by adding a tiny splash of heavy cream and whipping the frosting on high speed for another two to three minutes to fully dissolve the sugar crystals.
How to Serve This Cake
Presentation is half the fun with a decadent chocolate cake recipe like this one. For the cleanest slices, use a long, thin knife dipped in hot water and wiped dry between every single cut. This prevents the frosting and ganache from smearing across the dark chocolate layers.
This cake is incredibly rich, so smaller slices are often appreciated. It pairs beautifully with a glass of cold milk or a strong cup of dark roast coffee, which helps balance the sweetness of the peanut butter. If you want to go truly over the top, serve each slice with a scoop of vanilla bean ice cream or a dollop of unsweetened whipped cream.
Storage and Make-Ahead
Storing Leftovers
Because of the dairy in the frosting, this cake should be stored in the refrigerator if you aren’t serving it within a few hours. Keep it in an airtight cake carrier or wrap the sliced ends with plastic wrap to prevent the sponge from drying out. It will stay fresh and delicious for up to 4 days.
Freezing the Cake
You can freeze the unfrosted cake layers for up to 3 months. Wrap them tightly in double layers of plastic wrap and then foil. Thaw them in the refrigerator overnight before frosting. You can also freeze individual slices of the finished cake; just flash-freeze them on a tray first so the frosting stays intact before wrapping.
Final Thoughts
This chocolate peanut butter cup cake is more than just a dessert; it is a centerpiece that commands attention. By focusing on quality ingredients like Dutch-processed cocoa and ensuring your frosting is whipped to the perfect consistency, you can create a professional-grade homemade peanut butter dessert in your own kitchen. Whether it’s for a birthday, an anniversary, or just a Tuesday that needs more chocolate, this recipe never fails to impress both in appearance and flavor.
Frequently Asked Questions
Can I use natural peanut butter for the frosting?
It is generally not recommended to use “natural” peanut butter (the kind that requires stirring) for the buttercream. The high oil content and lack of stabilizers can cause the frosting to separate or become unpleasantly oily. For the best creamy peanut butter frosting, stick with a traditional creamy brand that stays emulsified at room temperature.
How do I get the chocolate drip to look perfect?
The secret is temperature. Your cake should be cold from the fridge, and your ganache should be just slightly warmer than room temperature. Use a squeeze bottle or a small spoon to test a “practice drip” on the back of the cake first. If it runs all the way to the bottom, wait two minutes for the ganache to thicken and try again.
Can I make this cake gluten-free?
Yes, this recipe adapts very well to a gluten-free lifestyle. Simply substitute the all-purpose flour with a high-quality 1:1 gluten-free baking flour blend that contains xanthan gum. Because the cake relies heavily on cocoa and oil for its texture, the difference in the final moist chocolate layer cake is almost indistinguishable from the original.
Do I have to use buttermilk?
Buttermilk is essential for the chemistry of this cake, providing the acidity needed to react with the baking soda. If you don’t have any on hand, you can make a quick substitute by adding one tablespoon of lemon juice or white vinegar to a cup of whole milk and letting it sit for five minutes until it curdles slightly.
Can I make the cake layers in advance?
Absolutely. In fact, many bakers prefer to make the layers a day in advance. Once the cakes are completely cool, wrap them in plastic wrap and store them at room temperature. Slightly chilled layers are actually easier to frost and stack because they are firmer and less likely to crumble during assembly.
Chocolate Peanut Butter Cup Cake

A decadent and moist chocolate cake paired with a rich, creamy peanut butter frosting and topped with chopped peanut butter cups. This indulgent dessert is perfect for celebrations or satisfying any sweet tooth craving.
- 2 cups all-purpose flour
- 2 cups granulated sugar
- 3/4 cup unsweetened cocoa powder
- 2 tsp baking soda
- 1 tsp salt
- 1 cup buttermilk, room temperature
- 1/2 cup vegetable oil
- 2 large eggs
- 2 tsp vanilla extract
- 1 cup hot brewed coffee
- 1.5 cups creamy peanut butter
- 1/2 cup unsalted butter, softened
- 3 cups powdered sugar
- 3-4 tbsp whole milk
- 1 cup chopped chocolate peanut butter cups
- 1Preheat oven to 350°F (175°C). Grease and flour two 9-inch round cake pans.
- 2In a large bowl, whisk together flour, sugar, cocoa, baking soda, and salt.
- 3Add buttermilk, oil, eggs, and vanilla. Mix on medium speed until well combined.
- 4Carefully stir in the hot coffee by hand until the batter is smooth.
- 5Divide batter evenly between pans and bake for 30-35 minutes, or until a toothpick comes out clean.
- 6Cool cakes in pans for 10 minutes, then transfer to wire racks to cool completely.
- 7For the frosting: Beat peanut butter and butter together until creamy.
- 8Gradually add powdered sugar and milk, beating until light and fluffy.
- 9Frost the cooled cake layers and top with chopped peanut butter cups.
Keywords: chocolate peanut butter cake, dessert, peanut butter frosting, reese's cake, layer cake


