
Chocolate Candy Bar Fudge

Finding the perfect balance between a professional confection and a quick kitchen project can be a challenge, but this easy chocolate candy bar fudge manages to bridge that gap perfectly. It offers a rich, velvety chocolate base that melts in your mouth, punctuated by the delightful crunch and chew of your favorite chopped candy bars. Whether you are looking to clear out a stash of leftover holiday treats or you simply want a decadent no-bake dessert that doesn’t require a candy thermometer, this recipe is a reliable crowd-pleaser that looks far more impressive than the effort suggests.
What makes this particular treat so approachable is its foundation. By using a simplified melting method, you avoid the common pitfalls of traditional fudge, such as graininess or failing to set. This sweetened condensed milk fudge technique ensures a consistent, glossy texture every time. It is a versatile canvas that welcomes everything from salty peanuts and caramel-filled bars to crispy wafers, making it a fantastic quick homemade candy for gifting, potlucks, or a simple weekend indulgence.
Why This Recipe Is a Keeper
- Effortless Preparation: This is a true no-bake wonder that requires minimal active time, making it ideal for busy schedules or warm days when you don’t want to turn on the oven.
- Incredible Texture: The combination of smooth, creamy fudge and various candy bar textures creates a sophisticated sensory experience in every bite.
- Highly Customizable: You can easily adapt the flavor profile by switching the types of chocolate or the variety of candy bars mixed into the batter.
- Great for Gifting: Because it sets firmly and travels well, this easy chocolate candy bar fudge is a fantastic candidate for holiday tins or dessert platters.
Ingredients You’ll Need
The beauty of this recipe lies in its short, impactful ingredient list. Each component plays a specific role in ensuring the fudge is structurally sound while remaining soft enough to bite through comfortably.
- Semi-Sweet Chocolate Chips: These provide the structural “backbone” of the fudge. Semi-sweet chocolate offers a balanced cocoa depth that isn’t overly sugary, which helps offset the sweetness of the candy bars.
- Sweetened Condensed Milk: This is the secret to a smooth, non-grainy finish. It provides the necessary sugar and moisture to create a fudge that is creamy rather than crumbly.
- Assorted Candy Bars: This is where you can get creative. Chopped Snickers, Milky Way, Twix, or Reese’s Cups all work beautifully to add layers of caramel, nougat, and peanut butter.
- Vanilla Extract: A splash of high-quality vanilla acts as a flavor enhancer, rounding out the chocolate notes and making the fudge taste more like it came from a professional confectionery.
- Pinch of Salt: While optional, a tiny bit of salt cuts through the richness and highlights the different flavors within the candy bar inclusions.
Simple Swaps and Variations
The White Chocolate Twist: If you prefer a lighter, more buttery flavor, swap the semi-sweet chips for white chocolate chips. This version works exceptionally well with fruit-filled candy or peppermint patties for a seasonal flair.
Dark Chocolate Decadence: For those who love a sophisticated, less-sweet treat, use 60% or 70% cacao dark chocolate chips. Pair this with caramel-heavy candy bars and a sprinkle of sea salt on top to balance the intensity.
Nut Lover’s Version: Boost the crunch factor by adding a half-cup of roasted salted peanuts or chopped pecans alongside your leftover candy bar recipe components. The extra salt and protein help temper the sweetness.
Peanut Butter Swirl: After pouring the fudge into the pan, dollop a few spoonfuls of warmed peanut butter over the top and use a knife to swirl it into the chocolate for a marbled effect and extra creaminess.
How to Make Easy Chocolate Candy Bar Fudge
Step 1: Prepare Your Pan and Candy
Before starting the melting process, it is crucial to have your 8×8-inch baking pan lined with parchment paper or aluminum foil, leaving an overhang on the sides for easy lifting. Additionally, chop your assorted candy bars into bite-sized pieces. Having these ready prevents the fudge from beginning to set before you’ve had a chance to mix in your toppings, ensuring a more even distribution of the easy chocolate candy bar fudge inclusions.
Step 2: Gently Melt the Base
In a medium saucepan over low heat, or in a microwave-safe bowl, combine the chocolate chips and the sweetened condensed milk. If using the stovetop, stir constantly to prevent the chocolate from scorching on the bottom. If using a microwave, heat in 30-second intervals, stirring vigorously in between. The goal is a completely smooth, glossy mixture. Heating the chocolate too quickly can cause it to seize or become oily, so patience is key during this stage.
Step 3: Incorporate Flavors and Inclusions
Once the chocolate and milk are fully homogenized, remove the mixture from the heat and immediately stir in the vanilla extract and the pinch of salt. Quickly fold in about two-thirds of your chopped candy bars. Folding them in while the mixture is still warm allows the fudge to “grip” the candy, ensuring that the pieces don’t fall out when you eventually slice the finished product.
Step 4: Spread and Top the Fudge
Transfer the warm fudge mixture into your prepared pan, using an offset spatula to smooth the top into an even layer. While the surface is still tacky, press the remaining third of the chopped candy bars into the top. Pressing them down slightly ensures they become an integrated part of the fudge rather than just sitting loosely on top. This creates a beautiful, textured visual that clearly displays the variety of treats hidden inside.
Step 5: Chill Until Firm
Place the pan in the refrigerator for at least two to three hours, or until the fudge is completely firm to the touch. Rushing this process can lead to messy, misshapen squares. The cooling period allows the fats in the chocolate and the milk to crystallize properly, resulting in that signature fudge “snap” followed by a slow, creamy melt on the tongue.
Pro Tips for the Best Results
Tip: Use Quality Chocolate. Since chocolate is the primary flavor, the better the quality of the chips, the better the final result. Look for chips that list cocoa butter rather than palm oil for the smoothest mouthfeel.
Tip: Don’t Over-Stir the Candy. When folding in the chopped bars, do it quickly and gently. Over-mixing can cause the chocolate coating on the candy bars to melt into the fudge, which might muddy the colors and textures.
Tip: The Warm Knife Trick. To get perfectly clean, professional-looking squares, run a sharp knife under hot water and wipe it dry before each cut. The residual heat will glide through the dense no-bake dessert without sticking.
Tip: Line Your Pan Correctly. Always use parchment paper rather than just greasing the pan. The “sling” method allows you to lift the entire block of fudge out at once, making it much easier to slice on a flat cutting board.
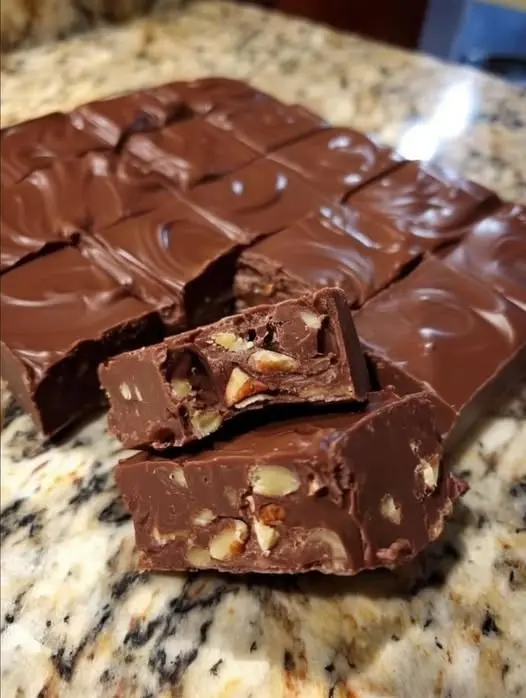
How to Serve Easy Chocolate Candy Bar Fudge
Presentation can elevate this simple treat into something special. For a formal dessert spread, consider cutting the fudge into small, 1-inch squares. Because this easy chocolate candy bar fudge is quite rich, smaller portions are often more appreciated by guests. You can serve them in individual mini cupcake liners, which not only looks elegant but also keeps the fudge from sticking to the serving platter.
For a more casual gathering, you can arrange the fudge on a wooden board alongside fresh berries or salty pretzels. The acidity of raspberries or the crunch of a pretzel provides a great contrast to the dense, sweet chocolate. If you are serving this during the holidays, a light dusting of powdered sugar or a few festive sprinkles can add a seasonal touch without changing the core flavor profile.
Storage and Make-Ahead
Storing Leftovers
This fudge keeps exceptionally well when stored in an airtight container. At room temperature, it will remain fresh for about 3 to 5 days, provided your kitchen isn’t too warm. For a firmer texture and longer shelf life, keep it in the refrigerator for up to two weeks. Always separate layers of fudge with parchment paper to prevent them from fusing together.
Freezing
If you want to prepare this well in advance, you can freeze the fudge. Wrap the entire block or individual squares tightly in plastic wrap, then place them in a freezer-safe bag. It will maintain its quality for up to three months. Thaw the fudge in the refrigerator overnight before serving to maintain the best consistency.
Final Thoughts
This easy chocolate candy bar fudge is a testament to the idea that delicious results don’t always require hours of technical labor. By using smart shortcuts and high-quality inclusions, you can create a confection that rivals boutique candy shops. It is a forgiving, fun, and highly rewarding project that allows you to clear out your pantry while creating something truly indulgent. Once you master the basic technique of this sweetened condensed milk fudge, you’ll find yourself making it for every holiday and special occasion.
Frequently Asked Questions
Can I use milk chocolate chips instead of semi-sweet?
Yes, you can certainly use milk chocolate chips, but keep in mind that the resulting fudge will be significantly sweeter and softer. Because milk chocolate has a higher fat and sugar content, the fudge may take slightly longer to set in the refrigerator. To balance the sweetness, you might consider adding a bit more salt or using candy bars with nuts or pretzels.
Why did my fudge turn out grainy?
Graininess usually occurs if the sugar in the mixture crystallizes or if the chocolate was overheated. When using the sweetened condensed milk fudge method, graininess is rare because the milk is already smooth. However, ensure you are melting the chips over low heat and stop as soon as they are melted. If the mixture boils, it can change the sugar structure and cause that undesirable texture.
Do I have to use a specific brand of candy bars?
Not at all! This recipe is the ultimate way to use up any variety of candy you have on hand. Whether it’s leftover Halloween candy or a specific mix of your favorites bought specifically for this recipe, any chocolate-coated bar will work. Just be mindful of very soft fillings like marshmallow, which might melt into the warm fudge base more quickly than harder candies.
How do I stop the fudge from sticking to the knife?
Fudge is naturally dense and sticky. The best way to ensure clean cuts is to make sure the fudge is very cold. Additionally, cleaning your knife with a warm, damp cloth between every single cut will prevent the buildup of fudge “crumbs” that can tear the edges of the squares. Using a long, straight-edged chef’s knife rather than a serrated one will also yield better results.
Can I make this recipe vegan?
To make a vegan version of easy chocolate candy bar fudge, you would need to use dairy-free chocolate chips and a vegan sweetened condensed milk (usually made from coconut or oat milk). Additionally, you would need to ensure the candy bars you choose are also vegan-certified. The ratios generally remain the same, though the setting time might vary depending on the fat content of the plant-based milk used.
Chocolate Candy Bar Fudge

This decadent Chocolate Candy Bar Fudge is the ultimate treat for any sweet tooth. Creamy, rich chocolate fudge serves as the perfect base for crunchy, chewy bits of your favorite candy bars, making every bite a delightful surprise.
- 3 cups semi-sweet chocolate chips
- 1 can (14 oz) sweetened condensed milk
- 1/4 cup unsalted butter, cubed
- 1 teaspoon vanilla extract
- 1/4 teaspoon salt
- 1 1/2 cups chopped mixed candy bars (such as Snickers, Twix, or Reese's)
- 1Line an 8x8 inch square baking pan with parchment paper, leaving an overhang on the sides for easy removal.
- 2In a medium microwave-safe bowl, combine the chocolate chips, sweetened condensed milk, and butter.
- 3Microwave in 30-second intervals, stirring in between, until the mixture is completely smooth and melted.
- 4Stir in the vanilla extract and salt until well combined.
- 5Fold in 1 cup of the chopped candy bars gently.
- 6Spread the mixture evenly into the prepared pan. Top with the remaining 1/2 cup of candy bar pieces, pressing them lightly into the fudge.
- 7Refrigerate for at least 3 hours, or until completely firm, before slicing into small squares.
Keywords: chocolate fudge, candy bar fudge, easy dessert, no-bake treat, homemade candy


