
Pumpkin Pie

There is something undeniably comforting about the aroma of cinnamon, nutmeg, and ginger wafting through the kitchen during the autumn months. A classic homemade pumpkin pie recipe is the centerpiece of many American holiday tables, offering a silky, custard-like texture and a warm, spiced flavor profile that feels like a hug in dessert form. Unlike store-bought versions that can often be overly sweet or dense, a handcrafted pie allows you to control the quality of the ingredients and the balance of the spices, resulting in a far superior finish that honors tradition.
Making this iconic dessert is remarkably approachable when you understand a few key techniques, such as how to prevent a soggy crust and how to achieve the perfect pumpkin pie set without cracks. By focusing on the harmony between the crisp, buttery pastry and the creamy pumpkin filling, you can elevate this humble vegetable into a sophisticated finale for any festive meal. This guide provides the editorial context and professional tips needed to master the art of the pumpkin custard from scratch.
Why This Recipe Is a Keeper
- Balance of Flavors: This version emphasizes the earthy sweetness of the pumpkin while allowing the warmth of the spices to shine without overpowering the palate.
- Superior Texture: By carefully managing the ratio of eggs to dairy, the result is a creamy pumpkin filling that is firm enough to slice cleanly but soft enough to melt in your mouth.
- Make-Ahead Friendly: Because custard pies need several hours to set and cool completely, this is the ultimate stress-free dessert to prepare a day in advance of your big event.
- Customizable Spicing: You have the freedom to adjust the ginger for more zing or the cloves for more depth, ensuring the classic homemade pumpkin pie recipe suits your family’s specific preferences.
Ingredients You’ll Need
The success of a classic homemade pumpkin pie recipe relies on the quality of its simple components. Each ingredient plays a specific role in the chemistry of the custard and the structural integrity of the slice.
- Pumpkin Puree: Ensure you are using 100% pure pumpkin puree rather than “pumpkin pie filling.” Puree allows you to control the sugar and spice levels yourself, whereas pre-mixed cans often contain thickeners and artificial flavors.
- Large Eggs: These act as the primary structural binder. As the eggs cook, they create a protein network that transforms the liquid mixture into a stable, sliceable custard.
- Brown and White Sugar: While white sugar provides clean sweetness, a touch of brown sugar adds a hint of molasses that complements the earthy pumpkin and warm spices beautifully.
- Evaporated Milk or Heavy Cream: Using evaporated milk is a traditional choice that provides a concentrated dairy flavor and a smooth texture without the high water content of regular milk, which could make the pie runny.
- Pumpkin Pie Spice: A blend of cinnamon, ginger, cloves, and nutmeg provides that nostalgic “fall” flavor. Freshly ground spices will always offer a more potent and aromatic result than older jars.
- Unbaked Pie Crust: A homemade pie crust made with cold butter and lard or shortening provides the flaky, structural base necessary to hold the heavy custard filling.
Variations and Smart Swaps
- Dairy-Free Alternative: For those avoiding dairy, full-fat canned coconut milk is an excellent substitute for evaporated milk. It provides the necessary fat content to keep the filling creamy pumpkin filling while adding a subtle tropical undertone.
- Maple Infusion: Replace the granulated sugar with high-quality maple syrup for a deeper, more complex sweetness that pairs naturally with the autumnal spices.
- Ginger Twist: If you enjoy a bit of heat, try adding a teaspoon of finely grated fresh ginger in addition to the dried ground ginger to brighten the flavor profile.
- Gluten-Free Option: You can easily swap the traditional pastry for a gluten-free pie crust or even a ginger snap cookie crust for a different textural experience.
How to Make a Classic Homemade Pumpkin Pie
Step 1: Prepare and Blind Bake the Crust
To ensure your homemade pie crust stays crisp under the weight of the custard, blind baking is a non-negotiable step. Roll out your chilled dough and fit it into the pie plate, crimping the edges for a decorative finish. Line the dough with parchment paper and fill it with pie weights or dried beans. Bake in a preheated oven until the edges are set and the bottom no longer looks raw. This creates a moisture barrier that prevents the dreaded “soggy bottom” once the liquid filling is added.
Step 2: Whisk the Spiced Pumpkin Base
In a large mixing bowl, combine the pumpkin puree with your sugars and spices. Whisking the spices directly into the pumpkin before adding the liquids helps to distribute the flavors evenly and prevents clumps of cinnamon or ginger. The mixture should look dark, glossy, and highly aromatic. This is the stage where the flavors begin to meld, so don’t rush the stirring process.
Step 3: Incorporate the Eggs and Dairy
Lightly beat your eggs before adding them to the pumpkin mixture. This ensures they incorporate fully without over-mixing the entire batter, which can introduce too much air. Slowly pour in the evaporated milk or heavy cream while whisking gently. The goal is a perfectly smooth, liquid consistency that looks uniform in color. A gentle hand here helps prevent bubbles from forming on the surface of the finished perfect pumpkin pie.
Step 4: The Low and Slow Bake
Pour the filling into your par-baked crust. Place the pie in the center of the oven and bake at a moderate temperature. Low and slow is the secret to a successful custard; high heat can cause the eggs to cook too quickly, leading to a rubbery texture or deep cracks in the center. The pie is done when the edges are slightly puffed and set, but the center still has a distinct “jiggle” like firm gelatin when shaken gently.
Step 5: The Cooling and Setting Phase
This is perhaps the hardest part of the classic homemade pumpkin pie recipe: the wait. The pie must cool on a wire rack at room temperature for at least two to three hours. During this time, the residual heat continues to set the center of the custard. Once cooled, transferring it to the refrigerator for another few hours ensures the texture is dense, creamy, and ready for clean slicing.
Pro Tips for Success
- Avoid Overbaking: If the center of the pie is completely firm when you take it out of the oven, it is overbaked. The “carry-over” heat will finish the cooking process on the counter; a slightly wobbly center is your insurance policy against cracks.
- Room Temperature Ingredients: Ensure your eggs and dairy are at room temperature before mixing. This helps the fats and proteins emulsify more smoothly, resulting in a more consistent creamy pumpkin filling.
- Use a Crust Shield: If the edges of your crust are browning too quickly while the custard is still liquid, loosely cover the edges with aluminum foil or a silicone crust shield to protect them.
- Strain the Filling: For a truly professional, velvet-smooth finish, pour your liquid filling through a fine-mesh sieve before adding it to the crust to remove any stray bits of egg or pumpkin fiber.
How to Serve Your Pumpkin Pie
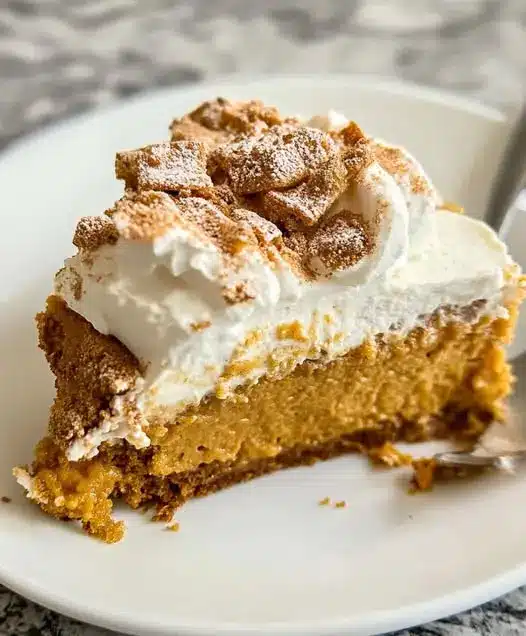
Presentation is key when serving a classic homemade pumpkin pie recipe. While the pie is stunning on its own, a few simple additions can make it feel even more special. The most traditional accompaniment is a generous dollop of homemade whipped cream, lightly sweetened with powdered sugar and a touch of vanilla extract.
Garnishes
To add a professional touch, lightly dust the top of the whipped cream with extra cinnamon or a grating of fresh nutmeg. For a bit of textural contrast, toasted pepitas (pumpkin seeds) or candied pecans can be sprinkled over the top just before serving, adding a delightful crunch to the soft custard.
Creative Pairings
If you want to move away from the traditional, try serving a slice with a drizzle of salted caramel sauce or a small scoop of cinnamon gelato. The cold creaminess of the gelato provides a wonderful temperature contrast to a pie that has been brought to room temperature shortly before serving.
Storage and Make-Ahead
Storing Leftovers
Because pumpkin pie is an egg-based custard, it should not be left out at room temperature for more than two hours. Once the meal is finished, cover the pie loosely with plastic wrap or aluminum foil and store it in the refrigerator. It will stay fresh and delicious for up to 3 to 4 days.
Making It Ahead
This is one of the best desserts for holiday planning. You can bake the pie up to 24 hours in advance. In fact, many people find that the spices develop more depth after a night in the fridge. Simply pull the pie out about 30 minutes before serving to take the chill off, as the flavors are more vibrant when the pie isn’t ice-cold.
Final Thoughts
Mastering a classic homemade pumpkin pie recipe is a rewarding endeavor that brings a sense of accomplishment to any home baker. There is a deep satisfaction in pulling a perfectly set, golden-brown pie from the oven, knowing that every layer was crafted with care. By following these techniques—from the par-baked homemade pie crust to the carefully tempered creamy pumpkin filling—you are guaranteed a dessert that will be the highlight of your autumn celebrations. Enjoy the process, embrace the seasonal aromas, and savor every spiced, velvety bite with those you love.
Frequently Asked Questions
Can I use fresh pumpkin instead of canned puree?
Yes, you can use fresh pumpkin, but it requires extra preparation. You will need to roast a “sugar pie” or “baking” pumpkin until soft, then puree and strain it thoroughly. Fresh pumpkin often has a higher water content than canned, so you may need to simmer the puree on the stove to thicken it slightly to ensure your perfect pumpkin pie sets correctly.
Why did my pumpkin pie crack in the middle?
Cracks are usually the result of overbaking or cooling the pie too quickly. When the eggs in the custard are overcooked, they tighten and pull apart, creating a fissure. To avoid this, remove the pie when the center is still jiggly and let it cool slowly at room temperature away from cold drafts or air conditioning vents.
Do I really need to blind bake the crust?
While you can skip it, blind baking is highly recommended for any custard pie. The liquid filling can soak into raw dough before it has a chance to bake, resulting in a gummy, soft bottom. Blind baking creates a cooked surface that stays crisp and flaky, providing a much better structural contrast to the creamy pumpkin filling.
How can I tell for sure when the pie is done?
The best way to tell is the “jiggle test.” Give the pie a gentle nudge; the edges should be firm and slightly domed, while the center (about 2-3 inches) should wobble slightly like firm Jello. You can also use an instant-read thermometer; the internal temperature should reach 175°F (80°C). Avoid sticking a knife in the center to check, as this can start a crack.
Can I freeze homemade pumpkin pie?
Yes, pumpkin pie freezes surprisingly well because of its high fat and sugar content. Once the pie has cooled completely, wrap it tightly in several layers of plastic wrap and then a layer of foil. Freeze for up to a month. Thaw the pie slowly in the refrigerator for 24 hours before serving to maintain the best custard texture.
Classic Homemade Pumpkin Pie

A smooth and creamy pumpkin pie with a perfect blend of autumnal spices and a flaky crust. Ideal for holiday gatherings and seasonal celebrations.
- 1 (15 oz) can pumpkin puree
- 3 large eggs
- 1/2 cup packed light brown sugar
- 1/3 cup granulated sugar
- 1 tablespoon pumpkin pie spice
- 1/2 teaspoon salt
- 1 1/4 cups evaporated milk
- 1 unbaked 9-inch deep-dish pie crust
- 1Preheat your oven to 425°F (218°C).
- 2In a large bowl, whisk the eggs, brown sugar, and granulated sugar together until smooth and well combined.
- 3Stir in the pumpkin puree, pumpkin pie spice, and salt.
- 4Gradually whisk in the evaporated milk until the mixture is uniform.
- 5Place the unbaked pie crust on a baking sheet and pour the pumpkin mixture into the crust.
- 6Bake for 15 minutes at 425°F, then reduce the oven temperature to 350°F (175°C).
- 7Continue baking for 40 to 50 minutes or until a knife inserted near the center comes out clean.
- 8Cool the pie on a wire rack for at least 2 hours before serving or refrigerating.
Keywords: pumpkin pie, thanksgiving dessert, holiday recipes, homemade pie, fall desserts


