
Apple Pie Bars

There is something inherently comforting about the scent of cinnamon and baked fruit wafting through a warm kitchen, signaling the arrival of crisp autumn days. While a traditional pie is a classic centerpiece, these best apple pie bars recipe offer a more approachable, portable, and arguably more delicious way to enjoy those iconic flavors. Combining a buttery shortbread base with a spiced fruit center and a crunchy oat-filled topping, this dessert bridges the gap between a fruit crisp and a sophisticated pastry. It is the kind of treat that works just as well at a casual backyard gathering as it does on a festive holiday dessert table.
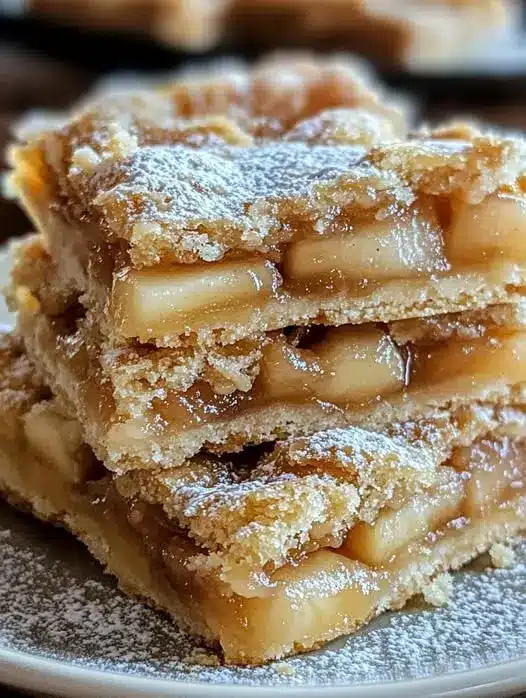
One of the primary advantages of making these Dutch apple pie bars is the incredible texture profile. Unlike a standard pie, where the bottom crust can sometimes become damp under the weight of the fruit, this recipe utilizes a sturdy shortbread foundation that is pre-baked to golden perfection. This ensures every bite has a satisfying snap that contrasts beautifully with the tender, spiced apples nestled above. Finished with a sweet vanilla drizzle, these bars provide all the nostalgic joy of a homemade pie without the stress of rolling out a delicate lattice or worrying about a soggy bottom. It is truly one of the most rewarding easy fall desserts you can add to your seasonal baking repertoire.
Why This Recipe Is a Keeper
- Superior Texture Contrast: By combining a crisp shortbread base with a soft apple filling and a crumbly streusel, you get multiple layers of texture in every single bite.
- Crowd-Friendly Portability: These bars are far easier to slice and serve than a traditional pie, making them the perfect candidate for potlucks, bake sales, or school events.
- Foolproof Crust: There is no need to chill dough for hours or master the art of the perfect crimp; the press-in shortbread crust is incredibly forgiving and consistently delicious.
- Balanced Sweetness: The use of tart apples and warm spices ensures the dessert is flavorful and aromatic without being cloyingly sweet, especially when balanced by the buttery oats in the topping.
Ingredients You’ll Need
The beauty of this recipe lies in how it transforms pantry staples into a multi-layered masterpiece. Each component serves a specific purpose, building layers of flavor that make these homemade apple crumble bars stand out from more basic fruit bars.
- Granny Smith Apples: These are the gold standard for baking because their tartness balances the sugar and their firm flesh holds its shape beautifully even after a long stint in the oven.
- Cold Unsalted Butter: Essential for both the crust and the topping, cold butter creates tiny pockets of steam as it melts, resulting in a flaky, shortbread texture rather than a greasy one.
- Old-Fashioned Rolled Oats: These provide the “Dutch apple” character to the topping, adding a chewy, toasted flavor that distinguishes these bars from a standard pastry-topped pie.
- Cinnamon and Nutmeg: This classic spice duo provides the warmth and depth we associate with autumn, permeating the apples and making the entire house smell incredible while baking.
- Brown and White Sugars: While white sugar provides clean sweetness, the molasses in the brown sugar adds a hint of caramel notes to the streusel topping.
- All-Purpose Flour: This acts as the structural foundation for the crust and helps thicken the apple juices into a jam-like consistency during the baking process.
- Vanilla Extract and Milk: These form the base of the simple glaze, adding a creamy finish that rounds out the bright acidity of the fruit.
Easy Ways to Change It Up
While this recipe is spectacular as written, it is also highly adaptable to suit your personal preferences or what you have available in your pantry.
Add Some Crunch: If you love a bit of nuttiness, consider folding a half-cup of chopped pecans or walnuts into the streusel topping. The toasted nuts pair beautifully with the cinnamon and oats.
Caramel Twist: For a more indulgent dessert, swap the vanilla glaze for a thick drizzle of salted caramel. The saltiness will enhance the flavor of the apples and make these shortbread crust apple bars feel like a gourmet bakery find.
Berry Blend: You can easily turn these into a multi-fruit bar by replacing a portion of the apples with fresh cranberries or blackberries. This adds a pop of color and a secondary layer of tartness that is particularly lovely during the holidays.
How to Make These Apple Pie Bars
Success with this recipe comes down to building the layers correctly. By following these steps, you ensure that each component—crust, filling, and topping—is cooked to its ideal consistency.
Step 1: Prepare the Shortbread Foundation
The first step is creating a solid base. You will blend the cold butter with flour, sugar, and a pinch of salt until the mixture resembles coarse crumbs. Press this firmly into a lined baking pan. Pre-baking the crust for about fifteen minutes is a critical technical step; it “sets” the dough so that when the moist apple filling is added later, the crust remains crisp and structural rather than absorbing the fruit juices and becoming soft.
Step 2: Prepare the Spiced Apple Filling
While the crust undergoes its first bake, peel and slice your apples into thin, uniform pieces. Tossing them with a mixture of flour, sugar, and spices is essential. The flour acts as a thickening agent, turning the liquid released by the apples into a luscious sauce that binds the fruit together. Ensure every slice is well-coated so the spice distribution is even throughout the bars.
Step 3: Mix the Streusel Topping
The streusel is what gives these bars their “Dutch apple” flair. You want to combine the oats, flour, sugars, and butter until you have large, clumpy crumbs. Using cold butter here is just as important as it was for the crust; if the butter is too soft, the topping will melt into a flat layer rather than staying in distinct, crunchy mounds. This layer provides the essential textural contrast to the soft fruit below.
Step 4: Layer and Final Bake
Spread the prepared apples over the hot, pre-baked crust, pressing them down slightly to minimize any large air gaps. Sprinkle the streusel generously over the top, covering the apples completely. Return the pan to the oven and bake until the topping is a deep golden brown and you can see the apple juices bubbling around the edges. This second bake allows the apples to soften fully while the crust finishes browning on the bottom.
Step 5: Cool and Apply the Glaze
Resist the urge to slice the bars immediately. They need to cool completely to allow the filling to set. Once the pan is room temperature, whisk together your powdered sugar, milk, and vanilla to create a smooth, pourable glaze. Drizzle it back and forth over the bars in a decorative pattern. This final touch adds a hit of sweetness and a professional aesthetic to the finished product.
Tips for the Best Results
- Slice Apples Thinly: Aim for slices about 1/8-inch thick. If the apples are too chunky, they won’t soften at the same rate as the crust bakes, leading to a crunchy filling.
- Use Cold Butter: For both the crust and the topping, keep your butter in the fridge until the very second you are ready to use it. This is the secret to a truly flaky texture.
- Line Your Pan: Use parchment paper with an overhang on the sides. This allows you to lift the entire block of bars out of the pan for clean, easy slicing on a cutting board.
- Don’t Over-mix the Streusel: You want distinct lumps and clumps. If you mix too much, you’ll end up with a paste that won’t have that signature crumble texture.
- The Cooling Rule: Letting the bars cool completely is the difference between a clean square and a messy pile of fruit. The starches in the apple filling need time to firm up.
How to Serve These Bars
One of the best things about the best apple pie bars recipe is how versatile it is when it comes to serving. For a casual afternoon snack, they are perfectly delicious at room temperature, enjoyed out of hand like a cookie. The sturdy crust makes them easy to hold, which is why they are so popular for autumn picnics or outdoor gatherings.
If you want to elevate them into a proper “plated” dessert, serve a square slightly warmed with a generous scoop of vanilla bean ice cream. The heat from the bar will start to melt the ice cream, creating a makeshift sauce that mingles with the cinnamon and oats. You could also garnish the plate with a dollop of freshly whipped cream and a light dusting of extra cinnamon for a festive look.
Storage and Make-Ahead
Storing Leftovers
These bars store remarkably well. Keep them in an airtight container at room temperature for up to two days. If you need to keep them longer, move the container to the refrigerator for up to five days. Note that the glaze may soften slightly in the fridge, but the flavor will remain excellent.
Making It Ahead
You can easily prepare these a day in advance. In fact, many people find that the flavors of the spices and apples deepen after sitting overnight. If making them ahead, wait to apply the glaze until the day you plan to serve them to ensure it looks fresh and bright.
Freezing Instructions
These bars freeze beautifully. Once they are completely cooled (but before glazing, if possible), wrap individual squares in plastic wrap and place them in a freezer-safe bag. They will stay fresh for up to three months. Thaw them in the refrigerator overnight or at room temperature for a few hours before serving.
Final Thoughts
Baking the best apple pie bars recipe is a wonderful way to celebrate the season without the stress of high-maintenance pastry work. Between the buttery shortbread, the tart and tender apples, and the toasted oat topping, this dessert hits every note of a classic fall treat. Whether you are baking these for a holiday party or simply to enjoy with a cup of coffee on a Saturday morning, they are sure to become a staple in your kitchen. Their simplicity, combined with their sophisticated flavor profile, makes them a winning recipe for bakers of all skill levels.
Frequently Asked Questions
What are the best apples to use for apple pie bars?
Granny Smith apples are widely considered the best choice because their high acidity balances the sugars and they maintain their structure during the bake. If you prefer a slightly sweeter filling, you can use Honeycrisp or Braeburn apples, which also hold up well under heat. Avoid softer varieties like McIntosh or Red Delicious, as they tend to turn into applesauce when baked for this long.
Why do I need to pre-bake the crust?
Pre-baking the crust, also known as blind baking, creates a barrier. If you were to put the raw apples directly onto the raw dough, the moisture from the fruit would soak into the bottom layer before it had a chance to crisp up. By baking the shortbread for 15 minutes first, you ensure a sturdy, crunchy base that can support the weight and moisture of the filling.
Can I make these apple bars gluten-free?
Yes, you can adapt this recipe by using a high-quality 1-to-1 gluten-free flour blend in both the crust and the topping. Ensure your oats are certified gluten-free as well. Because gluten-free crusts can sometimes be more fragile, you may want to press the dough a bit more firmly into the pan and allow the bars to cool completely in the refrigerator before attempting to slice them.
Can I use apple pie filling from a can instead of fresh apples?
While you can use canned filling in a pinch, the results will be significantly different. Fresh apples provide a better texture and a more nuanced, tart flavor. Canned fillings are often much sweeter and have a softer, more gelatinous consistency. If you do use canned filling, you may want to reduce the sugar in the rest of the recipe and perhaps increase the amount of streusel to compensate for the softer center.
How do I get clean slices?
The secret to perfect squares is two-fold: parchment paper and temperature. Lining your pan with parchment allows you to lift the bars out entirely so you aren’t struggling with the corners of the pan. More importantly, the bars must be completely cold—ideally chilled in the fridge for an hour—before you cut into them. Use a long, sharp chef’s knife and wipe it clean between each cut for the best results.
Classic Apple Pie Bars

These Apple Pie Bars feature a buttery shortbread crust, a sweet spiced apple filling, and a crunchy streusel topping. They offer all the flavors of traditional apple pie in a convenient, portable bar form.
- 2 cups all-purpose flour
- 1/2 cup granulated sugar
- 3/4 cup unsalted butter, softened
- 1/4 tsp salt
- Apple Filling:
- 4 large Granny Smith apples, peeled and thinly sliced
- 1/2 cup granulated sugar
- 2 tbsp all-purpose flour
- 1 tsp ground cinnamon
- 1/4 tsp ground nutmeg
- 1Preheat your oven to 350°F (175°C). Grease a 9x13 inch baking pan or line with parchment paper.
- 2In a medium bowl, whisk together 2 cups flour, 1/2 cup sugar, and salt. Cut in the softened butter using a pastry cutter or fork until the mixture is crumbly.
- 3Reserve 1 cup of the crumb mixture for the topping. Press the remaining mixture firmly into the bottom of the prepared baking pan.
- 4Bake the crust for 12-15 minutes until lightly golden.
- 5While the crust bakes, toss the sliced apples with 1/2 cup sugar, 2 tbsp flour, cinnamon, and nutmeg in a large bowl.
- 6Spread the apple mixture evenly over the pre-baked crust.
- 7Sprinkle the reserved 1 cup of crumb mixture over the top of the apples.
- 8Bake for 30-35 minutes, or until the topping is golden brown and the apples are tender.
- 9Allow the bars to cool completely in the pan before slicing into squares.
Keywords: apple pie bars, apple dessert, fall baking, streusel bars, apple recipe


