
Soft Dinner Rolls

Few things are as comforting or universally loved as the smell of fresh bread wafting through the house. When you pull a tray of best homemade soft dinner rolls out of the oven, you aren’t just serving a side dish; you are providing the centerpiece of the meal. These rolls are defined by their cloud-like interior, a delicate golden crust, and a rich, buttery finish that melts the moment it hits your tongue. Whether it is a casual Sunday supper or a formal holiday spread, a basket of fluffy yeast rolls is always the first thing to disappear from the table.
Mastering yeast dough can feel intimidating, but this recipe is designed to be approachable even for beginners. By focusing on simple techniques like proper yeast blooming and patient proofing, you can achieve professional-quality results in your own kitchen. This guide will walk you through the sensory cues and technical steps needed to ensure your rolls are perfectly airy every single time, making the process of kneading bread dough a rewarding part of your culinary repertoire.
Why You’ll Love This Recipe
- Incredible Texture: These rolls feature a tight, soft crumb that is specifically engineered to be pillowy and tender rather than chewy or crusty.
- Reliable Results: By using a standard enriched dough method, this recipe provides a consistent rise and a predictable bake time, taking the guesswork out of working with yeast.
- Perfectly Balanced Flavor: The combination of whole milk, a touch of sugar, and melted butter creates a flavor profile that is slightly sweet and deeply savory.
- Make-Ahead Friendly: You can easily prepare these make-ahead dinner rolls in advance, allowing you to focus on the main course without rushing at the last minute.
Ingredients You’ll Need
Creating the perfect roll starts with understanding how each ingredient functions within the dough. From the protein in the flour to the fat in the butter, every component plays a specific role in achieving that signature “soft-as-a-cloud” result.
- Active Dry Yeast: This is the leavening agent that makes the rolls rise. It requires “blooming” in warm liquid to ensure it is alive and active before you add the other ingredients.
- Whole Milk: Unlike water, milk adds fat and natural sugars (lactose), which contribute to a softer crumb and a more tender crust. It should be warmed to exactly 110°F to activate the yeast without killing it.
- Granulated Sugar: Sugar serves as “food” for the yeast, helping it produce carbon dioxide for a better rise, while also aiding in the browning of the crust through caramelization.
- Unsalted Butter: Melted butter is incorporated directly into the dough to coat the flour proteins, which limits gluten development just enough to keep the rolls soft rather than chewy.
- Large Egg: An egg adds structure and richness. It helps the dough rise higher and provides a beautiful yellow hue to the interior of the rolls.
- All-Purpose Flour: This provides the necessary protein to create a structure that holds the air bubbles produced by the yeast. It strikes the perfect balance between strength and tenderness.
- Salt: Essential for flavor, salt also regulates the yeast activity, preventing the dough from rising too quickly and becoming unstable.
Easy Ways to Change It Up
- Honey Butter Rolls: Replace the granulated sugar with an equal amount of honey for a deeper, floral sweetness and an even softer interior.
- Herb-Infused Rolls: Mix dried rosemary, thyme, or garlic powder directly into the flour before adding the liquid ingredients for a savory, aromatic twist.
- Cheesy Topped Rolls: Sprinkle a handful of finely grated Parmesan or Gruyère over the rolls during the last five minutes of baking for a salty, crispy crust.
- Whole Wheat Variation: Substitute up to one-third of the all-purpose flour with whole wheat flour. You may need a tablespoon of extra milk to compensate for the higher absorption of the wheat.
How to Make best homemade soft dinner rolls
Step 1: Bloom the Yeast and Activate the Base
Start by warming your milk to approximately 110°F. If the milk is too cold, the yeast will stay dormant; if it is too hot (above 120°F), it will perish. Combine the warm milk, sugar, and active dry yeast in a large bowl. Stir gently and let it sit for about 5 to 10 minutes. You are looking for a thick, foamy layer to form on the surface. This “bloom” is your visual insurance policy, proving that your yeast is healthy and ready to lift your dough.
Step 2: Incorporate the Enrichments and Flour
Once the yeast is foamy, whisk in your melted butter and the egg until well combined. Gradually begin adding the flour and salt. Use a sturdy wooden spoon or a dough hook if using a stand mixer. You want to stir until a “shaggy mass” forms—this is the stage where no dry streaks of flour remain, but the dough looks rough and uneven. This initial mixing begins the hydration process, allowing the flour to fully absorb the liquid.
Step 3: Knead for Structure and Elasticity
Whether by hand or mixer, kneading bread dough is the most critical technical step. Knead for about 8 to 10 minutes. You are looking for the dough to transform from a sticky, lumpy pile into a smooth, elastic ball that clears the sides of the bowl. To test if it’s done, poke the dough; it should spring back quickly. Proper kneading develops the gluten network that will trap the air bubbles, ensuring your rolls don’t collapse in the oven.
Step 4: The First Rise and Fermentation
Place your smooth dough ball into a lightly greased bowl and cover it with a clean kitchen towel or plastic wrap. Set it in a warm, draft-free spot for 1 to 1.5 hours. During this time, the yeast ferments the sugars, creating flavor and gas. You want the dough to at least double in size. If your kitchen is cold, you can place the bowl inside a turned-off oven with the oven light on to provide just enough warmth for a consistent rise.
Step 5: Shape Into Uniform Rounds
Gently punch down the risen dough to release the large air pockets. Turn it onto a lightly floured surface and divide it into equal pieces. For the best results, use a kitchen scale to ensure each roll is the same weight, which guarantees even baking. Roll each piece into a tight ball by cupping your hand over the dough and moving it in a circular motion against the counter. This creates surface tension on the top of the roll, which helps it rise upward rather than spreading outward.
Step 6: The Second Rise for Maximum Fluffiness
Arrange the shaped rolls in a greased 9×13 baking dish. They should be close but not necessarily touching yet. Cover them again and let them rise for another 30 to 45 minutes. This second proof is essential for that fluffy yeast rolls texture. The rolls should look puffy and “marshmallowy.” If you skip this step, the rolls will be dense and heavy. While they rise, preheat your oven to 350°F.
Step 7: Bake to Golden Perfection
Slide the rolls into the center of the oven and bake for 20 to 25 minutes. Keep an eye on the color; you are looking for a deep golden brown on the tops. When you tap a roll, it should sound slightly hollow. As soon as they come out of the oven, brush the tops generously with more melted butter. This not only adds flavor but also softens the top crust as it cools, giving you that iconic “soft roll” experience.
Pro Tips for Success
- Use a Thermometer: Don’t guess the temperature of your milk. A simple digital thermometer ensures you hit that 110°F sweet spot every time, protecting your yeast.
- Don’t Over-Flour: It is tempting to keep adding flour if the dough feels tacky, but too much flour leads to dry, tough rolls. The dough should be slightly tacky to the touch but should not stick to your clean hands.
- The Windowpane Test: To check your gluten development, stretch a small piece of dough. If it can stretch thin enough to see light through it without tearing, it is perfectly kneaded.
- Room Temperature Ingredients: Ensure your egg is at room temperature before adding it. A cold egg can shock the warm milk and yeast mixture, slowing down the initial fermentation.
- Generous Buttering: Brushing the rolls with butter immediately after baking is the secret to a professional finish. It prevents the crust from becoming hard or “crusty.”
Troubleshooting Common Problems
Why Didn’t My Dough Rise?
The most common culprit is dead yeast. If your yeast didn’t foam during the blooming stage, do not proceed with the recipe—the rolls will not rise. Another possibility is that your kitchen is too cold. Yeast thrives in temperatures between 75°F and 85°F. Try moving the dough to a warmer spot, like the top of a refrigerator or near a preheating oven.
Why Are My Rolls Dense and Heavy?
Dense rolls usually happen for two reasons: under-proofing or over-flouring. If you don’t let the rolls rise long enough during the second proof, they won’t have enough air trapped inside. Similarly, if you added too much flour during the kneading stage, the dough becomes too heavy for the yeast to lift effectively.
Why Are the Bottoms Burnt but the Tops Pale?
This often happens if the baking sheet is too thin or placed too low in the oven. Use a light-colored, heavy-duty baking pan and ensure the rack is in the center of the oven. If your oven runs hot on the bottom, you can place the baking dish on top of a second cookie sheet to provide an extra layer of insulation.
How to Serve best homemade soft dinner rolls
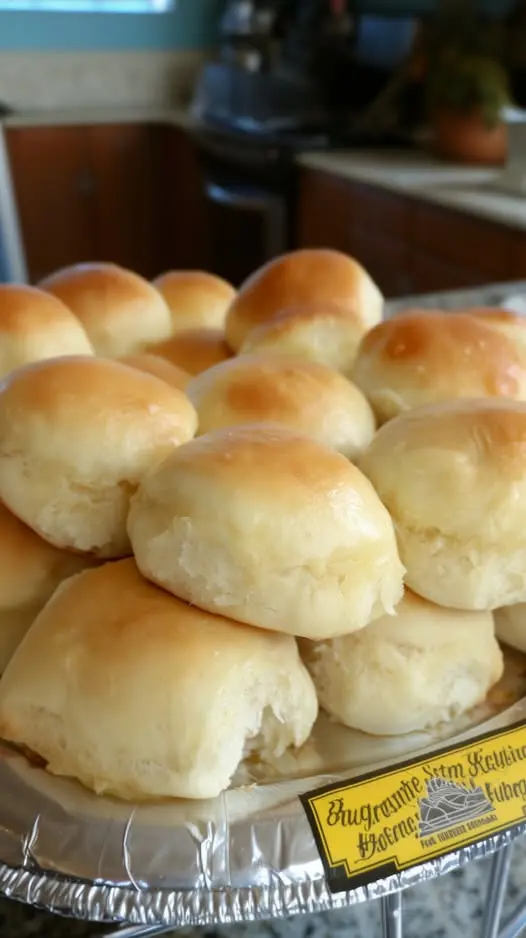
These rolls are at their absolute peak when served warm, just a few minutes after they have come out of the oven. The interior will be at its softest, and the butter wash will still be slightly glossy. Place them in a basket lined with a linen napkin to trap the heat and keep them tender throughout the meal.
While they are spectacular on their own, they are the perfect vessel for flavored spreads. Consider serving them alongside a small bowl of honey butter, cinnamon butter, or even a savory roasted garlic confit. Because of their sturdy yet soft structure, they are also excellent for soaking up gravy, stews, or the juices from a Sunday roast.
If you have leftovers, these rolls make incredible mini-sandwiches. Use them as the base for turkey sliders the day after Thanksgiving, or fill them with ham and Swiss cheese for a quick lunch. Their slight sweetness pairs beautifully with salty deli meats and sharp cheeses.
Storage and Make-Ahead
Storing Leftovers
Once completely cooled, store the rolls in an airtight container or a zip-top bag at room temperature. They will stay fresh for about 2 to 3 days. Avoid refrigerating the rolls, as the cold environment can actually cause the starches to crystallize and make the bread go stale faster.
Freezing
These rolls freeze beautifully. Wrap individual rolls or the entire batch in plastic wrap, then place them in a freezer-safe bag. They can be frozen for up to 3 months. To serve, thaw them at room temperature for a few hours before reheating.
Reheating
To restore that “just-baked” texture, wrap the rolls in aluminum foil and warm them in a 300°F oven for 7 to 10 minutes. The foil traps the moisture, preventing the rolls from drying out while they heat through.
Making It Ahead
If you want to save time on the day of your event, you can prepare the dough through the shaping stage (Step 5). Place the shaped rolls in the baking dish, cover tightly with plastic wrap, and refrigerate overnight. The cold temperature slows down the yeast. The next day, let them sit at room temperature for about 1 to 2 hours until they are puffy and no longer cold before baking as directed.
Final Thoughts
There is a unique sense of pride that comes with serving best homemade soft dinner rolls that you’ve crafted from scratch. While the process requires a bit of time and patience, the reward of a perfectly light, buttery roll is well worth the effort. By following these technical cues and allowing the yeast to do its work, you’ll create a side dish that elevates any meal. Don’t be surprised when these become the most requested item at every family gathering—once you’ve had them fresh from the oven, store-bought rolls simply won’t compare.
Frequently Asked Questions
Can I use Instant Yeast instead of Active Dry?
Yes, you can substitute Instant Yeast (also known as Rapid Rise) in an equal amount. The main difference is that Instant Yeast does not strictly require blooming in warm milk; you can mix it directly into the dry ingredients. However, blooming it still works perfectly fine and ensures the yeast is active. If using Instant Yeast, your rise times may be slightly shorter.
Why did my rolls turn out dry?
Dryness is usually caused by over-baking or adding too much flour. Every oven is different, so start checking your rolls at the 18-minute mark. They are done when the internal temperature reaches 190°F. Additionally, measuring your flour by weight rather than volume is the best way to prevent adding too much, which leads to a dry, crumbly texture.
Can I make these rolls by hand if I don’t have a mixer?
Absolutely! People have been kneading bread dough by hand for centuries. It will take a bit more physical effort—usually about 10 to 12 minutes of vigorous kneading—to achieve the same smoothness as a stand mixer. It’s a great way to get a feel for the dough’s development and is very satisfying once you see the texture transform.
Can I use bread flour instead of all-purpose flour?
You can certainly use bread flour for these fluffy yeast rolls. Bread flour has a higher protein content, which will create a slightly chewier, more substantial roll with a better “spring.” If you prefer a roll that is as soft and tender as possible, stick with all-purpose flour. If you like a bit of “bite” to your bread, bread flour is an excellent choice.
How do I know if my yeast is still good?
If you combine your yeast with warm milk and sugar and it doesn’t become foamy or produce a strong “bready” smell within 10 minutes, the yeast is likely expired or was killed by water that was too hot. Always check the expiration date on your yeast packet and store open yeast in the refrigerator or freezer to maintain its potency.
Soft Dinner Rolls

These soft and buttery dinner rolls are incredibly light and fluffy. This easy yeast bread recipe produces perfect rolls every time, making them a staple for family dinners and holiday gatherings.
- 1 cup warm whole milk (110°F)
- 1/4 cup granulated sugar
- 2 1/4 tsp active dry yeast (1 packet)
- 1/2 cup unsalted butter, melted and slightly cooled
- 1 large egg, room temperature
- 3 1/2 cups all-purpose flour
- 1 tsp salt
- 1In the bowl of a stand mixer, combine the warm milk, sugar, and yeast. Stir gently and let sit for 5-10 minutes until the mixture becomes foamy.
- 2Add the melted butter, egg, salt, and 2 cups of the flour. Use the dough hook attachment to mix on low speed until combined.
- 3Gradually add the remaining flour, 1/2 cup at a time, until the dough begins to pull away from the sides of the bowl.
- 4Continue to knead the dough on medium-low speed for 5-7 minutes until it is smooth, elastic, and slightly tacky to the touch.
- 5Place the dough in a lightly greased bowl, cover with plastic wrap, and let rise in a warm place for about 1 hour or until doubled in size.
- 6Gently punch down the dough and turn it out onto a lightly floured surface. Divide into 12 equal-sized pieces and roll each into a smooth ball.
- 7Place the dough balls into a greased 9x13" baking dish. Cover and let rise for another 30-45 minutes until puffy.
- 8Preheat your oven to 375°F (190°C). Bake the rolls for 15-18 minutes, or until the tops are golden brown.
- 9Remove from the oven and immediately brush the tops with melted butter for a soft, shiny finish.
Keywords: soft dinner rolls, homemade yeast rolls, buttery bread rolls, holiday side dish, easy bread recipe


