
Cherry Cheesecake

There is something undeniably nostalgic and sophisticated about a perfectly executed best homemade cherry cheesecake recipe. It is the kind of dessert that commands attention at any gathering, with its towering, ivory-colored filling and a vibrant, ruby-red fruit topping that glistens under the light. Achieving that elusive balance between a buttery, crisp graham cracker crust and a dense yet velvety filling is what separates a standard bakery find from an unforgettable home-baked masterpiece.
While many home cooks feel intimidated by the prospect of a baked cheesecake, the process is surprisingly approachable when you understand the mechanics of the ingredients. This version focuses on a creamy New York style cheesecake base that provides enough structural integrity to hold a generous mountain of cherries without losing its silkiness. By following a few key technical steps, you can produce a showstopper that looks as if it came from a high-end pastry shop.
Why This Recipe Is a Keeper
- Perfect Texture Balance: The combination of heavy cream and full-fat cream cheese creates a fruit-topped cheesecake that is incredibly rich without feeling overly heavy or cloying on the palate.
- Reliable Structural Integrity: Unlike no-bake versions, this baked method ensures a clean slice every time, making it ideal for dinner parties where presentation is paramount.
- Customizable Sweetness: By making your own cherry topping or selecting a high-quality preserve, you can control the tartness to perfectly complement the tangy cheesecake base.
- Make-Ahead Convenience: This recipe actually improves with time, as the flavors meld and the texture sets during its mandatory overnight chill in the refrigerator.
Ingredients You’ll Need
The success of the best homemade cherry cheesecake recipe relies heavily on the quality and temperature of your components. Using premium dairy and ensuring every item is at the correct stage before mixing will prevent the most common cheesecake pitfalls.
- Cream Cheese: You must use full-fat, brick-style cream cheese. The tub varieties contain more air and moisture, which can cause the cake to sink or fail to set properly.
- Graham Cracker Crumbs: These form the foundation of the graham cracker crust. Finely ground crumbs mixed with melted butter create a sturdy, flavorful base that stands up to the heavy filling.
- Granulated Sugar: Sugar does more than sweeten; it helps break down the cream cheese during the creaming process, ensuring a smooth, lump-free batter.
- Eggs: Acting as the primary binding agent, eggs provide the structure. They should be added one at a time to avoid over-incorporating air.
- Sour Cream or Heavy Cream: Adding a bit of sour cream provides that classic New York tang, while heavy cream contributes to the luxurious, melt-in-your-mouth mouthfeel.
- Vanilla Extract: A high-quality pure vanilla extract bridges the gap between the tang of the cheese and the sweetness of the fruit.
- Tart Cherries: Whether you use fresh, frozen, or canned, the cherries should have a hint of acidity to cut through the richness of the dairy.
- Cornstarch: A small amount of cornstarch in the filling or topping helps stabilize the proteins and prevents the fruit juice from running all over the plate.
Easy Ways to Change It Up
Chocolate Cherry Variation: For a more decadent twist, swap the traditional graham crackers for crushed chocolate sandwich cookies in the crust and drizzle the finished cake with a dark chocolate ganache before adding the cherries.
Almond Infusion: Cherry and almond are classic flavor partners. Adding a half-teaspoon of pure almond extract to the cheesecake batter or the cherry topping adds a professional, nutty depth that elevates the entire dessert.
Mixed Berry Topping: If cherries aren’t in season, you can easily adapt this into a general fruit-topped cheesecake by using a mixture of raspberries, blueberries, and blackberries simmered with a touch of lemon zest.
How to Make the Best Homemade Cherry Cheesecake
Step 1: Prepare and Par-Bake the Crust
The secret to a graham cracker crust that doesn’t get soggy is a quick trip to the oven before the filling is added. Combine your crumbs with melted butter and a pinch of sugar, then press them firmly into the bottom and slightly up the sides of a springform pan. Bake until the kitchen smells like toasted honey and the crust feels set to the touch. This creates a moisture barrier that keeps the base crisp even after the cheesecake is refrigerated for several days.
Step 2: Cream the Cheese and Sugar Slowly
To achieve a professional creamy New York style cheesecake, you must beat the cream cheese and sugar on medium-low speed. High speed incorporates too much air, which leads to bubbles and cracks. Spend several minutes on this step, scraping down the sides and bottom of the bowl frequently. You are looking for a glossy, completely smooth consistency with no visible lumps of cheese before you move on to adding the liquid ingredients.
Step 3: Gently Incorporate the Eggs
Once the base is smooth, add the eggs one by one. Mix only until the yellow streak disappears. Over-mixing at this stage is the leading cause of “souffléing,” where the cheesecake rises too much in the oven and then collapses, creating deep fissures on the surface. Incorporating baking tips for cheesecake like this ensures that the final product remains dense and flat, providing the perfect canvas for your cherry topping.
Step 4: The Water Bath Method
Baking the cheesecake in a water bath, or bain-marie, is non-negotiable for the best results. Wrap the outside of your springform pan in several layers of heavy-duty foil to prevent leaks, then place it in a large roasting pan filled with an inch of hot water. The steam provides a moist environment and ensures the edges don’t overcook before the center is set. This gentle heat is the ultimate insurance policy against a rubbery texture.
Step 5: The Gradual Cool Down
Temperature shock is the enemy of a perfect cheesecake. Once the timer goes off and the center still has a slight, gelatinous jiggle, turn off the oven and prop the door open slightly with a wooden spoon. Let the cake sit in the cooling oven for an hour. This slow transition allows the structure to firm up gradually, preventing the tension that causes the surface to pull apart and crack.
Pro Tips for the Best Results
- Tip: Always use room temperature ingredients. Cold cream cheese will never blend smoothly, resulting in a lumpy batter that ruins the velvet texture.
- Tip: Avoid over-beating the batter once the eggs are added. Too much air causes the cake to puff up and then crack as it cools.
- Tip: Grease the sides of the springform pan even above the crust line. As the cheesecake cools, it shrinks slightly; if it’s stuck to the sides, it will pull from the middle and crack.
- Tip: For the cleanest slices, use a thin-bladed knife dipped in hot water and wiped dry between every single cut.
- Tip: Make the cherry topping at least a few hours in advance so it is completely chilled before it hits the cheesecake surface.
Troubleshooting Common Problems
Why Did My Cheesecake Crack?
Cracks usually happen for two reasons: over-mixing the eggs or cooling the cake too quickly. If you see a crack, don’t panic. Since this is a fruit-topped cheesecake, the cherry layer serves as a delicious “spackle” that hides any surface imperfections perfectly. No one will ever know it isn’t flawless underneath.
Why Is the Center Still Wobbly?
A cheesecake is actually a custard, which means it continues to cook after it leaves the oven. You should remove it when the outer edges are set but the center 2-3 inches still jiggle like firm Jell-O. If the center is liquid, it needs more time; if it is completely still, it may be overbaked and could result in a drier texture.
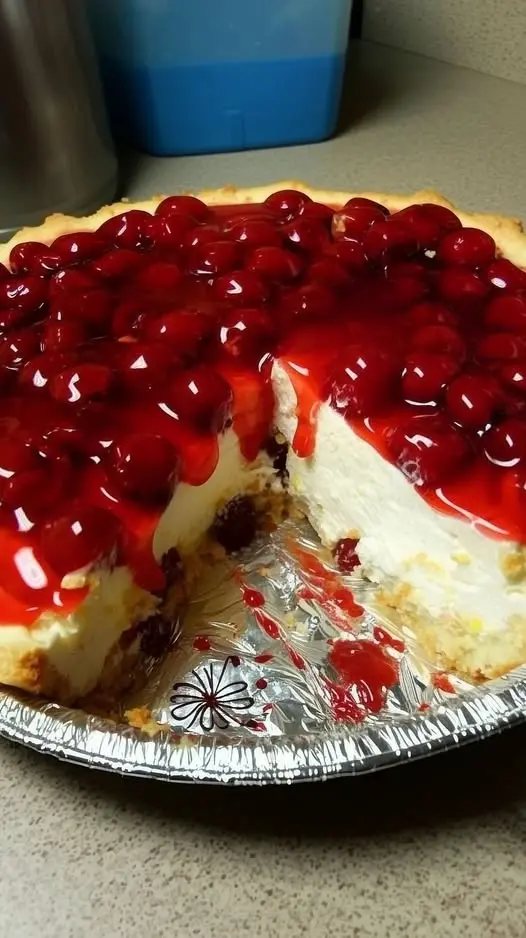
How to Serve Homemade Cherry Cheesecake
Presentation is half the joy of this best homemade cherry cheesecake recipe. When you are ready to serve, release the springform ring carefully. If the cake feels stuck, run a thin plastic spatula around the edge. You can serve the cake directly from the pan base or, if you’re feeling brave, slide it onto a decorative cake stand.
Garnishes
While the cherries are the star, a few sprigs of fresh mint can add a beautiful color contrast. For an extra touch of indulgence, serve each slice with a dollop of stiffly whipped cream infused with a hint of vanilla bean. A light dusting of powdered sugar over the crust edges can also add a professional finish.
Creative Presentation
Instead of spreading the cherry topping over the entire cake, you can serve the cheesecake plain and provide the cherry sauce in a glass carafe on the side. This allows guests to control their own fruit-to-cheese ratio and keeps the graham cracker crust exceptionally crisp for those taking leftovers home.
Storage and Make-Ahead
Storing Leftovers
Cheesecake must be kept refrigerated. Cover it loosely with plastic wrap or store it in a dedicated cake carrier. It will stay fresh and delicious for up to 5 days, though the crust may soften slightly after the third day as it absorbs moisture from the filling.
Freezing Instructions
This is an excellent dessert for freezing. It is best to freeze the cheesecake without the cherry topping. Wrap the fully chilled and set cake in plastic wrap, followed by a layer of aluminum foil. It can be frozen for up to 3 months. Thaw it overnight in the refrigerator before adding the fresh cherry topping and serving.
Making It Ahead
Because the texture of a creamy New York style cheesecake requires at least 8 to 12 hours of refrigeration to fully set, this is the ultimate make-ahead dessert. Prepare the cake 24 hours before your event for the absolute best flavor and consistency.
Final Thoughts
Mastering the best homemade cherry cheesecake recipe is a rite of passage for any serious home baker. It requires patience and attention to detail, but the reward is a dessert that far surpasses anything you can buy at a grocery store. The interplay of the tangy, dense filling against the sweet, tart cherries and the salty-sweet crunch of the crust is a timeless combination. Whether you are celebrating a milestone or simply want to elevate a Sunday dinner, this cheesecake is guaranteed to leave a lasting impression on everyone who tries a slice.
Frequently Asked Questions
Do I really need a water bath?
While you can technically bake a cheesecake without one, a water bath is the best way to ensure a crack-free surface and a creamy, non-rubbery texture. It regulates the heat so the eggs in the batter cook gently. If you absolutely cannot use a water bath, place a pan of water on the rack directly below the cheesecake to create steam.
Can I use canned cherry pie filling?
Yes, canned filling is a convenient shortcut. However, for the best homemade cherry cheesecake recipe, I recommend “doctoring” the canned filling with a squeeze of fresh lemon juice and a drop of almond extract to give it a brighter, more homemade flavor profile. High-quality preserves also work wonderfully as a quick topping.
Why did my crust get soggy?
A soggy crust usually happens if the springform pan wasn’t wrapped tightly enough in foil, allowing water from the bath to leak in. Use heavy-duty foil and use at least three large sheets to create a solid waterproof barrier. Additionally, par-baking the crust before adding the filling helps it stay crisp.
How do I know when the cheesecake is officially done?
The “jiggle test” is the most reliable method. Gently shake the pan; the edges should be slightly puffed and stable, while the center should move like a bowl of set custard. The internal temperature should be around 150°F (65°C) if you want to be precise with a digital thermometer, though this will leave a small hole in the center of your cake.
What is the best way to slice cheesecake cleanly?
To get those perfect, photo-worthy slices, use a sharp chef’s knife. Dip the knife into a tall glass of very hot water, wipe it clean with a towel, and make one clean downward stroke. Do not saw back and forth. Clean and re-heat the knife between every single cut to prevent the filling from sticking and tearing.
Classic Cherry Cheesecake

A luscious and creamy New York-style cheesecake featuring a buttery graham cracker crust and a vibrant cherry topping.
- Crust
- 1 1/2 cups graham cracker crumbs
- 1/3 cup melted unsalted butter
- 1/4 cup granulated sugar
- Filling
- 32 oz cream cheese, room temperature
- 1 cup granulated sugar
- 1 cup sour cream
- 1 tsp vanilla extract
- 4 large eggs
- Topping
- 21 oz cherry pie filling
- 1Preheat oven to 325°F (163°C) and grease a springform pan.
- 2Make the crust: Combine crumbs, sugar, and butter. Press into the pan and bake for 10 minutes.
- 3Make the filling: Beat cream cheese and sugar until smooth. Mix in sour cream and vanilla.
- 4Add eggs one at a time, mixing on low speed just until combined.
- 5Pour filling over crust and bake for 60-70 minutes until edges are set.
- 6Cool in the oven with the door cracked for 1 hour, then chill in the fridge for at least 6 hours.
- 7Spread cherry topping over the chilled cheesecake before serving.
Keywords: cherry cheesecake, baked cheesecake, dessert recipes, cherry dessert


