
Cherry Cheesecake

There is something undeniably timeless about a tall, velvety slice of cheesecake topped with a vibrant glisten of fruit. This easy homemade cherry cheesecake recipe delivers that iconic steakhouse-quality dessert right in your own kitchen, combining a buttery, toasted crust with a filling that is dense, creamy, and just the right amount of tangy. Unlike many complicated desserts that require professional-grade pastry skills, this version focuses on a foolproof method that ensures a perfectly smooth filling every single time you bake it.
The beauty of this recipe lies in the contrast of textures and temperatures. You get the crunch of the graham cracker crust, the silkiness of the baked custard, and the burst of sweetness from the cherry pie topping. Whether you are hosting a formal dinner party or looking for a comforting weekend project, this recipe is designed to be approachable for bakers of all levels. By following a few key technical steps, you can achieve a professional finish without the stress usually associated with high-end baking.
Why This Recipe Is a Keeper
- Iconic Flavor Profile: The combination of high-quality cream cheese and a hint of vanilla creates a creamy New York style cheesecake flavor that pairs perfectly with the tartness of the cherries.
- Reliable Texture: Using a gentle baking method ensures the center remains luscious and soft rather than rubbery or overly dry, giving you that melt-in-your-mouth experience.
- Make-Ahead Convenience: Because cheesecake actually improves after a long chill in the refrigerator, it is the ideal dessert for entertaining, allowing you to finish the work a full day in advance.
- Customizable Foundation: While the cherry topping is a classic, the base recipe is incredibly versatile and can be adapted with various fruits, sauces, or chocolates depending on the season.
Ingredients You’ll Need
To achieve the best results, every ingredient in this easy homemade cherry cheesecake recipe serves a specific purpose. From the fat content in the dairy to the structure provided by the eggs, understanding these components will help you bake with confidence.
- Cream Cheese: Use full-fat, brick-style cream cheese. This provides the necessary structure and rich mouthfeel that defines a classic baked cheesecake.
- Graham Cracker Crumbs: These form the base of our graham cracker crust. You can buy them pre-crushed or pulse whole crackers in a food processor until they resemble fine sand.
- Granulated Sugar: Sugar does more than sweeten; it helps soften the proteins in the cream cheese, contributing to a smoother, less grainy texture.
- Large Eggs: Eggs act as the binder. They provide the structure that allows the cheesecake to set while remaining custardy and rich.
- Sour Cream: Adding a bit of sour cream thins the heavy cream cheese just enough to create a perfectly smooth filling while adding a subtle, pleasant tang.
- Vanilla Extract: A high-quality pure vanilla extract enhances the dairy notes and provides an aromatic depth to the entire dessert.
- Unsalted Butter: Melted butter binds the crumbs together and ensures the crust is rich and stays intact when sliced.
- Cherry Topping: A classic cherry pie topping provides the essential fruit element that cuts through the richness of the cheese.
Variations and Smart Swaps
Different Crust Bases: If you want to move away from the traditional graham cracker crust, try using crushed vanilla wafers or even chocolate sandwich cookies. The chocolate base creates a stunning visual contrast with the white filling and red cherries.
Citrus Infusion: To brighten the flavor, add a tablespoon of fresh lemon zest and a teaspoon of lemon juice to the batter. This enhances the “tangy” profile and pairs beautifully with the cherry fruit topping.
Berry Swirls: Instead of a thick layer of topping on top, you can swirl a few tablespoons of raspberry or strawberry puree into the batter before baking for a marbled effect that looks as good as it tastes.
Lightened Version: While full-fat is recommended for the best texture, you can swap the sour cream for Greek yogurt. This maintains the acidity and moisture while adding a bit more protein and a slightly different tang.
How to Make This Easy Homemade Cherry Cheesecake Recipe
Step 1: Prepare the Buttery Graham Cracker Crust
Start by combining your fine crumbs with melted butter and a touch of sugar. Press this mixture firmly into the bottom and slightly up the sides of a springform pan. A firm press is essential; use the bottom of a flat measuring cup to ensure the crust is even and packed tight. Pre-baking the crust for about 10 minutes helps it set and stay crisp once the wet filling is added, preventing the dreaded “soggy bottom.”
Step 2: Beat the Cream Cheese to Smooth Perfection
In a large bowl, beat the room-temperature cream cheese until it is completely smooth and free of lumps. This is the most important stage for texture. Once the sugar is added, continue to cream the mixture until it is light and fluffy. Taking your time here ensures that your easy homemade cherry cheesecake recipe results in a professional, creamy New York style cheesecake consistency without any grainy bits.
Step 3: Incorporate the Eggs and Aromatics
Add the eggs one at a time, mixing on low speed just until the yellow disappears. Over-mixing at this stage incorporates too much air into the batter, which can cause the cheesecake to puff up and then crack as it cools. Stir in the sour cream and vanilla extract by hand or on the lowest mixer setting to keep the batter dense and velvety. The goal is a heavy, pourable custard that looks glossy and uniform.
Step 4: Bake until Gently Set
Pour the batter over your prepared crust and smooth the top. Bake in the center of the oven until the edges are slightly puffed and set, but the center still has a slight “jiggle” like gelatin when the pan is gently shaken. This “wobble” is the secret to a moist cheesecake; the residual heat will finish the cooking process as it cools. Using a water bath—placing the springform pan inside a larger pan filled with hot water—is highly recommended to provide the gentle, moist heat needed for a crack-free finish.
Step 5: Cool and Chill for the Best Texture
Do not rush the cooling process. Turn off the oven and crack the door, letting the cheesecake sit inside for an hour. This gradual temperature change prevents the cake from shrinking too quickly and cracking. Afterward, let it reach room temperature on the counter before moving it to the refrigerator. A minimum of six hours, or preferably overnight, is required for the fats to solidify and the flavors to fully develop.
Step 6: Add the Vibrant Cherry Finish
Once the cheesecake is thoroughly chilled and set, release it from the springform pan. Spoon the cherry pie topping over the top, allowing some of the syrup to drizzle naturally down the sides if desired. The cold cheesecake provides a firm base for the fruit, ensuring every slice is perfectly layered. Slice with a warm, clean knife for the cleanest presentation.
Pro Tips for the Best Results
- Room Temperature Ingredients: Ensure your cream cheese, eggs, and sour cream are at room temperature. Cold ingredients will not emulsify properly, leading to a lumpy batter.
- Avoid Over-Mixing: Once the eggs go in, keep the mixer speed low. You want to combine the ingredients, not whip air into them. Air bubbles are the primary cause of unsightly cracks.
- The Water Bath Trick: Wrap the outside of your springform pan in several layers of heavy-duty aluminum foil to prevent leaks, then bake it in a tray of hot water. This regulates the temperature and keeps the cake moist.
- Knife Technique: For those perfect, clean slices, dip a sharp knife into hot water and wipe it dry between every single cut. This prevents the cheese from sticking and tearing the slice.
- Check for Doneness Early: Start checking the “jiggle” about 5-10 minutes before the timer goes off. Every oven is different, and over-baking is the quickest way to a dry texture.
How to Serve This Cheesecake
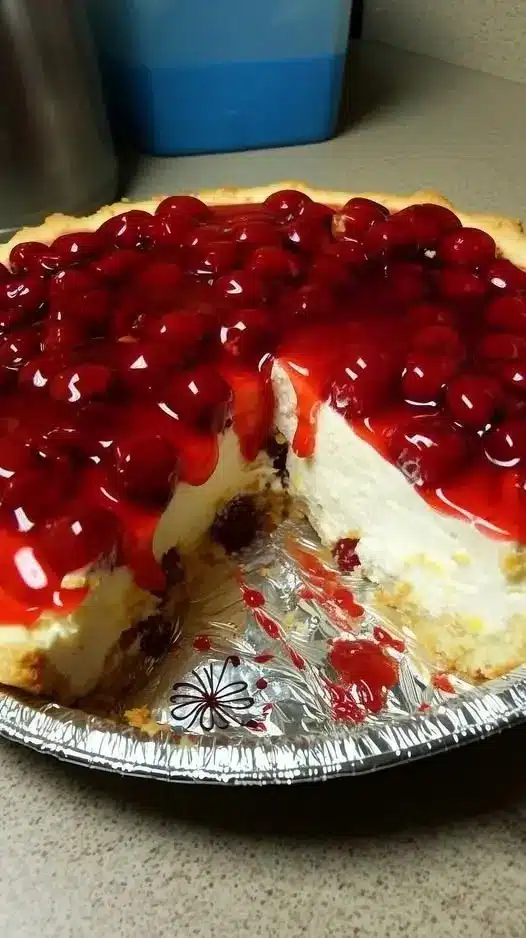
When serving this easy homemade cherry cheesecake recipe, presentation can elevate the experience. While the cherry pie topping is the star, a dollop of freshly whipped cream on the side adds a light, airy contrast to the dense cake. You might also consider a light dusting of powdered sugar around the plate for a touch of elegance.
This dessert is best served cold, straight from the refrigerator. If you are serving it for a party, keep it chilled until about 15 minutes before serving to ensure it maintains its structure. For a more decadent plate, you can pair it with a small glass of dessert wine or a strong cup of dark roast coffee, which balances the sweetness of the fruit and the richness of the cream.
Storage and Make-Ahead Guidance
Storing Leftovers
If you happen to have leftovers, store them in an airtight container in the refrigerator. Cheesecake is highly porous and can absorb odors from the fridge, so a tight seal is necessary. It will stay fresh and delicious for up to 5 days. Keep the fruit topping on, but be aware that the syrup may bleed slightly into the cheese over time.
Freezing Instructions
Cheesecake freezes remarkably well. If you want to freeze the whole cake, do so before adding the cherry topping. Wrap the chilled, firm cake in plastic wrap and then a layer of foil. It can be frozen for up to 3 months. Thaw it overnight in the refrigerator before adding the topping and serving. You can also freeze individual slices for a quick treat.
Making It Ahead
This is the ultimate make-ahead dessert. In fact, it is recommended to make it at least 24 hours in advance. This allows the graham cracker crust to soften just slightly and the filling to reach its maximum creaminess. You can add the fruit topping just a few hours before serving or right at the table.
Final Thoughts
Mastering an easy homemade cherry cheesecake recipe is a rewarding milestone for any home baker. It’s a dish that commands attention on the table but relies on simple, high-quality ingredients and patient technique rather than complex gadgetry. By focusing on the perfectly smooth filling and giving the cake the time it needs to cool and set, you’ll produce a dessert that rivals any professional bakery. This cheesecake isn’t just a treat; it’s a classic experience that brings a sense of nostalgia and celebration to every bite.
Frequently Asked Questions
Why did my cheesecake crack on top?
Cracks are usually caused by two things: over-mixing the batter (incorporating too much air) or a sudden change in temperature. To prevent this, keep your mixer on low speed once you add the eggs and use the “oven-door-ajar” cooling method described in the steps. Even if it does crack, remember that the cherry pie topping is excellent at hiding any imperfections!
Can I use frozen cherries instead of canned topping?
Yes, but you will need to cook them down with a bit of sugar and a cornstarch slurry first. Frozen cherries release a lot of liquid, so you cannot put them directly onto the cake. Simmer them on the stove until the juice thickens into a glossy syrup, then cool completely before topping your easy homemade cherry cheesecake recipe.
How do I know exactly when the cheesecake is finished baking?
Look for the “jiggle test.” The outer two inches of the cheesecake should look firm and slightly matte, while the very center (about the size of a silver dollar) should still wobble slightly when you nudge the pan. It should look like set gelatin, not liquid. If the center is sloshing, it needs more time; if it is firm and puffed across the whole top, it may be slightly overdone.
Do I really need a springform pan?
For a traditional tall cheesecake, a springform pan is highly recommended because it allows you to remove the sides without flipping the cake over, which would ruin the perfectly smooth filling. If you don’t have one, you can use a deep pie dish, but you will have to serve the slices directly from the dish rather than displaying the whole cake on a pedestal.
Can I make the crust without a food processor?
Absolutely. You can place your graham crackers in a large zip-top bag and crush them with a rolling pin or the bottom of a heavy skillet. Just aim for the finest crumbs possible to ensure a sturdy, even graham cracker crust that doesn’t crumble apart when you try to slice it.
Classic Cherry Cheesecake

A rich and velvety smooth New York-style cheesecake, baked to perfection on a buttery graham cracker crust and finished with a vibrant, sweet cherry topping.
- 1 1/2 cups graham cracker crumbs
- 1/4 cup granulated sugar
- 1/2 cup unsalted butter, melted
- 32 oz cream cheese, softened
- 1 cup granulated sugar
- 1 cup sour cream
- 1 tsp vanilla extract
- 4 large eggs
- 21 oz cherry pie filling
- 1Preheat your oven to 325°F (163°C). In a medium bowl, combine graham cracker crumbs, 1/4 cup sugar, and melted butter. Press the mixture firmly into the bottom of a 9-inch springform pan.
- 2Bake the crust for 10 minutes. Remove from the oven and let cool completely while you prepare the filling.
- 3In a large mixing bowl, beat the softened cream cheese and 1 cup sugar until smooth and creamy.
- 4Add the sour cream and vanilla extract, mixing until well combined.
- 5Add the eggs one at a time, beating on low speed after each addition just until blended. Do not overmix.
- 6Pour the batter over the cooled crust. Bake for 55 to 65 minutes, or until the center is almost set but still slightly jiggly.
- 7Turn off the oven and crack the door open. Let the cheesecake cool in the oven for 1 hour.
- 8Remove from the oven and run a knife around the edges. Refrigerate for at least 4 hours or overnight.
- 9Before serving, spread the cherry pie filling evenly over the top of the chilled cheesecake.
Keywords: cherry cheesecake, dessert recipe, homemade cheesecake, baked cheesecake, cherry topping


