
The Cheesiest Ground Beef Enchiladas

There is something uniquely comforting about a tray of bubbly, sauce-drenched tortillas emerging from the oven. This cheesy ground beef enchiladas recipe is the ultimate crowd-pleaser, combining seasoned beef, melty cheese, and a vibrant red sauce into a dish that feels like a celebration of Mexican comfort food. Unlike some versions that can feel heavy or dry, these enchiladas strike the perfect balance between a savory, spiced filling and a rich, velvety exterior that keeps every bite moist and flavorful.
Whether you are looking for a reliable easy weeknight dinner or a centerpiece for a casual weekend gathering, this recipe delivers big on flavor without requiring hours of labor. By focusing on a few key techniques—like properly seasoning the beef and lightly softening the tortillas—you can achieve restaurant-quality results in your own kitchen. This is the kind of meal that has everyone reaching for seconds before the first plate is even finished.
Why You’ll Love This Recipe
- Family-Friendly Flavor: The combination of savory beef and gooey melted cheese appeals to both kids and adults, making it a reliable staple for picky eaters.
- Excellent for Meal Prep: These enchiladas actually taste better as the flavors meld, and they hold up beautifully when assembled ahead of time or stored as leftovers.
- High Customization: You can easily adjust the heat level or swap in different cheeses and toppings to suit your personal preferences or what you have in the pantry.
- Sturdy and Satisfying: Using high-quality corn tortillas and a robust beef filling ensures a filling meal that feels substantial and resists becoming overly soggy in the oven.
Ingredients You’ll Need
The success of a cheesy ground beef enchiladas recipe depends on the harmony between the protein, the starch, and the sauce. Each component plays a vital role in building layers of flavor that stand up to the baking process.
- Ground Beef: Lean ground beef (80/20 or 90/10) provides the hearty base. It absorbs the spices beautifully while providing enough fat to keep the filling juicy.
- Corn Tortillas: Yellow or white corn tortillas offer an authentic earthy flavor and a sturdy texture that holds up under the weight of the sauce and cheese.
- Red Enchilada Sauce: This provides the essential moisture and tang. Whether you use a homemade enchilada sauce or a high-quality store-bought version, it is the soul of the dish.
- Shredded Cheese: A blend of sharp cheddar and Monterey Jack offers the best results—one for its bold, salty bite and the other for its superior melting capabilities.
- Aromatics: Freshly diced onions and minced garlic are sautéed with the beef to create a savory foundation that elevates the entire flavor profile.
- Diced Green Chiles: These add a subtle, smoky undertone and a hint of acidity without overpowering the dish with heat.
- Spices: A mix of chili powder, cumin, and smoked paprika ensures the beef is deeply seasoned and aromatic rather than just salty.
- Oil for Softening: A small amount of neutral oil or cooking spray is necessary to pliable the tortillas, preventing them from cracking during the rolling process.
Variations and Smart Swaps
- Protein Alternatives: If you want to lighten the dish, you can easily substitute the beef with ground turkey or chicken. Be sure to add a splash of beef broth to keep the leaner meat from drying out.
- Vegetarian Boost: Add a can of rinsed black beans or pinto beans to the beef mixture to stretch the filling and add extra fiber and texture.
- Cheese Swaps: For a more authentic flair, try topping the finished dish with crumbled Queso Fresco or Cotija in addition to the melted interior cheese.
- Green Sauce Version: While red sauce is traditional for beef, you can use a salsa verde (green enchilada sauce) for a brighter, more zesty flavor profile.
- Tortilla Options: If you prefer the soft, pillowy texture of flour tortillas, you can use them here. Just be aware they will absorb more sauce and become much softer than corn.
How to Make This Cheesy Ground Beef Enchiladas Recipe
Step 1: Brown and Season the Beef Filling
Start by heating a large skillet over medium-high heat. Add the ground beef and diced onions, breaking the meat apart with a wooden spoon as it cooks. You want to cook the beef until it is no longer pink and the onions have softened and turned translucent. Once the beef is browned, carefully drain the excess grease from the pan—this is a critical step to ensure your enchiladas aren’t oily. Stir in the garlic, green chiles, and your dry spices, allowing the heat to bloom the aromatics for about a minute until fragrant.
Step 2: Incorporate the Sauce and Simmer
To ensure the filling isn’t dry, pour a small amount of the enchilada sauce directly into the beef mixture. This helps bind the meat together and allows the flavors to penetrate the protein. Let the mixture simmer gently for a few minutes. This step creates a cohesive filling that stays inside the tortilla rather than crumbling out. Remove the pan from the heat and stir in a handful of shredded cheese, which will melt and act as a delicious “glue” for the beef.
Step 3: Soften the Tortillas
Corn tortillas are prone to breaking if rolled while cold. To make them pliable, you can either lightly fry them in a skillet with a teaspoon of oil for about 10 seconds per side or wrap a stack in damp paper towels and microwave them for 30–45 seconds. This creates the flexibility needed to roll a tight, professional-looking enchilada. Do not skip this step, as it also creates a slight barrier that prevents the tortilla from becoming mushy once the sauce is added.
Step 4: Assemble the Enchiladas
Pour a thin layer of sauce into the bottom of your baking dish to prevent sticking. Take a softened tortilla, dip the edge into the sauce if desired for extra moisture, and place a generous portion of the beef mixture down the center. Roll the tortilla tightly and place it seam-side down in the dish. Repeat this process until the dish is packed snugly. Seam-side down is the secret to keeping them from unraveling during the baking process.
Step 5: Top with Sauce and Cheese
Once all the tortillas are in the dish, pour the remaining enchilada sauce over the top, ensuring you cover the edges of the tortillas so they don’t get too crunchy or dry in the oven. Generously sprinkle the remaining shredded cheese over the sauce. The cheese should form a thick layer that will eventually melt into a beautiful, golden-brown crust that defines this cheesy ground beef enchiladas recipe.
Step 6: Bake Until Bubbly
Place the dish in a preheated oven and bake until the sauce is bubbling around the edges and the cheese is completely melted and starting to turn golden. If you prefer a very soft enchilada, you can cover the dish with foil for the first half of the baking time, then remove it to let the cheese brown. Let the dish rest for at least five minutes after removing it from the oven; this allows the sauce to thicken slightly and makes the enchiladas much easier to serve without falling apart.
Pro Tips for Success
- Drain the Fat: Always drain the rendered fat after browning the beef to prevent a “grease lake” from forming at the bottom of your casserole dish.
- Sauce the Bottom: Never place dry tortillas directly onto the baking dish. A thin layer of sauce acts as a non-stick coating and seasons the bottom of the enchiladas.
- Don’t Overfill: It is tempting to pack the tortillas, but overfilling makes them difficult to roll and more likely to burst. Aim for about 2-3 tablespoons of filling per tortilla.
- Freshly Shredded Cheese: If possible, grate your own cheese from a block. Pre-shredded cheese is coated in potato starch to prevent clumping, which can hinder that perfect, gooey melt.
- Room Temperature Sauce: If using refrigerated sauce, let it come to room temperature or warm it slightly so it doesn’t drop the temperature of the dish significantly before it hits the oven.
How to Serve Your Enchiladas
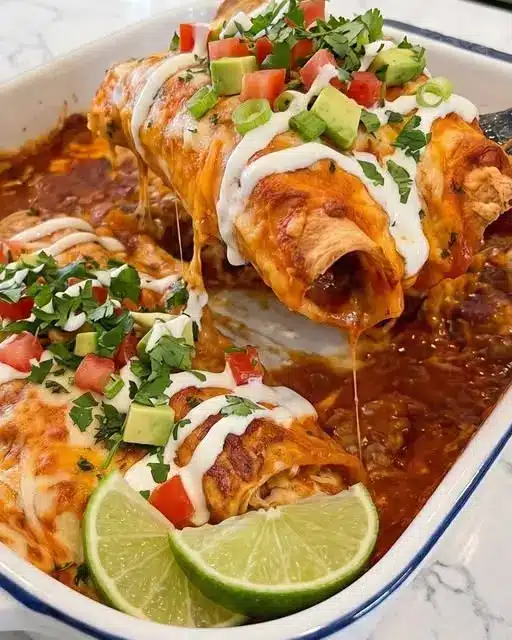
Presentation and toppings are what turn a simple tray of baked tortillas into a Mexican comfort food feast. The richness of the beef and cheese benefits greatly from fresh, cool, and acidic garnishes.
Essential Toppings
Traditional garnishes include a dollop of cool sour cream or Mexican crema to balance the spices. Freshly chopped cilantro adds a burst of herbal brightness, while diced red onions or pickled jalapeños provide a much-needed crunch. Don’t forget the lime wedges; a squeeze of fresh lime juice right before eating cuts through the richness of the cheese and awakens all the flavors.
Side Dish Ideas
To make this a complete meal, serve the enchiladas alongside classic Mexican rice or a simple cilantro-lime rice. A side of refried beans or seasoned black beans is also a traditional accompaniment. For something lighter, a crisp garden salad with a cumin-lime vinaigrette or a scoop of chunky guacamole with tortilla chips provides a refreshing contrast to the warm, baked dish.
Storage and Make-Ahead
Storing Leftovers
Leftover enchiladas stay fresh in the refrigerator for up to 3 to 4 days. Store them in an airtight container to prevent the tortillas from drying out. Because the tortillas continue to absorb the sauce as they sit, the texture will become softer over time, but the flavor often improves as the spices settle.
Freezing Instructions
This recipe is a fantastic candidate for freezing. You can freeze the enchiladas after they are assembled but before they are baked. Wrap the dish tightly in plastic wrap and then aluminum foil. They will keep for up to 3 months. When you are ready to eat, thaw them in the fridge overnight and bake as directed, adding a few extra minutes to the total time if they are still chilled.
Reheating Tips
For the best results, reheat individual portions in the microwave for 1–2 minutes or until the center is hot. If you want to maintain some of the texture, place them in a 350°F oven for about 10–15 minutes. Adding a small extra drizzle of sauce or a sprinkle of fresh cheese before reheating can help revive the dish.
Final Thoughts
Mastering this cheesy ground beef enchiladas recipe is a surefire way to bring warmth and satisfaction to your dinner table. By taking the time to properly season your beef and carefully assemble each roll, you create a dish that is far superior to anything you’ll find in the freezer aisle. It’s a versatile, hearty, and deeply comforting meal that works just as well for a frantic Tuesday night as it does for a festive family gathering. Grab your favorite baking dish, some high-quality cheese, and get ready to enjoy one of the most beloved classics in the repertoire of home cooking.
Frequently Asked Questions
Can I make these enchiladas ahead of time?
Yes, you can assemble the enchiladas up to 24 hours in advance. Keep the dish covered in the refrigerator. For the best results, wait to pour the final layer of sauce and cheese over the top until just before you are ready to put them in the oven. This prevents the tortillas from becoming too mushy while they sit in the fridge.
Why do my corn tortillas always crack when I roll them?
Corn tortillas crack because they are dry and cold. To prevent this, they must be heated until they are soft and pliable. You can do this by quickly dipping them in warm oil, steaming them in a microwave with damp paper towels, or heating them on a dry griddle. Once they are warm and flexible, they will roll easily without splitting.
Is this recipe very spicy?
The spice level is entirely up to you. Most standard red enchilada sauces are mild to medium. If you want a kick, you can add half a teaspoon of cayenne pepper to the beef filling or use “hot” diced green chiles. For a very mild version, stick to a mild sauce and ensure you remove all seeds if using fresh peppers in your filling.
Can I use flour tortillas instead of corn?
You can certainly use flour tortillas if you prefer their texture. Flour tortillas are more durable and won’t crack as easily, but they do tend to absorb more sauce, which can make the final dish quite soft and doughy. If using flour, you might want to slightly reduce the amount of sauce you use on the interior of the enchilada.
What is the best cheese for beef enchiladas?
For a classic cheesy ground beef enchiladas recipe, a combination of Cheddar and Monterey Jack is ideal. Cheddar provides a sharp, tangy flavor that stands up to the beef, while Monterey Jack is a superior melter that gives you that perfect cheese pull. Other good options include Pepper Jack for more heat or a “Mexican Blend” from the grocery store.
The Cheesiest Ground Beef Enchiladas

These cheesy ground beef enchiladas are the ultimate comfort food. Packed with seasoned beef and smothered in a rich red sauce and a thick layer of melted cheese, they are a guaranteed family favorite.
- 1 lb Lean ground beef
- 1 small Onion, diced
- 2 cloves Garlic, minced
- 1 packet (1 oz) Taco seasoning
- 8-10 Flour or corn tortillas
- 2 cups Red enchilada sauce
- 2 cups Shredded cheddar cheese
- 1 cup Shredded Monterey Jack cheese
- 1/4 cup Chopped cilantro for garnish
- 2 Green onions, sliced
- 1Preheat your oven to 375°F (190°C) and lightly grease a 9x13 inch baking dish.
- 2In a large skillet over medium-high heat, brown the ground beef with the diced onion until no longer pink. Drain any excess grease.
- 3Stir in the minced garlic and taco seasoning, cooking for 1-2 minutes until fragrant.
- 4Spread about 1/2 cup of enchilada sauce on the bottom of the prepared baking dish.
- 5Lay out a tortilla, fill it with a portion of the beef mixture and a sprinkle of cheese. Roll it tightly and place seam-side down in the dish. Repeat for all tortillas.
- 6Pour the remaining enchilada sauce over the rolled tortillas, ensuring the edges are covered.
- 7Top with the remaining cheddar and Monterey Jack cheese.
- 8Bake for 20-25 minutes, or until the cheese is melted and bubbling.
- 9Garnish with cilantro and green onions before serving.
Keywords: beef enchiladas, easy dinner, cheesy ground beef, Mexican dinner


