
Cherry Cheesecake Bars

There is something undeniably nostalgic about a perfectly layered dessert that balances a buttery, salty base with a silky, tart filling. This best cherry cheesecake bars recipe delivers exactly that, offering a sophisticated alternative to a traditional cheesecake without the stress of a springform pan or the dreaded cracked surface. The combination of a crisp graham cracker foundation, a velvety cream cheese center, and a vibrant cherry topping creates a dessert that is as visually stunning as it is delicious. Whether you are hosting a summer cookout or looking for a reliable holiday treat, these bars provide a handheld convenience that guests always gravitate toward.
What makes this specific version stand out is the balance of textures. By focusing on a thick, reinforced crust and a high-quality creamy cheesecake layer, we ensure that every bite holds its shape while remaining melt-in-your-mouth soft. The preparation is straightforward enough for a novice baker, yet the results are professional enough to serve at any gathering. In this guide, we will walk through the essential techniques for achieving the perfect set, preventing the common pitfalls of cheesecake baking, and ensuring your bars are the highlight of the dessert table.
Why You’ll Love This Recipe
- Handheld Convenience: Unlike a traditional cake that requires a fork and plate, this easy dessert bars format allows for easy serving and portion control, making it ideal for potlucks and parties.
- Balanced Flavor Profile: The saltiness of the graham cracker crust perfectly offsets the sweetness of the cherry topping and the signature tang of the cream cheese filling.
- Foolproof Technique: By baking the cheesecake in a rectangular pan, you eliminate the need for a water bath, significantly reducing the complexity and risk of a soggy crust.
- Make-Ahead Friendly: These bars actually improve in texture after a night in the refrigerator, allowing you to handle your dessert prep well in advance of your event.
Ingredients You’ll Need
To achieve the best cherry cheesecake bars recipe, the quality of your ingredients is paramount. Each component plays a specific role in building the structural integrity and flavor depth of the final bar. Using full-fat dairy and fresh aromatics will ensure that the bars feel indulgent rather than airy or artificial.
- Graham Cracker Crumbs: These form the structural foundation of the bars. Using finely ground crumbs mixed with melted butter creates a sturdy graham cracker crust that won’t crumble when sliced.
- Cream Cheese: It is essential to use full-fat, brick-style cream cheese. Avoid the whipped varieties or those sold in tubs, as they contain too much air and moisture for a proper set.
- Granulated Sugar: This provides just enough sweetness to the filling without overpowering the natural tang of the cheese.
- Large Eggs: Eggs act as the binding agent for the cheesecake layer. They provide the necessary structure that allows the bars to be sliced cleanly once chilled.
- Vanilla Extract: High-quality pure vanilla extract adds a layer of aromatic warmth that bridges the flavors of the crust and the fruit topping.
- Sour Cream: A small amount of sour cream added to the batter softens the texture and adds a subtle extra hit of acidity that makes the creamy cheesecake layer truly pop.
- Cherry Pie Filling: Whether you use a high-quality store-bought cherry pie filling or a homemade version, this serves as the glossy, fruity finish that defines the dish.
Variations and Smart Swaps
Different Crust Bases: If you want to move away from the traditional graham cracker crust, try using crushed vanilla wafers or chocolate sandwich cookies for a different flavor profile. The chocolate base works particularly well with the cherry topping for a “Black Forest” inspired bar.
Berry Variations: While cherries are the classic choice, this base recipe is incredibly versatile. You can easily swap the cherry topping for blueberry pie filling, raspberry preserves, or even a swirl of lemon curd for a bright, citrusy alternative.
Dietary Adjustments: To make these bars gluten-free, simply substitute the graham crackers for a certified gluten-free brand. The filling itself is naturally gluten-free as long as you ensure your vanilla extract and other additives are safe.
Almond Infusion: Cherry and almond are a classic pairing. Adding half a teaspoon of almond extract to the cheesecake batter or the cherry topping provides a professional, “bakery-style” flavor depth that many people love.
How to Make the Best Cherry Cheesecake Bars Recipe
Step 1: Prepare and Blind-Bake the Crust
Begin by combining your graham cracker crumbs, melted butter, and a touch of sugar until the mixture resembles wet sand. Press this firmly into the bottom of a parchment-lined baking pan. The key to a successful best cherry cheesecake bars recipe is a pre-baked crust. Baking the crust on its own for about 10 minutes at 350°F sets the structure and prevents the cheesecake filling from making the base soggy. Once it smells toasted and looks slightly darkened, remove it from the oven and let it cool slightly while you prepare the filling.
Step 2: Cream the Cheese and Sugar
In a large bowl, beat the room-temperature cream cheese and sugar together until the mixture is completely smooth and free of lumps. This is the most important stage for texture; if the cream cheese is too cold, you will end up with tiny white specks in your bars. Use a medium speed to incorporate the sugar, scraping down the sides of the bowl frequently to ensure every bit of cheese is Aerated and creamy before moving on to the liquid ingredients.
Step 3: Incorporate the Eggs and Aromatics
Add the eggs one at a time, mixing on low speed just until combined. Avoid over-beating at this stage, as incorporating too much air into the eggs can cause the cheesecake to puff up and then sink, leading to cracks. Stir in the sour cream and vanilla extract by hand or on the lowest setting of your mixer. This creates a dense, silky creamy cheesecake batter that will bake up evenly and provide a stable base for the fruit topping.
Step 4: Bake the Cheesecake Layer
Pour the prepared batter over the pre-baked crust and spread it into an even layer using an offset spatula. Bake in the center of the oven until the edges are set and slightly puffed, but the center still has a slight, uniform jiggle when the pan is gently shaken. This jiggle is a sensory cue that the cheesecake is perfectly cooked; it will continue to firm up as it cools. Over-baking at this stage will result in a dry, rubbery texture, so keep a close eye on the pan during the final few minutes.
Step 5: Cool, Top, and Chill
Allow the baked bars to cool completely to room temperature on a wire rack. Once cooled, spread the cherry pie filling evenly across the top. The final and most critical step is refrigeration. These bars must chill for at least four hours, or preferably overnight. This resting period allows the fats in the cream cheese to solidify, making the bars firm enough to slice into clean, beautiful squares that hold their shape on a serving platter.
Pro Tips for Success
- Room Temperature Ingredients: Always ensure your cream cheese, eggs, and sour cream are at room temperature before you begin. This prevents lumps and ensures a perfectly smooth batter.
- Parchment Paper Sling: Line your pan with parchment paper, leaving an overhang on the sides. This allows you to lift the entire block of bars out of the pan for easy, clean slicing.
- Clean Slices: For professional-looking squares, dip your knife in hot water and wipe it clean between every single cut. The heat helps glide through the cherry pie filling and cheese without dragging.
- Don’t Overmix the Eggs: Incorporating too much air after adding eggs leads to bubbles and cracking. Keep the mixer speed low and stop as soon as the yellow streaks disappear.
- Firm Pressing: When forming the crust, use the bottom of a flat measuring cup to press the crumbs firmly. A loose crust will crumble when you try to pick up the bars.
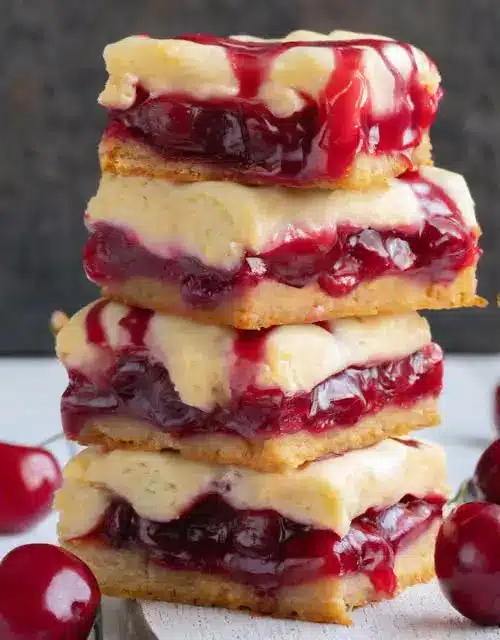
How to Serve Cherry Cheesecake Bars
When it comes to serving the best cherry cheesecake bars recipe, presentation can elevate the dish from a simple home snack to a gourmet dessert. These bars are best served chilled, directly from the refrigerator. Because they are rich and indulgent, cutting them into smaller 2-inch squares is often the best approach for parties, allowing guests to enjoy a few bites without it feeling too heavy.
To enhance the visual appeal, consider adding a small dollop of whipped cream to each square just before serving. A sprig of fresh mint or a light dusting of powdered sugar around the plate can also add a touch of elegance. If you are serving these at a summer event, keeping the platter on a bed of ice (with a barrier) will help maintain the creamy cheesecake texture even in warmer temperatures. They pair beautifully with a cup of strong coffee or a crisp glass of dessert wine.
Storage and Make-Ahead
Storing Leftovers
Because of the high dairy content, these bars must be stored in the refrigerator. Place them in an airtight container or cover the pan tightly with plastic wrap. They will stay fresh and maintain their texture for up to 5 days. If you have already sliced them, you can place small squares of parchment paper between the bars to prevent the cherry topping from sticking to the container lid.
Freezing
These bars freeze remarkably well, making them a fantastic option for long-term prep. To freeze, let the bars set completely in the fridge first. Slice them into squares, then wrap each individual square tightly in plastic wrap followed by a layer of aluminum foil. They can be frozen for up to 3 months. When you are ready to enjoy them, thaw the bars in the refrigerator overnight. Do not thaw them at room temperature, as this can cause the crust to become mushy.
Making It Ahead
The best cherry cheesecake bars recipe is actually better when made a day in advance. The flavors have more time to meld, and the cheesecake layer achieves its maximum silkiness after 12–24 hours of chilling. You can bake the crust and the cheesecake layer, then add the cherry topping just before serving, or assemble the entire thing and let it rest together.
Final Thoughts
Mastering the best cherry cheesecake bars recipe is a rewarding experience for any home baker. It offers all the luxury of a gourmet cheesecake with a fraction of the technical difficulty. By focusing on the quality of your cherry pie filling and ensuring your crust is perfectly crisp, you create a dessert that appeals to both children and adults alike. These bars are a testament to the fact that simple, well-executed ingredients often result in the most memorable dishes. Once you see how easily these come together and how quickly they disappear at your next gathering, they are sure to become a staple in your recipe rotation.
Frequently Asked Questions
Can I use fresh cherries instead of canned pie filling?
Yes, you can certainly use fresh cherries, but you will need to cook them down first. Simmer pitted cherries with a bit of sugar, lemon juice, and a cornstarch slurry until the mixture thickens into a glossy sauce. Let this homemade topping cool completely before spreading it over your creamy cheesecake layer to ensure the bars stay firm.
Why did my cheesecake bars crack on top?
Cracks are usually caused by over-baking or over-mixing the batter. If you beat too much air into the eggs, the cheesecake will rise and then collapse, creating fissures. Additionally, if the oven temperature is too high or the bars stay in too long, the proteins in the cheese tighten and pull apart. Fortunately, the cherry pie filling is an excellent way to hide any minor surface imperfections.
Do I really need to chill them for 4 hours?
Yes, chilling is non-negotiable for the best cherry cheesecake bars recipe. When the bars come out of the oven, the structure is still quite soft. Refrigeration allows the fats to set and the moisture to redistribute. If you try to slice them too early, the crust will fall apart and the filling will ooze, losing that distinct, layered look that makes these bars so appealing.
Can I make these bars in a different sized pan?
While an 8×8 or 9×9 inch pan is standard for thick bars, you can use a 9×13 inch pan for a larger crowd. However, keep in mind that the layers will be much thinner, and the baking time will need to be reduced significantly. Always watch for the visual cue of the “slight jiggle” in the center to determine when they are done, regardless of the pan size used.
How do I prevent the graham cracker crust from crumbling?
A crumbling graham cracker crust is usually the result of not enough butter or not enough pressure. Ensure your crumbs are thoroughly coated in the melted butter so they stick together. When pressing the mixture into the pan, use significant force with the bottom of a glass or a measuring cup. Pre-baking the crust also helps “glue” the crumbs together before the wet filling is added.
Cherry Cheesecake Bars

Creamy and decadent cheesecake bars featuring a buttery graham cracker crust and a luscious cherry topping.
- 1 1/2 cups graham cracker crumbs
- 1/4 cup granulated sugar
- 6 tbsp unsalted butter, melted
- 16 oz cream cheese, softened
- 1/2 cup granulated sugar
- 2 large eggs
- 1 tsp vanilla extract
- 21 oz cherry pie filling
- 1Preheat oven to 325°F (163°C) and grease an 8-inch square baking pan.
- 2Combine graham cracker crumbs, 1/4 cup sugar, and melted butter; press firmly into the pan.
- 3Beat cream cheese and 1/2 cup sugar until smooth.
- 4Add eggs one at a time, then vanilla, mixing on low until combined.
- 5Pour batter over crust and bake for 35-40 minutes until set.
- 6Cool completely, top with cherry filling, and refrigerate for 4 hours before slicing.
Keywords: cherry cheesecake, dessert bars, cherry pie filling, baking recipes


