
Chocolate Caramel Nut Clusters

Few confections capture the perfect balance of salty, sweet, crunchy, and chewy quite like homemade chocolate caramel nut clusters. Often referred to as “turtles” in candy shops, these bite-sized treats are a masterpiece of texture. When you make them at home, you move beyond the waxy, over-sweetened versions found in grocery store aisles and enter a world of rich, buttery caramel and high-quality tempered chocolate. This recipe transforms humble nuts and sugar into a sophisticated treat that feels like a labor of love but is surprisingly approachable for the home cook.
The beauty of this easy homemade candy lies in its simplicity and the quality of the ingredients you choose. By taking the time to toast your nuts and carefully melt your chocolate, you create a depth of flavor that store-bought candies simply cannot replicate. Whether you are preparing these for a holiday dessert platter or a thoughtful DIY gift, mastering the art of the cluster is a rewarding skill for any aspiring confectioner. This guide will walk you through the nuances of caramel consistency and chocolate setting to ensure professional results every time.
Why You’ll Love This Recipe
- Superior Texture Contrast: The combination of toasted, crisp pecans, gooey slow-cooked caramel, and a snappy chocolate shell creates a multi-sensory experience in every single bite.
- Customizable Flavor Profiles: Unlike boxed candies, you can control the salt levels and choose between milk, dark, or semi-sweet chocolate to perfectly suit your personal palate.
- Perfect for Gifting: These holiday treats are naturally sturdy and have a long shelf life, making them the ideal candidate for cookie tins, gift bags, or party favors.
- No Special Equipment Required: While a candy thermometer is helpful for precision, you can successfully create these clusters with standard kitchen tools you likely already have on hand.
Ingredients You’ll Need
To create the best pecan caramel clusters, each ingredient must be selected for its specific role in flavor and structure. Since there are so few components, using the highest quality available will significantly impact the final taste of your candy.
- Pecan Halves: These provide the structural base for your clusters. Toasting them is essential to unlock their oils and provide a sturdy, crunchy contrast to the soft caramel.
- Granulated Sugar and Corn Syrup: These form the foundation of your caramel. The corn syrup acts as an interfering agent, preventing the sugar from crystallizing and ensuring a smooth, silky texture.
- Heavy Cream and Butter: These dairy components add richness and fat, which keeps the caramel soft enough to bite through without sticking to your teeth.
- High-Quality Chocolate: Use bars or high-end chips. Avoid “almond bark” or cheap coating chocolates if you want the best flavor; real cocoa butter makes a world of difference in the mouthfeel.
- Sea Salt or Fleur de Sel: A delicate sprinkle of salt on top cuts through the intense sweetness of the caramel and enhances the earthy notes of the pecans.
- Vanilla Extract: A splash of pure vanilla added at the end of the caramel cooking process provides a floral, aromatic finish that ties the sugar and dairy together.
Variations and Smart Swaps
Nut Substitutions: While pecans are traditional for this turtle candy recipe, you can easily swap them for toasted almonds, cashews, or even macadamia nuts for a tropical twist on the classic.
Chocolate Options: For a more grown-up flavor, use a dark chocolate with at least 70% cocoa solids. If you prefer a nostalgic, creamy experience, high-quality milk chocolate is the way to go. You can even drizzle white chocolate over the top for a decorative finish.
Salted Pretzel Base: If you love a “sweet and salty” punch, place a small mini-pretzel at the bottom of each cluster before adding the caramel. This adds an extra layer of crunch and a different type of saltiness.
Spiced Caramel: Add a pinch of cinnamon or a tiny dash of cayenne pepper to your caramel or chocolate to create a warming, slightly spicy profile that pairs beautifully with dark chocolate.
How to Make Homemade Chocolate Caramel Nut Clusters
Step 1: Toast the Pecans for Maximum Flavor
Begin by spreading your pecan halves in a single layer on a baking sheet. Toasting the nuts at a moderate temperature is a critical step that many people skip. It dries out the nuts slightly, making them crispier, and brings the natural oils to the surface. Roast them until they are fragrant and a shade darker, then let them cool completely. Using room temperature or slightly warm nuts ensures that the caramel adheres properly without causing the fats in the nut to separate.
Step 2: Cook the Caramel to the Proper Consistency
Combine your sugar, corn syrup, butter, and cream in a heavy-bottomed saucepan. Cook the mixture over medium heat, stirring occasionally. You are looking for a “firm ball” stage if using a thermometer, or a deep golden amber color. This stage is vital because if the caramel is undercooked, it will flow off the nuts and create a mess; if overcooked, it will become hard and difficult to chew. Once reached, stir in your vanilla and a pinch of salt to round out the flavor.
Step 3: Assemble the Nut and Caramel Bases
On a piece of parchment paper, arrange small piles of pecans—usually 3 to 5 halves per cluster. Spoon a generous tablespoon of the warm caramel over the center of each nut pile. The caramel should act as the “glue” that holds the nuts together. Allow these bases to sit and firm up at room temperature for at least 30 minutes. If your kitchen is particularly warm, you can pop them in the fridge to speed up the setting process, which prevents the chocolate from melting the caramel later.
Step 4: Melt and Temper the Chocolate
Melt your chocolate gently using a double boiler or short bursts in the microwave. If you want that professional “snap” and a glossy finish, try to keep the chocolate tempered by not overheating it. High-quality chocolate contains cocoa butter, which needs to be handled carefully to prevent “bloom” or white streaks. Once the chocolate is smooth and glossy, it is ready to coat your caramel-topped nuts. This layer seals the caramel in and provides the final structural element of the homemade chocolate caramel nut clusters.
Step 5: Coat and Garnish the Clusters
Spoon the melted chocolate over the top of each caramel mound, using the back of the spoon to spread it to the edges so the caramel is completely covered. While the chocolate is still wet, sprinkle a few grains of flaky sea salt on top. This not only looks beautiful but provides that essential flavor balance. Let the clusters set completely at room temperature until the chocolate is firm to the touch before attempting to move or store them.
Pro Tips for Success
- Tip: Use a Heavy Saucepan. When making caramel, a thick-bottomed pot distributes heat more evenly, which prevents the sugar from scorching in hot spots.
- Tip: Don’t Rush the Cooling. Let the caramel set fully before adding the chocolate. If the caramel is too warm, it will mix with the chocolate rather than staying in distinct, delicious layers.
- Tip: Organize Your Workspace. Candy making moves fast once the temperatures are reached. Have your nuts laid out and your salt ready before you start the caramel.
- Tip: Keep Moisture Away. Ensure all your tools and bowls are completely dry. Even a single drop of water can cause melting chocolate to “seize,” turning it into a grainy, unworkable clump.
- Tip: Adjust for Altitude. If you live at a high altitude, remember that the boiling point of water is lower, so you may need to adjust your caramel’s final temperature downward by a few degrees.
Troubleshooting Common Problems
Why is my caramel too soft and runny?
This usually happens if the caramel didn’t reach a high enough temperature during the cooking process. If it doesn’t reach the “firm ball” stage (around 245°F), it won’t have enough structure to hold its shape at room temperature. To fix this for future batches, ensure you use a reliable candy thermometer and don’t stop cooking until the target temperature is reached.
Why did my chocolate turn white or streaky?
This is known as “bloom,” and it happens when the cocoa butter separates from the cocoa solids. It usually occurs if the chocolate was heated too quickly or if it was stored in a place with fluctuating temperatures. While the clusters are still perfectly safe to eat, you can avoid this by melting your chocolate slowly and stirring it frequently to keep the temperature stable.
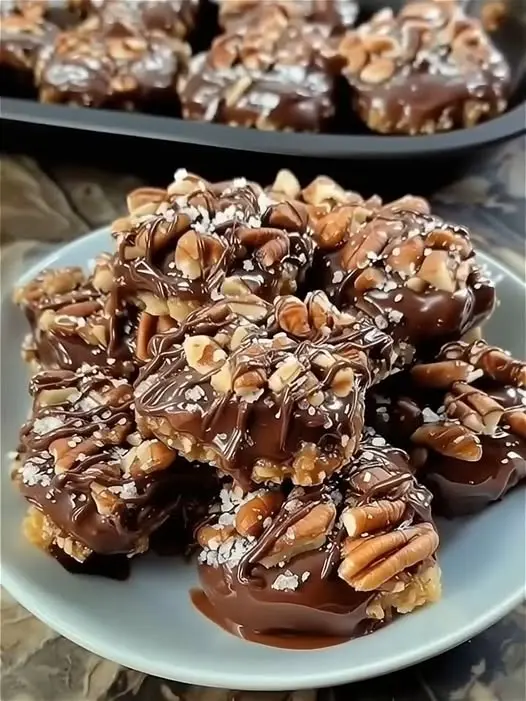
How to Serve Homemade Chocolate Caramel Nut Clusters
Serving homemade chocolate caramel nut clusters is all about showcasing their handcrafted appeal. These are rich, decadent treats, so they are best served in small portions. They make a stunning addition to a dessert charcuterie board alongside fresh berries, sharp white cheddar cheese, and crisp apple slices. The acidity of the fruit and the saltiness of the cheese provide an excellent counterpoint to the deep sweetness of the clusters.
For a more formal presentation, place each cluster in a small paper candy liner (like a mini muffin liner). This prevents them from sticking to each other and makes them easy for guests to pick up at a party. If you are serving these as a post-dinner treat, they pair exceptionally well with a dark roast coffee or a glass of tawny port, both of which highlight the toasted notes of the pecans and the bitterness of the chocolate.
Storage and Make-Ahead
Storing Leftovers
Keep your clusters in an airtight container at room temperature for up to two weeks. If your kitchen is very warm, the refrigerator is a better option to prevent the chocolate from softening, though room temperature storage provides the best texture for the caramel. Use parchment paper between layers to prevent the clusters from sticking together.
Freezing Instructions
These candies freeze remarkably well. Place them in a freezer-safe bag or container with parchment paper separators. They will stay fresh for up to three months. When you are ready to eat them, thaw them in the refrigerator overnight. Thawing slowly prevents condensation from forming on the chocolate, which can cause sugar bloom.
Making It Ahead
Since these clusters need time to set, they are the perfect make-ahead treat. You can prepare the nut and caramel bases a day in advance, keep them covered at room temperature, and finish them with chocolate the following day. This breaks up the work and ensures the caramel is perfectly stable before you start the dipping process.
Final Thoughts
Mastering homemade chocolate caramel nut clusters is a milestone for any home baker or candy maker. There is a profound sense of satisfaction in watching simple sugar and cream transform into a golden, chewy caramel that perfectly hugs a cluster of toasted nuts. By following these technical cues and focusing on high-quality ingredients, you’ll create a treat that rivals the finest confectionaries. Enjoy the process of crafting these bites, and remember that even if they aren’t visually perfect the first time, the combination of chocolate and caramel is always a winning flavor profile.
Frequently Asked Questions
Can I use salted nuts instead of unsalted?
Yes, you can use salted nuts, but you should be cautious with the amount of extra sea salt you sprinkle on top. If using salted nuts, I recommend omitting the salt in the caramel itself to ensure the clusters don’t become overwhelmingly salty. Always taste a nut first to see how heavy the factory salting is before you begin assembly.
What is the best chocolate for melting?
For the best results, use “couverture” chocolate or high-quality baking bars. These contain a higher percentage of cocoa butter, which allows them to melt more smoothly and set with a better sheen. While standard chocolate chips will work in a pinch, they often contain stabilizers that prevent them from flowing as easily as professional-grade chocolate.
Can I make these without a candy thermometer?
It is possible but requires a bit more intuition. You can use the “cold water test” by dropping a small amount of caramel into a bowl of ice water. If it forms a ball that holds its shape but is still pliable when pressed, you have reached the firm ball stage. However, for consistent homemade chocolate caramel nut clusters, a $10 digital thermometer is a very worthwhile investment.
How do I prevent the caramel from being too sticky?
The stickiness is usually a result of undercooking the caramel or a high humidity environment. To ensure a clean bite, make sure you reach at least 242°F-245°F. Additionally, adding a little extra butter can help the caramel release from the teeth more easily, creating a “shorter” texture that is less likely to be aggressively sticky.
Can I use a different nut like peanuts?
Absolutely! Using peanuts essentially creates a “Snickers” style cluster. Peanuts are smaller, so you will need more of them to create a stable base for the caramel. Be sure to use roasted, unsalted peanuts for the best flavor balance with the sweet caramel and chocolate coating.
Chocolate Caramel Nut Clusters

Decadent homemade treats featuring toasted pecans topped with gooey caramel and smooth milk chocolate, finished with a sprinkle of sea salt.
- 2 cups pecan halves, toasted
- 11 oz soft caramels, unwrapped
- 2 tbsp heavy cream
- 1 1/2 cups milk chocolate chips
- 1 tsp sea salt
- 1Arrange pecan halves into 24 small clusters on a baking sheet lined with parchment paper.
- 2In a microwave-safe bowl, combine caramels and heavy cream. Heat in 30-second intervals, stirring until smooth.
- 3Spoon a tablespoon of melted caramel over each pecan cluster.
- 4Melt the chocolate chips in the microwave, stirring until completely melted and glossy.
- 5Spoon the melted chocolate over the caramel layer on each cluster.
- 6Sprinkle with sea salt and let set at room temperature until firm, or refrigerate for 20 minutes.
Keywords: chocolate, caramel, pecans, turtles, candy, dessert


