
Chocolate Peanut Clusters

There is something undeniably nostalgic about a tray of easy homemade chocolate peanut clusters sitting on a holiday dessert table. This classic treat strikes the perfect balance between rich, velvety chocolate and the satisfying crunch of roasted salted peanuts. Unlike complex confections that require candy thermometers and precise timing, these clusters come together with minimal effort, making them a staple for busy families and seasoned bakers alike. The marriage of salty and sweet is a timeless flavor profile that appeals to nearly everyone, ensuring these won’t last long once they are set out for guests.
Whether you are preparing a last-minute gift or looking for a simple no-bake holiday candy to round out your cookie tin, this method provides a foolproof way to achieve professional results. By focusing on the quality of your chocolate and the texture of your nuts, you can create a high-end candy experience right in your own kitchen without ever turning on the oven.
Why This Recipe Is a Keeper
- Ultimate Simplicity: With no actual baking required, this recipe is accessible for cooks of all skill levels and is a fantastic way to involve children in holiday kitchen activities.
- Perfect Texture: The contrast between the smooth, melt-in-your-mouth chocolate coating and the firm, crunchy nuts creates a sensory experience that far exceeds anything you can find in a store-bought box.
- Highly Giftable: These clusters are sturdy and hold up well at room temperature, making them an ideal choice for food gifts, bake sales, or festive party favors.
- Budget-Friendly: You can make a large batch of these gourmet-style treats using just a few affordable pantry staples, allowing you to feed a crowd without breaking the bank.
Ingredients You’ll Need
The success of these clusters relies on the quality and ratio of just a few key components. When there are so few ingredients, each one plays a vital role in the final flavor and structural integrity of the candy.
- Semi-sweet Chocolate Chips: These provide the rich, stable base for your easy homemade chocolate peanut clusters. Using semi-sweet chocolate chips ensures the candy isn’t cloyingly sweet while maintaining a smooth melting consistency.
- Roasted Salted Peanuts: The salt on these nuts is essential for cutting through the richness of the chocolate. Roasting enhances the natural oils in the peanuts, providing a deeper, more complex nutty aroma.
- Milk Chocolate or Almond Bark: Incorporating a portion of milk chocolate or vanilla almond bark helps the candy set with a beautiful sheen and prevents it from becoming too brittle once cooled.
- Coconut Oil (Optional): A tiny amount of coconut oil can be stirred into the melting chocolate to help thin it out, making it easier to coat every nook and cranny of the peanuts.
- Flaky Sea Salt: A light garnish of sea salt on top of the wet clusters acts as a flavor enhancer, making the chocolate taste even more intense and luxurious.
Simple Swaps and Variations
While the classic version is hard to beat, these clusters serve as an excellent canvas for various flavor profiles and dietary needs. You can easily adapt the recipe based on what you have in your pantry.
Dark Chocolate Sea Salt: For a more sophisticated palate, replace the semi-sweet chocolate with high-quality dark chocolate (60% cacao or higher) and use unsalted peanuts, finishing the clusters with a heavy pinch of Maldon sea salt.
The “Avalanche” Twist: Mimic the popular candy shop treat by adding a handful of mini marshmallows and a scoop of peanut butter into the chocolate mixture before scooping. This creates a softer, chewier texture that kids absolutely love.
White Chocolate Cranberry: Swap the dark chocolates for white chocolate morsels and fold in dried cranberries along with the peanuts. The tartness of the fruit beautifully balances the creamy sweetness of the white chocolate base.
Nut-Free Options: If you are dealing with a nut allergy, you can substitute the peanuts with toasted sunflower seeds or even pretzel pieces to maintain that essential salty crunch without the allergens.
How to Make Easy Homemade Chocolate Peanut Clusters
Step 1: Melt the Chocolate Components
The foundation of a great cluster is perfectly tempered chocolate. Whether you choose to use a double boiler or the microwave, the key is low and slow heat. If using a microwave, heat the semi-sweet chocolate chips in short 30-second bursts, stirring vigorously between each interval. This prevents the chocolate from scorching or seizing. You want the mixture to be glossy and completely liquid, with no stubborn lumps remaining. This smooth consistency is what allows the chocolate to flow over the peanuts and create a uniform coating.
Step 2: Fold in the Peanuts
Once the chocolate is smooth, it is time to add the roasted salted peanuts. Pour them into the bowl and use a large spatula to fold them in until every single peanut is thoroughly submerged in the chocolate. You want to see “valleys” of chocolate between the nuts, ensuring there is enough binder to hold the cluster together once it hardens. If the mixture looks too dry, you can melt an additional half-cup of chocolate to reach the desired ratio.
Step 3: Scoop and Portion the Candy
Line a large baking sheet with parchment paper or a silicone mat to prevent sticking. Using a tablespoon or a small cookie scoop, drop rounded mounds of the mixture onto the prepared sheet. Leave a little space between each one to prevent them from merging into one giant candy bar. This is the stage where you can add any garnishes, such as sprinkles or flaky salt, while the chocolate is still tacky so they adhere properly.
Step 4: Set and Harden
The final stage is the most difficult: waiting. The no-bake holiday candy needs time to firm up. You can leave them at room temperature if your kitchen is cool, but for the best snap and texture, place the baking sheet in the refrigerator for at least 30 to 60 minutes. Once the chocolate is matte and firm to the touch, they are ready to be peeled off the parchment and enjoyed.
Pro Tips for the Best Results
- Tip: Keep Moisture Away. Ensure your bowls and spatulas are bone-dry before starting. Even a single drop of water can cause melting chocolate to seize and turn into a grainy, unworkable mess.
- Tip: Use Quality Peanuts. Look for “extra crunchy” or “double roasted” peanuts. They provide a much better structural contrast to the soft chocolate than soft or raw peanuts do.
- Tip: Master the Scoop. A spring-loaded cookie scoop is the best tool for this job. it ensures that all your easy homemade chocolate peanut clusters are uniform in size, which makes for a much prettier presentation on a gift platter.
- Tip: Check the Temperature. If your chocolate is too hot when you add the peanuts, it may take much longer to set. Let the melted chocolate sit for two or three minutes before folding in the nuts.
Troubleshooting Common Problems
Why is my chocolate turning white or gray?
This is known as “bloom,” and it usually happens when the chocolate is stored in an area that is too warm or has high humidity. The cocoa butter separates and rises to the surface. While it doesn’t look as pretty, the clusters are still perfectly safe to eat and will taste the same.
Why won’t my clusters stay together?
If your clusters are falling apart, you likely didn’t have enough chocolate “binder” compared to the volume of peanuts. Next time, try increasing the amount of chocolate or using smaller peanuts to ensure there is more surface area for the chocolate to grab onto.
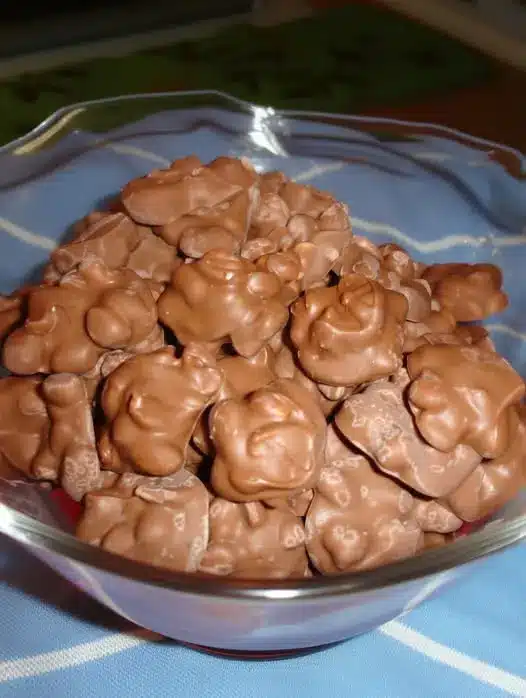
How to Serve These Clusters
Presentation is half the fun when it comes to homemade candy. These clusters look beautiful when served in small paper candy cups, which also makes them easier for guests to grab during a party without getting chocolate on their fingers. For a festive holiday look, choose liners in gold, red, or green to match the season.
If you are serving these as part of a larger dessert spread, they pair excellently with sharp cheeses, fresh berries, or a glass of cold milk. They also make a fantastic topping for vanilla bean ice cream—just chop them up slightly and sprinkle them over the top for an instant sundae upgrade. Because they are so rich, a little goes a long way, so small portions are usually best.
Storage and Make-Ahead
Storing Leftovers
These easy homemade chocolate peanut clusters should be stored in an airtight container to keep the peanuts from losing their crunch. They will stay fresh at room temperature for about a week, provided your house isn’t too warm. For longer storage, keep them in the refrigerator for up to three weeks.
Freezing Instructions
Yes, you can freeze these! Place the set clusters in a freezer-safe bag or container with layers of parchment paper between them to prevent sticking. They will last for up to three months in the freezer. When you are ready to eat them, let them thaw in the refrigerator overnight to prevent condensation from forming on the chocolate.
Final Thoughts
Making easy homemade chocolate peanut clusters is a reminder that some of the most satisfying treats are also the simplest. By combining the humble peanut with high-quality chocolate, you create a snack that is far greater than the sum of its parts. This recipe is perfect for those moments when you need a homemade touch without the stress of complicated baking techniques. Once you see how quickly these disappear from the dessert table, they are sure to become a permanent fixture in your recipe box for years to come.
Frequently Asked Questions
Can I use different types of nuts?
Absolutely. While peanuts are the traditional choice, this recipe works beautifully with roasted almonds, pecans, walnuts, or even macadamia nuts. Just ensure that whatever nut you choose is roasted first, as raw nuts can have a “woody” texture that doesn’t pair as well with chocolate.
What is the best way to melt chocolate without a microwave?
The double boiler method is the most reliable way to melt chocolate gently. Place a heat-safe glass bowl over a pot of simmering water, ensuring the bottom of the bowl doesn’t touch the water. Stir the chocolate chips constantly until they are melted and smooth. This method provides more control and reduces the risk of burning.
Can I make these vegan?
Yes, you can easily make vegan easy homemade chocolate peanut clusters by using dairy-free chocolate chips. Many high-quality dark chocolates are naturally vegan, but always check the label for milk solids or whey. Ensure your peanuts are processed in a way that aligns with your dietary needs as well.
How do I prevent the chocolate from melting in my hands?
The “snap” and stability of the chocolate depend on how it was melted. Adding a small amount of almond bark or candy melts to your chocolate chips adds paraffin or vegetable fats that help the candy stay firm at room temperature. Also, keeping the clusters refrigerated until shortly before serving helps them maintain their structure.
Why are my peanuts not crunchy?
This usually happens if the peanuts were old or if they were stored in a humid environment before being added to the chocolate. For the absolute best crunch, you can quickly toast your peanuts in a dry pan over medium heat for 2-3 minutes to refresh them before stirring them into the melted chocolate.
Chocolate Peanut Clusters

These Chocolate Peanut Clusters are an effortless, delicious treat made with just a few ingredients. Perfect for holiday gifting or a quick sweet snack, they combine smooth melted chocolate with crunchy roasted peanuts for the ultimate flavor combination.
- 16 oz semi-sweet chocolate chips
- 11 oz butterscotch chips
- 16 oz salted roasted peanuts
- 1Line two large baking sheets with parchment paper or silicone mats.
- 2In a large microwave-safe bowl, combine the chocolate chips and butterscotch chips.
- 3Microwave in 30-second intervals, stirring between each, until the mixture is completely smooth.
- 4Fold in the salted roasted peanuts until they are evenly coated in the chocolate mixture.
- 5Drop spoonfuls of the mixture onto the prepared baking sheets, forming small clusters.
- 6Allow the clusters to sit at room temperature for at least 2 hours or until firm. For faster setting, place them in the refrigerator for 30 minutes.
Keywords: chocolate peanut clusters, easy candy, no-bake dessert, homemade treats, holiday candy


