
Chocolate Cream Pie

Finding the perfect balance between a rich, decadent filling and a light, airy topping is the hallmark of a truly classic chocolate cream pie recipe. This timeless dessert has earned its place at the center of American dinner tables for generations, offering a nostalgic indulgence that appeals to both children and adults. Unlike a simple box mix, a homemade version relies on a silky chocolate custard cooked slowly on the stovetop to achieve a texture that is dense enough to slice cleanly yet soft enough to melt away the moment it hits your tongue. It is the ultimate comfort food for anyone who appreciates the deep, complex notes of high-quality cocoa paired with the buttery crunch of a perfectly baked crust.
What makes this specific version stand out is the attention to the cooking technique, ensuring the filling is never grainy or thin. By using a combination of whole milk and heavy cream along with egg yolks for stability, we create a bittersweet chocolate base that feels incredibly luxurious. This recipe isn’t just about satisfying a sugar craving; it’s about the contrast of temperatures and textures, from the cold, homemade whipped cream to the room-temperature flaky pastry. Whether you are preparing this for a holiday gathering or a quiet Sunday supper, it represents the very best of traditional home baking, delivering a professional-level result with straightforward, honest ingredients.
Why This Recipe Is a Keeper
- Unmatched Texture: By tempering the egg yolks and using cornstarch as a thickener, the classic chocolate cream pie recipe achieves a glossiness and stability that store-bought versions simply cannot replicate.
- Deep Flavor Profile: The use of real chocolate bars rather than just cocoa powder provides a multi-dimensional chocolate flavor that lingers pleasantly without being cloyingly sweet.
- Make-Ahead Convenience: Because the custard requires several hours to fully set in the refrigerator, this is an ideal dessert to prepare a full day in advance, leaving your kitchen clean on the day of your event.
- Customizable Foundation: While the chocolate filling is the star, the recipe is incredibly flexible, allowing you to swap the crust type or the garnishes to suit your specific tastes or the occasion.
Ingredients You’ll Need
Success with a classic chocolate cream pie recipe starts with selecting high-quality dairy and chocolate, as these components provide the bulk of the flavor and structure for the finished dish.
- Whole Milk and Heavy Cream: This combination provides the necessary fat content to ensure the pudding is rich and sturdy. Avoiding low-fat milk is essential for preventing a watery consistency.
- Egg Yolks: These act as a natural emulsifier, adding a golden richness and helping the silky chocolate custard set into a sliceable form once chilled.
- Cornstarch: This is the primary thickening agent that works alongside the eggs to create a structure that holds its shape even after the pie is cut and served.
- Bittersweet Chocolate: Using a bar with at least 60% cacao ensures the pie has a sophisticated chocolate punch that balances the sugar in the custard.
- Unsalted Butter: Whisked in at the very end, butter adds a professional-grade sheen to the filling and a rounded, mellow finish to the cocoa notes.
- Vanilla Extract: A generous splash of high-quality vanilla acts as a flavor enhancer, brightening the chocolate and rounding out the dairy components.
- Pre-baked Pie Shell: Whether you choose a flaky pastry or a crushed cookie base, a blind-baked pie crust is vital to ensure the bottom stays crisp under the heavy filling.
Simple Swaps and Variations
The Crust Alternative: While a traditional flour-and-butter crust is standard, many bakers prefer a graham cracker or Oreo cookie crust. This adds a different type of crunch and can be even faster to prepare since it requires less precision during the baking phase.
Infused Flavors: You can easily elevate the profile of your classic chocolate cream pie recipe by whisking a teaspoon of espresso powder into the dry ingredients. Coffee acts as a hidden booster that makes the chocolate taste even more intense without adding a distinct coffee flavor.
Spiced Chocolate: For a “Mexican Chocolate” twist, add half a teaspoon of ground cinnamon and a tiny pinch of cayenne pepper to the custard. This creates a warm, lingering heat that pairs beautifully with the cold whipped cream topping.
Topping Textures: Instead of plain whipped cream, try topping the pie with toasted marshmallows or a drizzle of salted caramel. Shaved chocolate curls or crushed cacao nibs also add a wonderful visual appeal and a bit of textural contrast.
How to Make a Classic Chocolate Cream Pie
Step 1: Blind Bake the Pie Crust
Before starting the filling, you must ensure your crust is fully cooked and cooled. For this classic chocolate cream pie recipe, the filling is not baked in the oven, so the crust must be crisp and golden brown. Use pie weights or dried beans to prevent the pastry from shrinking or bubbling during the blind-baked pie crust process. Once baked, let it cool completely on a wire rack; adding hot custard to a warm crust can lead to a soggy bottom that loses its structural integrity.
Step 2: Whisk the Base and Temper the Eggs
In a medium saucepan, whisk together your sugar, cornstarch, and cocoa powder before gradually adding the milk. This prevents lumps from forming later. Over medium heat, stir constantly until the mixture begins to steam. To avoid “scrambled eggs,” pour a small amount of the hot milk mixture into your beaten egg yolks while whisking vigorously. This slowly raises the temperature of the yolks, allowing them to be safely incorporated back into the main pot without curdling.
Step 3: Thicken the Custard on the Stovetop
Return the tempered egg mixture to the saucepan and continue cooking over medium heat. This is the most critical stage for a silky chocolate custard. You must stir or whisk constantly, reaching into the corners of the pan to prevent burning. Watch for the mixture to thicken significantly—it should reach a consistency where it coats the back of a spoon and produces a few large, slow bubbles. Removing it too early will result in a runny pie, while overcooking can break the emulsion.
Step 4: Incorporate the Chocolate and Butter
Once the custard is thick, remove the pan from the heat immediately. Stir in the chopped bittersweet chocolate, butter, and vanilla extract. The residual heat of the pudding will melt the chocolate and butter, creating a glossy, uniform appearance. Stir until no streaks of butter remain. This step is where the flavor profile is finalized, as the high-quality fats from the butter provide that signature mouthfeel that defines a professional-grade dessert.
Step 5: The Essential Chilling Phase
Pour the warm filling into your cooled pie shell and smooth the top with a spatula. To prevent a “skin” from forming on the surface of the pudding, press a piece of plastic wrap directly onto the surface of the chocolate. Refrigerate the pie for at least six hours, though overnight is preferred. This time allows the starches and proteins to fully set, ensuring that when you slice the pie, the classic chocolate cream pie recipe holds its shape perfectly on the plate.
Pro Tips for the Best Results
- Tip: Chop the chocolate finely. The smaller the pieces of chocolate, the faster they will melt into the hot custard, ensuring a perfectly smooth finish without over-mixing the pudding.
- Tip: Use a heavy-bottomed saucepan. Thin pans have hot spots that can easily scorch the dairy or the chocolate, leading to a burnt flavor that ruins the entire silky chocolate custard.
- Tip: Don’t skip the plastic wrap. Placing the wrap directly on the filling surface is the only way to avoid the tough, rubbery layer that forms as the custard cools in the fridge.
- Tip: Whip the cream to stiff peaks. When making your homemade whipped cream, ensure it is whipped until it holds its shape firmly. This prevents the cream from weeping or sliding off the pie after you garnish it.
- Tip: Sift your dry ingredients. Sifting the cocoa powder and cornstarch together before adding liquid ensures there are no stubborn lumps that might survive the whisking process.
How to Serve This Recipe
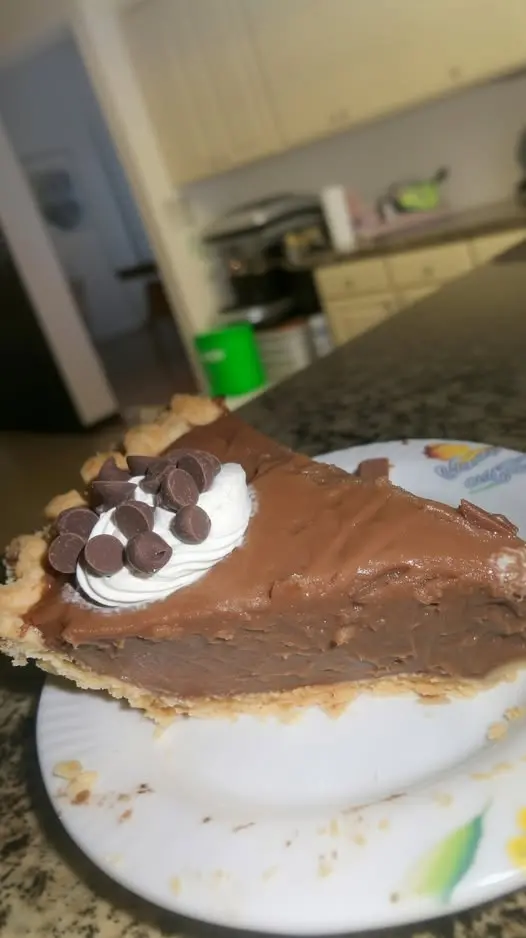
Presentation is key when serving a classic chocolate cream pie recipe. The contrast between the dark chocolate and the snowy white topping is naturally beautiful, but a few extra touches can make it look bakery-quality. Always wait to add the homemade whipped cream until you are within an hour or two of serving. This ensures the topping remains voluminous and fresh.
Garnishes and Toppings
For a professional look, use a vegetable peeler on a room-temperature chocolate bar to create long, elegant curls to scatter over the top of the cream. Alternatively, a light dusting of cocoa powder through a fine-mesh sieve adds a matte, sophisticated finish. If you want a more rustic look, use a large spoon to create deep swirls and “peaks” in the whipped cream, mimicking the look of a classic American diner pie.
Recommended Pairings
Because this pie is quite rich, it pairs excellently with beverages that offer a bit of acidity or bitterness. A strong cup of black coffee or a glass of cold milk is the traditional choice. For an adult gathering, a small glass of ruby port or a creamy stout can complement the bittersweet chocolate notes beautifully. If serving as part of a larger dessert spread, consider pairing it with fresh raspberries or strawberries to cut through the density of the custard.
Storage and Make-Ahead
Storing Leftovers
If you have any pie remaining, it must be stored in the refrigerator. Use a pie carrier or tent a piece of foil over the top, taking care not to crush the whipped cream. The classic chocolate cream pie recipe will stay fresh and delicious for about 3 to 4 days. Note that the crust may begin to soften slightly after the second day as it absorbs moisture from the filling.
Making It Ahead
This is a fantastic make-ahead dessert. You can bake the crust and prepare the chocolate filling up to 24 hours in advance. In fact, the flavor often improves after a day in the fridge. However, always wait to add the whipped cream and garnishes until the day you plan to serve it for the best textural experience. This prevents the cream from absorbing any refrigerator odors or losing its airy structure.
Final Thoughts
Mastering a classic chocolate cream pie recipe is a rewarding milestone for any home baker. It combines the technical skill of making a stovetop custard with the simple joy of a whipped-cream-topped treat. By following the steps to properly temper your eggs and allowing for a full chill time, you’ll produce a dessert that is far superior to anything found in a frozen aisle. The combination of a blind-baked pie crust and a silky chocolate custard creates a harmony of flavors that is both sophisticated and deeply satisfying. Share a slice with friends or family, and you’ll quickly see why this recipe remains an enduring favorite in the world of American desserts.
Frequently Asked Questions
Why did my chocolate pie filling turn out runny?
A runny filling usually happens for two reasons: undercooking the custard or not allowing it to chill long enough. The mixture must reach a point where it produces large bubbles on the stove to activate the cornstarch. Furthermore, the classic chocolate cream pie recipe absolutely requires at least 6 hours of refrigeration to set the fats and starches; cutting into it too early will result in a pudding that doesn’t hold its shape.
Can I freeze a chocolate cream pie?
Freezing is generally not recommended for custard-based pies. The silky chocolate custard contains cornstarch and egg yolks, which can “weep” or separate when thawed, leading to a grainy texture and a soggy crust. It is much better to enjoy this pie fresh from the refrigerator within a few days of making it.
Can I use milk chocolate instead of bittersweet?
You can, but keep in mind that milk chocolate contains more sugar and less cocoa solids. If you use milk chocolate, the pie will be significantly sweeter and the chocolate flavor will be less intense. If you make this swap, you may want to slightly reduce the added sugar in the classic chocolate cream pie recipe to maintain a balanced flavor profile.
How do I prevent lumps in my pudding?
The best way to prevent lumps is to whisk the dry ingredients (sugar, cornstarch, cocoa) together before adding any liquid. Gradually whisk in the milk to create a smooth paste first, then add the rest. Additionally, using a constant whisking motion while the custard thickens on the heat ensures that no part of the mixture sits on the bottom of the pan long enough to clump or scorch.
Do I have to use a pastry crust?
Not at all! While a blind-baked pie crust made of pastry is traditional, a chocolate wafer crust or a graham cracker crust works beautifully. These crumb-based crusts provide a different texture that many people prefer with cream pies, and they are often easier for beginners to handle than traditional rolled dough.
Classic Chocolate Cream Pie

This decadent Chocolate Cream Pie features a rich, silky custard filling in a buttery, flaky crust, topped with a cloud of fresh whipped cream and chocolate shavings.
- 1 (9-inch) pie crust, baked and cooled
- 1 cup granulated sugar
- 1/3 cup cornstarch
- 1/4 tsp salt
- 3 cups whole milk
- 4 large egg yolks
- 6 oz bittersweet chocolate, finely chopped
- 2 tbsp unsalted butter, softened
- 2 tsp pure vanilla extract
- Whipped cream for topping
- 1In a medium saucepan, whisk together the sugar, cornstarch, and salt until well combined.
- 2Gradually whisk in the milk until the mixture is smooth.
- 3Place the egg yolks in a small bowl and lightly beat them. Slowly whisk about 1/2 cup of the milk mixture into the yolks to temper them, then pour the yolk mixture back into the saucepan.
- 4Cook over medium heat, whisking constantly, until the mixture comes to a gentle boil and thickens significantly.
- 5Remove from heat and immediately stir in the chopped chocolate, butter, and vanilla extract until the chocolate is melted and the filling is smooth.
- 6Pour the chocolate filling into the pre-baked pie crust and smooth the top with a spatula.
- 7Press a piece of plastic wrap directly onto the surface of the filling to prevent a skin from forming.
- 8Refrigerate for at least 4 hours, or until completely set.
- 9Before serving, remove the plastic wrap and top with a generous layer of whipped cream.
Keywords: chocolate pie, cream pie, homemade dessert, chocolate custard, baking


