
Chocolate Peanut Butter Lasagna

There is something truly magical about the combination of salty peanut butter and rich chocolate, and this chocolate peanut butter lasagna recipe represents the absolute pinnacle of that pairing. Often referred to as a “lush” or a “dream dessert,” this no-bake chocolate peanut butter dessert features four distinct, decadent layers that come together to create a show-stopping treat. From the crunchy chocolate cookie crust to the velvety peanut butter cream and the silky chocolate pudding, every bite offers a perfect balance of textures and flavors that will satisfy even the most intense sweet tooth.
The beauty of this layered dessert lies in its simplicity and the fact that it requires absolutely no oven time, making it an ideal choice for hot summer days or busy holiday seasons when oven space is at a premium. By following a few simple steps to ensure each layer is properly set, you can achieve professional-looking results that make this easy refrigerator cake look far more complicated than it actually is to assemble. Whether you are hosting a backyard barbecue or looking for the ultimate potluck dessert recipe, this dish is guaranteed to be the first one to disappear.
Why This Recipe Is a Keeper
- No-Bake Convenience: You won’t need to turn on the oven for a single second, making this an excellent stress-free option for entertaining during the warmer months or busy holidays.
- Perfect Flavor Balance: The saltiness of the peanut butter perfectly offsets the sweetness of the chocolate and whipped topping, ensuring the dessert is rich without being cloyingly sweet.
- Make-Ahead Friendly: This dessert actually improves with time as the layers settle, allowing you to prepare it a full day in advance so you can focus on your guests.
- Crowd-Sized Portions: Prepared in a standard 9×13-inch pan, this recipe yields plenty of slices, making it the ultimate choice for large family gatherings or neighborhood potlucks.
Ingredients You’ll Need
Creating a successful chocolate peanut butter lasagna recipe depends on using ingredients that provide both structural stability and high-impact flavor. Each layer serves a specific purpose, from providing a sturdy base to adding a creamy, melt-in-your-mouth finish. Here is what you will need to get started.
- Chocolate Sandwich Cookies: These form the foundation of your dessert. When crushed and mixed with butter, they create a crisp, sturdy crust that holds up well under the heavy creamy layers.
- Cream Cheese: Ensure your cream cheese is completely softened to room temperature. It acts as the stabilizing agent for the peanut butter layer, providing a cheesecake-like tang and structure.
- Creamy Peanut Butter: Standard commercial peanut butter works best here. Avoid “natural” varieties that separate, as the excess oil can prevent the middle layer from setting properly.
- Powdered Sugar: This sweetens the peanut butter layer while helping to thicken it, ensuring it stays in place when you slice into the finished lasagna.
- Whipped Topping: Used in both the peanut butter layer and as the final topping, this provides a light, airy texture that makes the dessert feel “fluffy” rather than dense.
- Instant Chocolate Pudding: Make sure to buy the “instant” variety rather than “cook and serve.” The instant version thickens within minutes when whisked with cold milk, providing that essential silky layer.
- Cold Whole Milk: Using whole milk results in a richer, more stable pudding layer. It is crucial that the milk is very cold to help the instant pudding set up quickly.
- Mini Chocolate Chips or Peanut Butter Cups: These serve as the final garnish, adding a necessary textural contrast and a professional finishing touch to the top of the dessert.
Easy Ways to Change It Up
While the classic version is hard to beat, this chocolate peanut butter lasagna recipe is incredibly versatile. You can easily adapt the flavors to suit your personal preferences or what you have available in your pantry.
- Nut Butter Alternatives: If you have a peanut allergy in the family, you can substitute the peanut butter with almond butter or even a toasted sunflower seed butter for a similar flavor profile.
- Graham Cracker Crust: For a lighter, more honeyed base, swap the chocolate sandwich cookies for crushed graham crackers. This creates a flavor reminiscent of a classic peanut butter cheesecake.
- Double Chocolate Version: If you are a true chocoholic, use chocolate whipped topping instead of the standard white version, and drizzle the final product with extra chocolate ganache.
- Crunchy Texture: Substitute half of the creamy peanut butter for crunchy peanut butter in the second layer to add little bursts of peanut texture throughout the dessert.
How to Make This Chocolate Peanut Butter Lasagna Recipe
Step 1: Prepare the Chocolate Cookie Base
The first step in building your layered dessert is creating a solid foundation. Pulse your chocolate sandwich cookies in a food processor until they reach a fine crumb consistency—there is no need to remove the cream filling, as it helps bind the crust. Mix the crumbs with melted butter until the mixture resembles wet sand. Press this mixture firmly and evenly into the bottom of a 9×13-inch baking dish. Use the bottom of a flat measuring cup to pack it down tightly; this ensures the crust won’t crumble when you lift the slices out later. Place the pan in the freezer for about 10 minutes to firm up while you prepare the next layer.
Step 2: Whip Up the Creamy Peanut Butter Layer
In a large mixing bowl, beat the softened cream cheese until it is completely smooth and free of lumps. This is a critical step, as cold cream cheese will leave streaks in your filling. Once smooth, add the creamy peanut butter and powdered sugar, beating until well combined. Gently fold in a portion of the whipped topping by hand. Folding rather than beating at this stage preserves the air bubbles, keeping the layer light and mousse-like. Spread this mixture carefully over the chilled crust, using an offset spatula to reach the corners without disturbing the cookie base.
Step 3: Mix the Silky Chocolate Pudding
In a separate bowl, whisk together the instant chocolate pudding mixes and the cold whole milk. Continue whisking for about two minutes until the mixture begins to thicken significantly. It is important to work relatively quickly here, as the pudding will continue to set as it sits. Once it has reached a spreadable but firm consistency, pour it over the peanut butter layer. Smooth the top into an even sheet. This layer provides the classic “lasagna” look and a deep cocoa flavor that contrasts beautifully with the salty peanut butter below.
Step 4: Top and Chill for Perfection
The final structural layer is the remaining whipped topping. Spread it gently over the chocolate pudding, taking care not to swirl the two layers together for the cleanest visual appearance. Sprinkle your choice of toppings—mini chocolate chips, chopped peanut butter cups, or even a drizzle of melted peanut butter—across the top. Now comes the most important part of this chocolate peanut butter lasagna recipe: the chill time. Cover the dish and refrigerate for at least 4 to 6 hours, though overnight is even better. This time allows the crust to soften slightly and the pudding to fully hydrate, resulting in perfectly clean, distinct layers.
Pro Tips for Success
- Softened Cream Cheese is Non-Negotiable: If your cream cheese is even slightly cold, your peanut butter layer will be lumpy. Leave it on the counter for at least two hours before starting.
- Clean Slices: For those perfectly defined layers you see in professional photos, wipe your knife clean with a damp paper towel between every single cut.
- Don’t Over-Mix the Whipped Topping: When folding the whipped topping into the peanut butter mixture, use a light hand. Over-mixing will deflate the air and make the layer heavy.
- Use Cold Milk for Pudding: Instant pudding relies on a cold temperature to activate the thickening agents. If your milk is room temperature, the pudding may remain runny.
- Freeze for Extra Firmness: If you are serving this outdoors at a summer party, pop the tray in the freezer for 30 minutes before serving to help it hold its shape in the heat.
How to Serve This Recipe
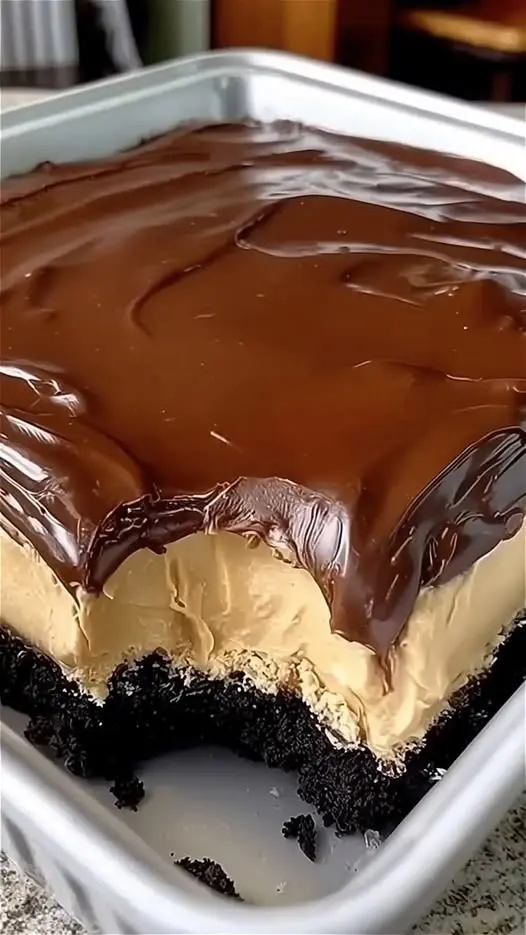
Presentation is half the fun when it comes to a layered dessert. Because the sides of the dish show off the beautiful stripes of chocolate and tan, a clear glass 9×13-inch baking dish is often the best vessel for serving. This allows your guests to see exactly what they are in for before you even cut the first slice.
Garnishes and Toppings
While the recipe is delicious as is, you can elevate the presentation by adding a few extra garnishes just before serving. A drizzle of chocolate syrup or slightly warmed peanut butter over each individual plate adds a gourmet touch. For a bit of extra crunch, you might also consider a sprinkle of crushed roasted peanuts or even a few sea salt flakes to really make the chocolate flavor pop.
Perfect Pairings
Because this dessert is quite rich, it pairs beautifully with a strong cup of black coffee or a cold glass of milk. If you are serving this as part of a larger celebration, it fits right in alongside other potluck dessert recipe classics like fruit skewers or a simple vanilla pound cake, providing a heavy, indulgent option to balance out lighter treats.
Storage and Make-Ahead
This is one of those rare desserts that actually tastes better the day after it is made. The flavors have more time to meld, and the crust develops a slightly softer, more cohesive texture that makes it easier to eat with a fork.
Storing Leftovers
Keep any leftover chocolate peanut butter lasagna recipe in the refrigerator, tightly covered with plastic wrap or a fitted lid. It will stay fresh and delicious for up to 4 or 5 days. Note that the cookie crust may eventually become quite soft, but the flavor will remain excellent.
Freezing Instructions
If you want to make this even further in advance, this dessert freezes beautifully. Wrap the entire pan in a double layer of plastic wrap and a layer of aluminum foil. It can be frozen for up to one month. To serve, thaw it in the refrigerator for several hours. You can also eat it semi-frozen for a texture that resembles a high-end ice cream cake.
Final Thoughts
Mastering this chocolate peanut butter lasagna recipe is a surefire way to become the hero of any gathering. It strikes the perfect balance between an impressive, multi-layered appearance and a straightforward, no-fuss preparation method. By focusing on quality ingredients and allowing for plenty of chilling time, you ensure a dessert that is as structurally sound as it is delicious. This no-bake chocolate peanut butter dessert proves that you don’t need an oven to create something truly spectacular. Once you see how quickly this disappear from the table, it is sure to become a permanent fixture in your dessert rotation.
Frequently Asked Questions
Can I use homemade whipped cream instead of store-bought whipped topping?
While you can use homemade whipped cream, you must stabilize it first (using gelatin or a commercial stabilizer) if you want the dessert to last more than a few hours. Traditional whipped topping is specifically designed to hold its shape for days, which is why it is the standard choice for this layered dessert. If you use unstabilized whipped cream, the layers may eventually begin to weep and collapse.
Why is my pudding layer not thickening properly?
The most common reason for runny pudding is using too much milk or using the “cook and serve” variety by mistake. Ensure you are using “instant” pudding and that your milk is very cold. Additionally, if you used a low-fat or non-dairy milk alternative, the pudding may not set as firmly as it would with whole cow’s milk. If it’s already mixed and runny, you can try whisking in an extra tablespoon of pudding mix if you have it.
Can I make this recipe in a different size pan?
Yes, you can half the recipe and use an 8×8-inch square pan for a smaller family gathering. The thickness of the layers will remain roughly the same. Conversely, if you need to feed an even larger crowd, you can make two 9×13 pans, as the effort to double the ingredients is very minimal since you are already doing the prep work. Just ensure you have enough fridge space for both dishes to chill properly.
How do I get the first slice out without it falling apart?
The first slice is notoriously difficult in any 9×13 dessert. To make it easier, ensure the crust is well-chilled before adding the layers. You can also lightly grease the bottom of the pan with a tiny bit of butter or cooking spray before pressing in the crumbs. Most importantly, don’t rush the chilling time—a well-set chocolate peanut butter lasagna recipe is much easier to slice cleanly than one that is still room temperature in the middle.
Is there a way to make this recipe gluten-free?
Absolutely. To make a gluten-free version of this potluck dessert recipe, simply swap the standard chocolate sandwich cookies for a gluten-free brand (most major grocery stores now carry these). The rest of the core ingredients—peanut butter, cream cheese, and pudding mix—are generally gluten-free, but always check the labels on your specific brands to be certain there is no hidden flour or cross-contamination.


