
Coconut Layer Cake

There is something undeniably elegant about a towering, snow-white cake adorned with a flurry of coconut flakes. This homemade coconut layer cake recipe delivers a sophisticated dessert that strikes the perfect balance between a tender, velvety crumb and the tropical, nutty sweetness of real coconut. Unlike many store-bought options that rely on artificial extracts, this version utilizes high-quality fats and real coconut milk to achieve a flavor profile that is both deep and refreshing. It is a showstopper that feels just as appropriate for a formal spring celebration as it does for a cozy Sunday afternoon tea.
While multi-layered cakes can often feel intimidating to the home baker, the beauty of this fluffy white cake lies in its straightforward technique and reliable results. By focusing on the temperature of your ingredients and the aeration of your batter, you can create a professional-quality cake that remains incredibly moist for days. This guide will walk you through the nuances of building a moist coconut cake that will undoubtedly become the centerpiece of your dessert repertoire.
Why This Recipe Is a Keeper
- Unmatched Texture: The combination of cake flour and properly whipped egg whites results in a fine, delicate crumb that is light enough to melt in your mouth but sturdy enough to hold layers of rich frosting.
- Authentic Flavor: By incorporating full-fat coconut milk directly into the batter, we ensure the tropical flavor is baked into every bite, rather than just sitting on top of the frosting.
- Impressive Presentation: The natural beauty of the toasted coconut topping creates a rustic yet refined look that requires very little professional decorating skill to achieve.
- Make-Ahead Friendly: The high moisture content of the cake layers means they actually improve in flavor and texture when prepared a day in advance, making it perfect for stress-free entertaining.
Ingredients You’ll Need
The success of any homemade coconut layer cake recipe depends on the quality and function of its components. Selecting the right type of flour and coconut products is essential for achieving that signature light-yet-moist consistency that defines a classic Southern-style coconut cake.
- Cake Flour: This is non-negotiable for a truly tender cake. Cake flour has a lower protein content than all-purpose flour, which prevents excess gluten from developing and ensures the crumb remains soft and airy.
- Unsalted Butter: Ensure your butter is softened to room temperature (about 65-68°F). This allows it to properly trap air during the creaming process, which provides the cake’s primary lift.
- Canned Coconut Milk: Use full-fat canned coconut milk rather than the carton version used for cereal. The higher fat content contributes to the moist coconut cake texture and provides a much more concentrated flavor.
- Egg Whites: Using only the whites keeps the cake a brilliant snowy white and contributes to a lighter, more cloud-like structure compared to whole eggs.
- Sweetened Shredded Coconut: This is used both in the batter for texture and as a coating for the exterior. For the outside, consider a mix of shredded and large flakes for visual interest.
- Cream Cheese: If you are opting for a cream cheese coconut frosting, ensure it is the full-fat block variety, which provides the necessary stability for layering.
- Coconut and Vanilla Extracts: A combination of both provides a well-rounded flavor. The vanilla adds warmth, while the coconut extract amplifies the tropical notes without making it taste “perfumey.”
Simple Swaps and Variations
Toasted vs. Untoasted Coconut: While traditional recipes use raw shredded coconut for a pure white look, topping the cake with a toasted coconut topping adds a wonderful crunch and a deeper, caramelized nutty flavor that contrasts beautifully with the sweet frosting.
The Lemon Twist: For a bright, citrusy variation, add a layer of tart lemon curd between the cake layers before applying the frosting. The acidity of the lemon cuts through the richness of the coconut and cream cheese perfectly.
Pineapple Infusion: Create a “Piña Colada” inspired cake by adding finely crushed, well-drained pineapple to the frosting or as a thin layer between the sponges. This adds a juicy, tropical element that is especially popular in the summer months.
Dairy-Free Adaptation: This recipe adapts well to dairy-free needs. Substitute the butter with a high-quality vegan butter stick and use a coconut-based cream cheese or a simple coconut milk glaze for the exterior.
How to Make This Homemade Coconut Layer Cake
Step 1: Cream the Butter and Sugar for Aeration
The foundation of a light fluffy white cake is the creaming process. Begin by beating your room-temperature butter and granulated sugar together on medium-high speed for at least 3 to 5 minutes. You are looking for the mixture to turn noticeably pale, almost white, and to double in volume. This step creates a web of tiny air bubbles that will expand in the oven, giving the cake its lift. If you skip this or cut it short, the cake will likely be dense and heavy rather than airy.
Step 2: Sift and Combine the Dry Ingredients
Sifting the cake flour, baking powder, and salt is a critical step that removes any lumps and further aerates the flour. In a separate bowl, whisk these together to ensure the leavening agents are evenly distributed. Even distribution prevents “tunneling,” which are large, unsightly holes in the finished cake. By ensuring a uniform mixture, you guarantee that every slice of your homemade coconut layer cake recipe has a consistent, professional crumb.
Step 3: Alternate the Wet and Dry Ingredients
To maintain the emulsion you created during the creaming stage, you must add the dry ingredients and the coconut milk alternately. Start with one-third of the flour mixture, then half of the coconut milk, and repeat, ending with the flour. Mix only until just combined after each addition. Over-mixing at this stage will activate the gluten in the flour, turning your tender cake into something tough and bread-like. Use a low speed on your mixer or finish the final mix by hand with a rubber spatula.
Step 4: Gently Fold in the Whipped Egg Whites
In a clean, grease-free bowl, whip your egg whites until they reach stiff peaks. These whites act as a secondary leavening agent. Carefully fold them into your thick coconut batter using a wide spatula. Use a “cut and fold” motion: cut through the center, scrape the bottom, and fold the batter over the top. The goal is to incorporate the whites without deflating the air you’ve worked so hard to build. This is what transforms the batter into a truly fluffy white cake.
Step 5: Bake and Monitor for Doneness
Divide the batter evenly between prepared pans. Bake until the tops are springy to the touch and a wooden skewer inserted into the center comes out clean or with just a few moist crumbs. Avoid over-baking, as coconut cakes can dry out quickly due to the absorption qualities of the shredded coconut. Let the cakes cool in the pans for about 10 minutes before transferring them to a wire rack. Cooling completely is essential; if the layers are even slightly warm, your frosting will melt and slide right off.
Pro Tips for the Best Results
- Tip: Use room temperature ingredients. Cold egg whites or cold coconut milk can cause the butter to seize, resulting in a curdled batter and an uneven bake.
- Tip: For the most moist coconut cake, do not over-bake. Check the cakes 5 minutes before the timer is set to go off. Every oven is different, and even two minutes can make the difference between moist and dry.
- Tip: If using a cream cheese coconut frosting, keep the cake refrigerated. Cream cheese frosting is softer than buttercream and will lose its structure in a warm room.
- Tip: Toast your coconut flakes in a dry skillet over medium heat for 3-5 minutes, stirring constantly. This brings out the natural oils and provides a much better flavor than raw flakes.
- Tip: Level your cakes. Use a serrated knife to trim the domed tops off your cooled cake layers. This ensures a stable, flat surface for stacking and a professional, even look when sliced.
Troubleshooting Common Problems
Why Is My Cake Dense Instead of Fluffy?
A dense cake usually stems from two issues: under-creaming the butter and sugar or over-mixing the batter after the flour is added. Ensure you cream the butter until it is significantly lighter in color. Once the flour touches the wet ingredients, handle the batter as gently as possible to avoid developing gluten.
Why Did the Coconut Sink to the Bottom?
If you find that the shredded coconut has settled at the bottom of your layers, it is likely because the batter was too thin or the coconut pieces were too large and heavy. Using finely shredded coconut or tossing the coconut in a tablespoon of flour before adding it to the batter can help keep it suspended.
Why Is My Frosting Too Runny?
This often happens with cream cheese frosting if the butter or cream cheese was too soft, or if you over-beat it. To fix this, sift in a little more powdered sugar or place the frosting in the refrigerator for 30 minutes to firm up before attempting to frost the cake.
How to Serve This Cake
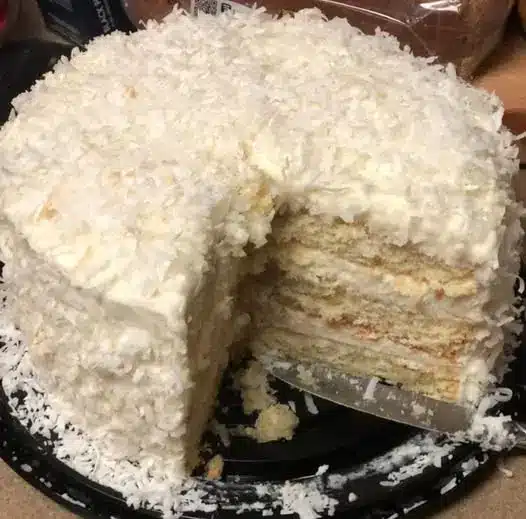
Presentation is half the joy of a homemade coconut layer cake recipe. Once the cake is fully frosted, generously press shredded coconut into the sides and top. For a more dramatic look, use a combination of fine shreds and large toasted coconut chips. This provides a beautiful contrast between the stark white frosting and the golden-brown flakes.
Suggested Accompaniments
While this cake is a star on its own, it pairs beautifully with fresh tropical fruits. Serve a slice alongside a few macerated strawberries or a wedge of fresh mango to balance the richness. For a beverage pairing, a crisp glass of Prosecco or a hot cup of Earl Grey tea complements the floral and nutty notes of the coconut perfectly.
Slicing for Success
To get clean, professional-looking slices, use a long, thin serrated knife. Dip the knife in hot water and wipe it clean between every single cut. This prevents the frosting and coconut flakes from dragging through the delicate fluffy white cake layers, ensuring every guest receives a perfect piece.
Storage and Make-Ahead
Storing Leftovers
Because of the dairy in the frosting, this cake should be stored in the refrigerator. Use a cake dome or a large airtight container to prevent the cake from absorbing other odors in the fridge. Properly stored, it will stay fresh and delicious for up to 4 to 5 days. For the best texture, let a slice sit at room temperature for about 20 minutes before eating.
Freezing Instructions
You can freeze the individual cake layers (unfrosted) very effectively. Wrap the cooled layers tightly in plastic wrap and then a layer of aluminum foil. They will stay fresh for up to 3 months. Thaw them overnight in the refrigerator before frosting. You can also freeze the fully assembled cake, though the texture of the coconut flakes may soften slightly upon thawing.
Making It Ahead
This is an ideal make-ahead dessert. You can bake the layers and make the frosting a day in advance. Assemble the cake the evening before you plan to serve it. This “rest” allows the moisture from the frosting to slightly permeate the layers, resulting in an even more moist coconut cake experience.
Final Thoughts
Mastering a homemade coconut layer cake recipe is a rewarding milestone for any baker. It is a dessert that feels nostalgic and timeless, yet always manages to impress at the table. By focusing on quality ingredients—specifically the cake flour and full-fat coconut milk—and exercising patience during the creaming and folding stages, you can produce a bakery-quality result in your own kitchen. Whether you are celebrating a major milestone or simply want to elevate a weekend dinner, this cake provides a taste of the tropics that is truly unparalleled.
Frequently Asked Questions
Can I use desiccated coconut instead of shredded coconut?
It is best to use shredded coconut for this recipe. Desiccated coconut is much drier and more finely ground, which can soak up too much moisture from the batter and make the cake crumbly. If you only have desiccated coconut, use it only for the exterior decoration, not inside the batter itself.
Is it possible to make this cake in a 9×13-inch pan?
Yes, you can turn this homemade coconut layer cake recipe into a sheet cake. Simply pour the batter into a greased 9×13-inch baking pan and increase the baking time by 10-15 minutes. It won’t have the height of a layer cake, but it will be just as delicious and much easier to transport for potlucks.
Can I use coconut cream instead of coconut milk?
Coconut cream is much thicker and has a higher fat content than canned coconut milk. While it will add a lot of flavor, it can make the cake overly heavy or greasy. Stick to full-fat canned coconut milk for the best balance of moisture and structure in your fluffy white cake.
How do I stop my cake layers from sticking to the pan?
The best method is to grease the pans with butter, then line the bottoms with a circle of parchment paper. Grease the top of the parchment paper as well. This ensures that even the most delicate moist coconut cake layers will release perfectly every time without tearing.
Can I use all-purpose flour if I don’t have cake flour?
You can make a substitute by measuring one cup of all-purpose flour, removing two tablespoons, and replacing them with two tablespoons of cornstarch. Sift this mixture together several times. However, for the most professional result, actual store-bought cake flour is highly recommended for its superior texture.
Moist Coconut Layer Cake

A show-stopping Coconut Layer Cake that is incredibly moist, fluffy, and infused with tropical flavor. Perfect for birthdays, holidays, or any special occasion, this cake features tender layers and a rich cream cheese frosting covered in shredded coconut.
- 3 cups all-purpose flour
- 1 tablespoon baking powder
- 1/2 teaspoon salt
- 1 cup unsalted butter, softened
- 2 cups granulated sugar
- 4 large eggs
- 1 teaspoon vanilla extract
- 1 teaspoon coconut extract
- 1 cup canned full-fat coconut milk
- 2 cups sweetened shredded coconut
- 1Preheat oven to 350°F (175°C). Grease and flour two 9-inch round cake pans.
- 2In a medium bowl, whisk together the flour, baking powder, and salt.
- 3In a large bowl or stand mixer, cream the butter and sugar until light and fluffy. Add the eggs one at a time, beating well after each addition. Stir in the vanilla and coconut extracts.
- 4Gradually add the dry ingredients to the wet ingredients, alternating with the coconut milk, beginning and ending with the flour mixture. Mix until just combined.
- 5Divide the batter evenly between the prepared pans and smooth the tops.
- 6Bake for 30-35 minutes, or until a toothpick inserted into the center comes out clean.
- 7Let the cakes cool in the pans for 10 minutes before transferring to a wire rack to cool completely.
- 8Frost with your favorite cream cheese frosting and press shredded coconut into the top and sides of the cake.
Keywords: coconut cake, layer cake, dessert recipes, baking, tropical cake


