
Homemade Dinner Rolls

There is nothing quite like the aroma of freshly baked bread wafting through a home, promising a level of comfort that only a best homemade dinner rolls recipe can provide. These rolls are the quintessential side dish, characterized by a golden-brown exterior that gives way to an impossibly soft, pillowy interior. Whether you are preparing a centerpiece holiday meal or simply want to elevate a Sunday family dinner, mastering the art of the yeast roll is a culinary milestone that brings immense satisfaction to the baker and joy to everyone at the table.
While working with yeast can sometimes feel intimidating, this approach focuses on a reliable method that ensures a successful rise and a tender crumb every time. By understanding how simple pantry staples transform into fluffy yeast rolls, you can move away from store-bought options and embrace the superior flavor of bread made from scratch. This guide will walk you through the nuances of dough hydration, proofing, and baking to ensure your results are consistently professional.
Why This Recipe Is a Keeper
- Unmatched Texture: These soft pull-apart rolls feature a delicate, airy structure that remains moist for days, thanks to the enrichment of butter and milk.
- Reliable Results: By using a straightforward proofing process, this recipe removes the guesswork often associated with yeast breads, making it accessible for beginners.
- Versatile Pairing: The neutral yet buttery flavor profile complements everything from savory Thanksgiving turkey to hearty beef stews or even simple jams.
- Make-Ahead Friendly: You can easily prepare the dough in advance, allowing you to enjoy the luxury of fresh bread without the stress of last-minute prep.
Ingredients You’ll Need
Success in bread baking starts with selecting the right components. Each ingredient in this easy dinner rolls preparation serves a specific chemical and structural purpose, contributing to the final height, color, and mouthfeel of the rolls.
- All-Purpose or Bread Flour: Flour provides the protein needed to build gluten. Bread flour offers a chewier texture, while all-purpose flour results in a lighter, more delicate roll.
- Active Dry or Instant Yeast: This is the leavening agent responsible for the rise. It consumes the sugars and releases carbon dioxide, creating those beautiful air pockets.
- Whole Milk: The fat and sugar in milk tenderize the dough and contribute to a richer flavor compared to using water alone.
- Unsalted Butter: Butter adds flavor and coats the gluten strands, ensuring the rolls are tender rather than tough.
- Granulated Sugar: A small amount of sugar feeds the yeast and helps the crust achieve a beautiful golden-brown caramelization in the oven.
- Large Egg: The egg acts as an emulsifier and provides structure, helping the rolls keep their shape while adding a hint of richness to the dough.
- Fine Sea Salt: Salt is essential for flavor, but it also regulates the yeast activity to prevent the dough from rising too quickly and collapsing.
Variations and Smart Swaps
- Garlic and Herb: Brush the tops of the rolls with melted butter mixed with minced garlic, dried oregano, and parsley immediately after they come out of the oven.
- Honey Wheat: Replace half of the all-purpose flour with whole wheat flour and swap the granulated sugar for an equal amount of honey for a nuttier, wholesome flavor.
- Cheesy Center: Flatten each dough ball slightly during the shaping stage, place a small cube of sharp cheddar or mozzarella in the center, and pinch the dough closed to create stuffed soft pull-apart rolls.
- Vegan Adaptation: Use a high-quality plant-based butter and unsweetened almond or soy milk, and replace the egg with a flaxseed meal slurry or additional milk.
How to Make the Best Homemade Dinner Rolls Recipe
Step 1: Activate the Yeast and Mix the Dough
The first step involves waking up the yeast. By combining warm milk with sugar and yeast, you create an environment where the yeast can thrive. If using active dry yeast, wait for the mixture to become foamy, which indicates the yeast is alive and active. Once ready, you will gradually incorporate the melted butter, egg, and flour. The goal is to form a shaggy dough that begins to pull away from the sides of the bowl. This initial mixing stage is crucial for ensuring that all ingredients are evenly distributed before the heavy work of kneading begins.
Step 2: Knead Until Smooth and Elastic
Kneading is where the magic happens. Whether you are using a stand mixer or working by hand on a floured surface, you are physically aligning the gluten proteins. You’ll know the dough is ready when it feels smooth, slightly tacky but not sticky, and passes the “windowpane test”—where a small piece of dough can be stretched thin enough to see light through it without tearing. This strength is what allows the best homemade dinner rolls recipe to hold its shape and rise significantly during the proofing stages.
Step 3: The First Rise for Flavor and Volume
Place the kneaded dough in a lightly greased bowl and cover it with a damp cloth or plastic wrap. You want to leave it in a warm, draft-free spot until it has doubled in size. During this time, the yeast produces gases that expand the gluten network. This fermentation process doesn’t just provide lift; it is also where the complex, yeasty flavor of the bread develops. Depending on the temperature of your kitchen, this can take anywhere from one to two hours. Patience here is key to achieving that signature airy texture.
Step 4: Shape the Rolls and Second Proof
Once the dough has doubled, gently punch it down to release excess air. Divide the dough into equal portions—using a kitchen scale is the best way to ensure even baking. Roll each piece into a tight, smooth ball by cupping your hand over the dough and moving it in a circular motion against the counter. Arrange the balls in a prepared baking pan. They will need a second, shorter rise, often called “proofing,” which allows the dough to relax and expand again, ensuring the rolls touch each other and create those soft, pull-apart edges.
Step 5: Bake Until Golden and Fragrant
Preheat your oven and bake the rolls until the tops are a deep golden brown. You are looking for a visual cue of even browning across the entire batch. If you tap the top of a roll, it should sound slightly hollow. For an extra touch of decadence, brush the tops with additional melted butter the moment they exit the oven. This adds a beautiful sheen and softens the top crust. Let the rolls rest in the pan for just a few minutes before transferring them to a wire rack to prevent the bottoms from becoming soggy.
Pro Tips for Success
- Check Your Temperature: Ensure your milk is between 105°F and 115°F. If it is too hot, it will kill the yeast; if it is too cold, the yeast will stay dormant and your easy dinner rolls won’t rise.
- Avoid Over-Flouring: It is tempting to keep adding flour if the dough feels sticky, but too much flour results in dense, dry rolls. Use just enough to make the dough manageable.
- Create a Warm Environment: If your kitchen is cold, turn your oven on for one minute, then turn it off and place the dough inside. The residual heat creates a perfect proofing box.
- Measure by Weight: For the most consistent results, use a digital scale to measure your flour. Measuring by volume (cups) can vary significantly depending on how the flour is packed.
- The Butter Brush: Don’t skip the post-bake butter wash. It adds a professional finish and a salty-sweet flavor that defines the best homemade dinner rolls recipe experience.
Troubleshooting Common Problems
Why are my rolls dense and heavy?
This usually happens if the dough didn’t rise long enough or if too much flour was added during the kneading process. Ensure your yeast is fresh and that you allow the dough to fully double in size during both the first and second rise. Heavy dough can also be a result of under-kneading, which prevents the gluten from supporting the air bubbles.
Why did my dough fail to rise at all?
The most common culprit is dead yeast. Always check the expiration date on your yeast packet. Additionally, if the liquid used to dissolve the yeast was too hot (over 120°F), it likely neutralized the yeast. Another possibility is a kitchen that is too cold, which significantly slows down the fermentation process.
Why are the rolls brown on top but raw in the middle?
This is often caused by an oven temperature that is too high. The outside cooks and browns before the heat can penetrate the center of the rolls. If you notice the rolls browning too quickly, you can tent them loosely with aluminum foil for the remainder of the baking time to protect the tops.
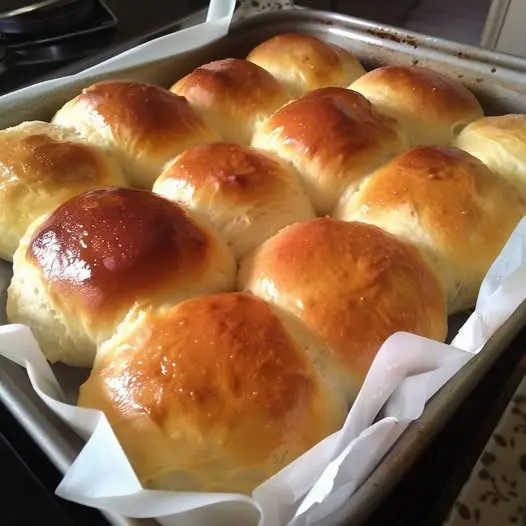
How to Serve Homemade Dinner Rolls
These rolls are best served warm, ideally within thirty minutes of leaving the oven. The internal crumb is at its most tender during this window. Place them in a basket lined with a clean cloth napkin to trap the heat while they sit on the dinner table. Providing a small dish of softened, salted butter or a compound butter infused with honey or herbs allows guests to customize their rolls.
While they are a staple for traditional holiday feasts, don’t overlook their potential as mini-sandwich buns. Leftover fluffy yeast rolls are perfect for making sliders with pulled pork, chicken salad, or even ham and Swiss cheese. Their sturdy yet soft structure holds up well to various fillings without falling apart, making them a favorite for post-holiday lunches.
Storage and Make-Ahead
Storing Leftovers
Once completely cooled, store the rolls in an airtight container or a zip-top bag at room temperature for up to three days. To maintain their softness, avoid storing them in the refrigerator, as the cold environment can actually cause bread to go stale faster through a process called starch retrogradation.
Freezing
These rolls freeze beautifully. You can freeze them after they are baked and cooled; simply wrap them tightly in foil and place them in a freezer bag for up to three months. Alternatively, you can freeze the shaped, unrisen dough balls. When ready to bake, let them thaw and rise in a warm spot before proceeding with the baking instructions.
Reheating
To restore that “just-baked” feel, wrap the rolls in aluminum foil and warm them in a 350°F oven for 7 to 10 minutes. This gently heats them through without drying out the exterior. A quick 10-second zap in the microwave also works in a pinch, though the oven method provides the best texture.
Final Thoughts
Mastering the best homemade dinner rolls recipe is a rewarding journey that connects you to the timeless tradition of bread making. While it requires a bit of time for proofing, the actual hands-on work is minimal compared to the incredible results. There is a deep sense of pride in placing a pan of golden, make-ahead yeast rolls on the table, knowing they were crafted with care. Once you taste the difference that fresh yeast and real butter make, you’ll find it hard to go back to anything else. Embrace the process, enjoy the tactile nature of the dough, and prepare for your kitchen to smell like the best bakery in town.
Frequently Asked Questions
Can I use instant yeast instead of active dry yeast?
Yes, you can substitute instant yeast (also called rapid-rise yeast) for active dry yeast in a 1:1 ratio. The main difference is that instant yeast does not strictly require “blooming” in warm liquid; you can mix it directly with the dry ingredients. Additionally, your rise times may be slightly faster, so keep a close eye on the dough as it doubles in size.
How do I make these rolls ahead of time?
To make make-ahead yeast rolls, you can perform the first rise in the refrigerator overnight. The cold temperature slows down the yeast, allowing for a long, slow fermentation that actually improves the flavor. The next day, shape the cold dough into balls, let them come to room temperature and rise until doubled, and then bake as directed.
Why did my rolls turn out dry and crumbly?
Dryness is usually caused by over-baking or adding too much flour to the dough. If the rolls stay in the oven too long, the moisture evaporates, leaving behind a crumbly texture. Ensure you are using the correct oven temperature and checking for doneness a few minutes early. Also, using milk instead of water helps provide the fat necessary to keep the crumb moist.
Can I make this recipe by hand without a stand mixer?
Absolutely. While a stand mixer makes the process easier, kneading by hand is a great way to feel the development of the gluten. It will take about 8 to 10 minutes of vigorous kneading to achieve the same smooth, elastic consistency that a mixer provides. It is an excellent workout and a very satisfying way to interact with your food.
What is the best way to get a shiny, golden top?
The best way to achieve a professional shine is to use an egg wash (one egg beaten with a tablespoon of water or milk) brushed over the rolls just before they go into the oven. For a softer, more matte golden finish, you can brush them with plain milk before baking. Brushing with butter *after* baking adds flavor and a slight sheen but won’t change the crust color.
Homemade Dinner Rolls

Soft, buttery, and fluffy rolls that are perfect for any dinner table. This recipe yields a classic yeast roll with a tender crumb and golden crust.
- 1 cup warm milk (110°F)
- 2 1/4 tsp active dry yeast
- 1/4 cup granulated sugar
- 1/3 cup unsalted butter, melted
- 1 tsp salt
- 1 large egg
- 3.5 to 4 cups all-purpose flour
- 1In a large bowl, whisk the warm milk, sugar, and yeast. Let stand for 5-10 minutes until foamy.
- 2Add the melted butter, salt, and egg. Stir until combined.
- 3Gradually add 3 cups of flour and stir with a wooden spoon or dough hook until a soft dough forms. Add more flour, 1/4 cup at a time, until the dough is smooth and elastic.
- 4Knead for 5-7 minutes on a floured surface.
- 5Place dough in a greased bowl, cover, and let rise in a warm place for 1 hour.
- 6Punch down dough and divide into 15 pieces. Shape into balls and place in a greased 9x13 inch pan.
- 7Cover and let rise for 30 minutes.
- 8Bake at 375°F for 15-18 minutes until golden brown.
Keywords: dinner rolls, yeast rolls, homemade bread, easy rolls, dinner side dish


