
Berry Cobbler

There is nothing quite like the sight of a bubbling, fruit-filled dessert fresh out of the oven to signal the height of the season. This easy homemade berry cobbler recipe captures the essence of summer with its jammy, multi-berry filling and a golden-brown, buttery biscuit topping that strikes the perfect balance between soft and crisp. Unlike a pie, which requires the patience for chilling and rolling dough, a cobbler is wonderfully rustic and forgiving, making it the ideal project for both novice bakers and seasoned pros who want a high-reward treat with minimal fuss.
The beauty of this summer berry dessert lies in the contrast of textures. As the berries bake, they release their natural juices, creating a thick, glossy sauce that seeps into the bottom of the sweet, cake-like topping. Whether you are using a mix of blackberries, blueberries, and raspberries or sticking to a single favorite, the result is a vibrant, comforting dish that practically begs for a scoop of cold vanilla ice cream. This easy baking recipe is designed to be approachable, letting the natural sweetness of the fruit shine through while providing a reliable technique for a perfect biscuit every time.
Why You’ll Love This Recipe
- Minimal Effort, Maximum Flavor: This fruit cobbler from scratch requires no complicated equipment or advanced pastry skills, coming together in just a few minutes of active prep time.
- Versatile Fruit Options: You can easily adapt the fresh berry filling based on what is in season or what you happen to have in your freezer, making it a year-round favorite.
- Superior Texture: The biscuit topping is engineered to stay light and fluffy on the inside while developing a signature crunch on the surface that holds up against the juicy fruit.
- Crowd-Pleasing Appeal: It is the ultimate “bring-along” dessert for potlucks and family gatherings, as it tastes just as delicious at room temperature as it does warm from the oven.
Ingredients You’ll Need
While the final dish looks and tastes sophisticated, the ingredient list is surprisingly humble. Most of these items are likely already in your pantry, allowing you to whip up a sweet biscuit topping whenever the craving for something warm and fruity strikes. Focus on quality, especially with the fruit, to ensure the best flavor profile.
- Mixed Berries: A combination of strawberries, blueberries, raspberries, or blackberries works best. The mix provides a complex balance of tartness and sweetness that a single berry sometimes lacks.
- Granulated Sugar: Used in both the filling and the dough, sugar helps macerate the berries to release their juices and provides the necessary sweetness to the biscuit.
- Cornstarch: This is a crucial thickening agent. It ensures the berry juices turn into a luscious sauce rather than a watery mess that makes the topping soggy.
- Lemon Juice and Zest: A touch of acidity is essential to brighten the fresh berry filling and highlight the natural floral notes of the fruit.
- All-Purpose Flour: This provides the structure for the cobbler topping, keeping it sturdy enough to scoop but tender enough to melt in your mouth.
- Baking Powder: This leavening agent is responsible for the “lift” in the biscuits, creating those characteristic nooks and crannies that soak up the berry juice.
- Cold Unsalted Butter: Using cold butter is the secret to a flaky topping. As the butter melts in the oven, it creates steam, which leaves behind tiny pockets of air.
- Whole Milk or Heavy Cream: This binds the dough together and adds a rich, milky flavor to the biscuit layer.
Variations and Smart Swaps
Frozen Fruit Alternative: If fresh berries aren’t available, you can use frozen berries without thawing them first. Just be sure to add an extra teaspoon of cornstarch to account for the extra moisture frozen fruit often carries.
Switch Up the Berries: Don’t feel limited to a “triple berry” blend. This easy homemade berry cobbler recipe works beautifully with just blueberries and lemon, or even a combination of blackberries and stone fruits like sliced peaches.
Add a Spice Kick: For a warmer flavor profile, add half a teaspoon of ground cinnamon or a pinch of nutmeg to the flour mixture. This adds a cozy, autumnal feel to the dessert.
Gluten-Free Option: You can substitute the all-purpose flour with a high-quality 1-to-1 gluten-free baking blend. Look for one that contains xanthan gum to ensure the biscuit topping maintains its structure.
How to Make This Easy Homemade Berry Cobbler Recipe
Step 1: Prepare the Berry Filling
Start by tossing your choice of berries with sugar, cornstarch, and lemon juice directly in your baking dish or a separate bowl. This step allows the sugar to begin drawing out the juices while the cornstarch coats every piece of fruit. Ensure the berries are evenly coated so the thickener is distributed throughout the dish, preventing any thin or runny spots in the final bake. If your strawberries are particularly large, be sure to halve or quarter them so they cook at the same rate as the smaller blueberries and raspberries.
Step 2: Whisk the Dry Ingredients for the Topping
In a medium mixing bowl, combine your flour, sugar, baking powder, and a pinch of salt. Use a whisk to ensure there are no clumps and that the leavening agent is thoroughly incorporated. This step is vital for an even rise. If the baking powder isn’t well-mixed, you might end up with some parts of the cobbler topping being dense while others are overly airy.
Step 3: Cut in the Cold Butter
Incorporate the cold, cubed butter into the dry ingredients using a pastry cutter or your fingertips. You are looking for a texture that resembles coarse crumbs, with some pea-sized pieces of butter still visible. These small chunks of fat are what create a tender, flaky sweet biscuit topping. Avoid overworking the dough with your hands, as the heat from your palms can melt the butter prematurely, leading to a tough, bread-like texture instead of a light biscuit.
Step 4: Form the Biscuit Dough
Gently stir in the milk or heavy cream until a soft, shaggy dough forms. It is important to stop mixing as soon as the flour streaks disappear. Over-mixing develops gluten, which is the enemy of a tender cobbler. The dough should be thick and slightly sticky, not smooth like a cookie dough. This rustic texture is exactly what gives a cobbler its signature “cobbled stone” appearance once it is dolloped over the fruit.
Step 5: Assemble and Bake
Drop spoonfuls of the dough over the prepared fresh berry filling. You don’t need to cover the fruit completely; leaving small gaps allows steam to escape and lets the beautiful purple and red juices bubble up around the golden biscuits. Place the dish in a preheated oven and bake until the fruit is vigorously bubbling in the center and the topping is a deep golden brown. The bubbling is a key indicator that the cornstarch has reached the temperature necessary to thicken the sauce properly.
Pro Tips for Success
Tip: Use Cold Ingredients. Just like making pie crust or traditional biscuits, keeping your butter and liquid (milk or cream) as cold as possible is the number one way to ensure a flaky, tender topping.
Tip: Don’t Skimp on the Cornstarch. Berries release a surprising amount of liquid. If you omit the thickener, you’ll end up with a berry soup. The cornstarch transforms that liquid into a jammy glaze.
Tip: Watch the Bubbles. Don’t pull the cobbler out of the oven just because the top looks brown. Look for the fruit juices bubbling in the center of the dish to ensure the filling is fully cooked and thickened.
Tip: Let It Rest. It is tempting to dig in immediately, but letting the cobbler sit for 15–20 minutes after baking allows the juices to set further, making it much easier to serve.
Troubleshooting Common Problems
Why Is My Cobbler Filling Too Runny?
A runny filling usually happens for two reasons: either not enough thickener (cornstarch) was used, or the cobbler didn’t bake long enough. The filling must reach a full boil to activate the cornstarch. If you used frozen berries, they release more water, so an extra teaspoon of cornstarch is often necessary to compensate.
Why Is My Topping Dense or Hard?
This is usually the result of over-mixing the dough or using butter that was too soft. When the flour is overworked, gluten develops, making the biscuit tough. Always mix just until combined and ensure your butter stays cold until it hits the oven.
How to Serve This Berry Cobbler
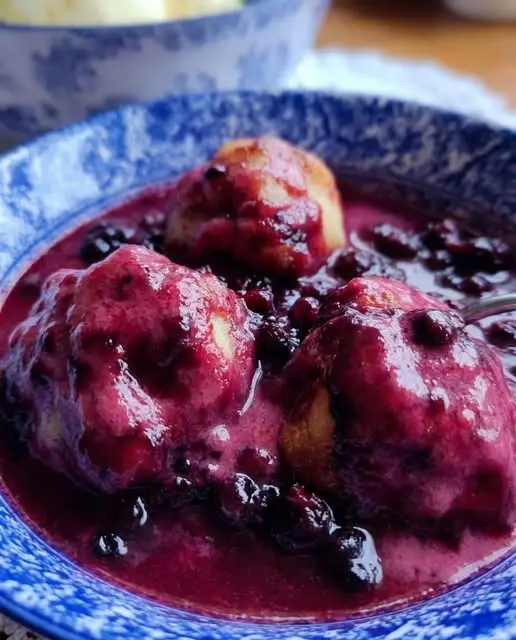
Serving a fruit cobbler from scratch is all about embracing its rustic nature. This isn’t a dessert that needs to look perfect on the plate; its beauty lies in the messy, vibrant swirls of fruit and the golden crags of the biscuit.
The Classic Accompaniment
The gold standard for serving cobbler is “à la mode.” A generous scoop of high-quality vanilla bean ice cream provides a cold, creamy contrast to the warm, tart berries. As the ice cream melts, it mingles with the berry sauce to create a delicious cream-based fruit syrup that is absolutely irresistible.
Garnish and Presentation
If you want to dress it up for guests, a light dusting of powdered sugar over the top of the cooled biscuits adds a professional touch. A few sprigs of fresh mint can also provide a pop of green color that makes the deep reds and purples of the berries stand out even more.
Alternative Toppings
If ice cream isn’t your preference, a dollop of lightly sweetened whipped cream or a drizzle of cold pouring cream works beautifully. For a breakfast twist, a spoonful of thick Greek yogurt can turn leftover cobbler into a decadent morning treat.
Storage and Make-Ahead
Storing Leftovers
If you have leftovers, they can be stored in an airtight container in the refrigerator for up to 3 days. Keep in mind that the biscuit topping will soften over time as it absorbs moisture from the fruit filling.
Reheating
To restore the crispness of the topping, it is best to reheat leftovers in the oven or a toaster oven at 350°F (175°C) for about 10 minutes. While the microwave is faster, it will leave the biscuit topping soft and somewhat chewy.
Make-Ahead Options
You can prepare the berry filling and the dry biscuit mix separately a few hours in advance. However, do not combine the wet and dry ingredients for the topping until you are ready to bake, as the baking powder begins to react as soon as it hits the liquid.
Final Thoughts
Baking a summer berry dessert shouldn’t be a stressful endeavor. This easy homemade berry cobbler recipe is designed to celebrate the fruit in its simplest form, providing a reliable method for a treat that feels both nostalgic and fresh. Whether you are hosting a backyard barbecue or simply want a cozy Sunday night project, this cobbler delivers on flavor and comfort. The combination of sweet, bursting berries and a buttery, crisp topping is a timeless duo that never fails to satisfy a dessert craving.
Frequently Asked Questions
Can I use only one type of berry for this recipe?
Absolutely. While a mix provides a nice complexity, a pure blueberry or blackberry cobbler is equally delicious. If using only raspberries, you may want to slightly increase the sugar, as they tend to be tarter than blueberries or strawberries.
Can I make this cobbler vegan?
Yes, you can easily adapt this easy baking recipe for a vegan diet. Substitute the butter with a cold vegan butter stick and use a plant-based milk like almond or oat milk. The results will still be delicious and flaky.
Do I need to peel the berries?
No, there is no need to peel or remove skins from berries like blueberries or grapes if you were adding them. For strawberries, simply remove the green leafy tops (hulls) and slice them if they are particularly large.
Is it better to use fresh or frozen berries?
Fresh berries are ideal during the summer months when they are at their peak sweetness. However, frozen berries are a fantastic high-quality alternative in the off-season. They are frozen at the peak of ripeness and work perfectly in this fruit cobbler from scratch.
Why did my cobbler turn purple?
If you are using blueberries or blackberries, their pigment is very strong. As they cook and burst, the juices will naturally dye the bottom of the biscuit topping a beautiful shade of purple. This is completely normal and a sign of a well-cooked, juicy filling!
Classic Mixed Berry Cobbler

A delightful and simple dessert featuring a warm, bubbling mixture of fresh berries topped with a sweet, golden-brown biscuit crust. Perfect when served with a scoop of vanilla ice cream.
- Berry Filling
- 6 cups mixed fresh berries (blueberries, raspberries, and blackberries)
- 3/4 cup granulated sugar
- 2 tablespoons cornstarch
- 1 tablespoon fresh lemon juice
- 1/2 teaspoon ground cinnamon
- Biscuit Topping
- 2 cups all-purpose flour
- 1/4 cup granulated sugar, plus more for sprinkling
- 1 tablespoon baking powder
- 1/2 teaspoon salt
- 1/2 cup cold unsalted butter, cut into small cubes
- 3/4 cup whole milk
- 1 teaspoon vanilla extract
- 1Preheat your oven to 375°F (190°C) and lightly grease a 9x13 inch baking dish with butter or non-stick spray.
- 2In a large mixing bowl, gently toss the mixed berries with 3/4 cup sugar, cornstarch, lemon juice, and cinnamon until the fruit is evenly coated.
- 3Pour the berry mixture into the prepared baking dish and spread it into an even layer.
- 4In a separate medium bowl, whisk together the flour, 1/4 cup sugar, baking powder, and salt.
- 5Use a pastry cutter or two forks to cut the cold butter into the flour mixture until it resembles coarse crumbs with some pea-sized pieces remaining.
- 6Stir in the milk and vanilla extract until just combined. The dough will be thick and slightly sticky.
- 7Drop rounded tablespoons of the dough over the top of the berries. It doesn't need to cover them completely.
- 8Bake for 35 to 40 minutes, or until the fruit filling is bubbling and the biscuit topping is golden brown.
- 9Remove from the oven and allow to cool for at least 15 minutes before serving to let the juices thicken.
Keywords: berry cobbler, mixed berry dessert, summer baking, fruit cobbler, easy dessert


