
Garlic Butter Scallops

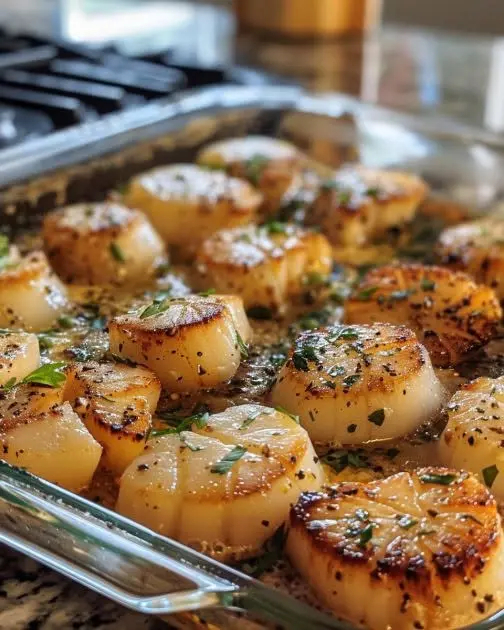
Few dishes carry the same level of sophisticated elegance as pan seared garlic butter scallops. When done correctly, a sea scallop offers a delicate, buttery sweetness and a melt-in-your-mouth texture that rivals any high-end steakhouse offering. The magic lies in the contrast between the deeply caramelized, golden-brown crust and the tender, succulent center. It is a dish that feels like a celebrated luxury, yet it requires only a handful of ingredients and less than ten minutes of actual cooking time on the stovetop.
Mastering this recipe is less about complex maneuvers and more about understanding the relationship between heat and moisture. By focusing on a few essential techniques—such as properly drying the seafood and choosing the right fat for searing—you can achieve restaurant-quality scallops in your own kitchen. Whether you are planning a romantic date night or looking for a quick weeknight dinner that feels special, this preparation delivers maximum flavor with minimal effort, making it a staple for any home cook’s repertoire.
Why You’ll Love This Recipe
- Incredible Speed: This is one of the fastest gourmet proteins you can prepare, taking only about two to three minutes of searing time per side to reach perfection.
- Superior Texture: By using a high-heat method, you create a stunning golden brown crust that provides a satisfying snap before giving way to a soft, tender interior.
- Rich Flavor Profile: The combination of nutty browned butter, aromatic garlic, and a bright splash of lemon creates a sauce that perfectly complements the natural sweetness of the seafood.
- Impressive Presentation: Despite its simplicity, the visual appeal of a perfectly seared scallop makes it an ideal centerpiece for entertaining guests or celebrating special occasions.
Ingredients You’ll Need
To achieve the best results, every ingredient in this dish must be selected for its specific function. Because there are so few components, the quality of your seafood and the smoke point of your cooking fat will directly impact the final outcome of your pan seared garlic butter scallops.
- Sea Scallops: Look for “dry-packed” scallops whenever possible. These have not been treated with phosphates, meaning they won’t leach excess water in the pan, allowing for a much better sear.
- Unsalted Butter: Adding butter toward the end of the cooking process allows you to baste the scallops, coating them in a rich, nutty sauce without the milk solids burning too early.
- High-Smoke Point Oil: A neutral oil like avocado or grapeseed oil is essential for the initial sear. It handles the high heat necessary for caramelization better than butter or extra virgin olive oil.
- Fresh Garlic: Minced garlic provides the aromatic backbone of the sauce. It should be added late in the process so it softens and fragrances the butter without becoming bitter or burnt.
- Fresh Lemon Juice: A squeeze of citrus at the very end cuts through the richness of the butter and highlights the delicate oceanic sweetness of the scallops.
- Fresh Parsley: This adds a pop of color and a subtle earthy freshness that balances the savory notes of the garlic and salt.
Variations and Smart Swaps
Spice Infusions: If you prefer a bit of heat, consider adding a pinch of red pepper flakes to the butter as it melts. This infuses the browned butter sauce with a gentle warmth that pairs beautifully with the sweet seafood.
Herb Alternatives: While parsley is traditional, you can swap it for fresh chives or tarragon. Tarragon, in particular, offers a slight anise flavor that is a classic pairing for high-end shellfish dishes.
Wine-Based Sauce: For a more complex flavor profile, deglaze the pan with a tablespoon or two of dry white wine, such as Sauvignon Blanc or Pinot Grigio, just before adding the butter and garlic.
How to Make Pan Seared Garlic Butter Scallops
Step 1: Prep and Dry the Scallops
The most critical step in learning how to sear scallops is removing surface moisture. Take the scallops out of the refrigerator and pat them thoroughly dry on all sides using paper towels. If they are even slightly damp, they will steam in the pan rather than sear, leaving you with a rubbery texture instead of a crust. Remove the small, tough side muscle if it is still attached, then season them generously with salt and pepper just before they hit the heat.
Step 2: Get the Pan Ripping Hot
Place a large stainless steel or cast-iron skillet over medium-high heat. Add your high-smoke point oil and wait until it is shimmering and just starting to produce a faint wisp of smoke. You need intense heat to trigger the Maillard reaction—the chemical process that creates that iconic golden brown crust. Using a cold pan is the most common mistake, leading to overcooked interiors before the exterior has a chance to color.
Step 3: Sear Without Moving
Carefully place the scallops in the hot pan, ensuring they are not crowding one another. If you add too many at once, the pan temperature will drop, and the scallops will release liquid. Let them sear undisturbed for about 2 minutes. Resist the urge to peek or move them; they need constant contact with the hot surface to develop a thick, even crust. You will know they are ready to flip when they release easily from the pan surface.
Step 4: Flip and Baste with Garlic Butter
Turn the scallops over using tongs. Immediately drop the butter and minced garlic into the spaces between the scallops. As the butter melts and begins to foam, tilt the pan slightly and use a large spoon to continuously pour the hot, garlic-scented butter over the scallops. This technique, known as “arrosé,” finishes the cooking process gently while deeply flavoring the meat. Cook for another 1 to 2 minutes until the sides are opaque but the center remains slightly translucent.
Step 5: Finish with Citrus and Herbs
Remove the pan from the heat immediately to prevent overcooking. Squeeze fresh lemon juice over the top and garnish with chopped parsley. The residual heat in the pan will continue to cook the scallops for a few seconds, so it is best to plate them right away. The resulting pan seared garlic butter scallops should be firm to the touch but still have a slight “give,” indicating a tender interior.
Pro Tips for Success
- Tip: Always use a heavy-bottomed pan. Cast iron or heavy stainless steel retains heat much better than thin non-stick pans, which is vital for achieving a professional sear.
- Tip: Don’t salt too early. Salting the scallops too far in advance can draw out internal moisture to the surface. Season them immediately before placing them in the pan.
- Tip: Look for the “foot.” The side muscle (the foot) is a little rectangular tag of tissue on the side of the scallop. It’s safe to eat but can be tough, so it’s best to pinch it off before cooking.
- Tip: Use a timer. Because scallops cook so quickly, thirty seconds can be the difference between perfection and a rubbery texture. Use your phone or a kitchen timer to stay precise.
Troubleshooting Common Problems
Why didn’t my scallops get a brown crust?
This usually happens for two reasons: the scallops were too wet, or the pan wasn’t hot enough. If you used “wet” scallops (treated with additives), they will naturally release more water, making a sear almost impossible. Always look for “dry” scallops and ensure your oil is shimmering-hot before starting.
Why are my scallops tough or rubbery?
Toughness is almost always a result of overcooking. Scallops should be pulled from the heat while the very center still looks slightly translucent. They will finish cooking through residual heat on the plate. If they feel bouncy like a rubber ball, they have been on the heat too long.
How to Serve Pan Seared Garlic Butter Scallops
When serving pan seared garlic butter scallops, you want side dishes that can soak up the incredible garlic butter sauce without overpowering the delicate flavor of the seafood. A classic pairing is a creamy parmesan risotto or a bed of angel hair pasta tossed in olive oil and lemon zest. The starch provides a neutral base that lets the sweetness of the scallops shine.
For a lighter, low-carb option, serve the scallops over a cauliflower purée or alongside sautéed baby spinach and asparagus. The vibrant green of the vegetables creates a beautiful visual contrast against the golden scallops. If you are serving them as an appetizer, a simple piece of crusty French bread is essential for mopping up every last drop of the garlic-infused butter from the plate.
Storage and Make-Ahead
Storing Leftovers
Scallops are best enjoyed immediately after cooking, as their texture changes significantly upon cooling. However, if you have leftovers, store them in an airtight container in the refrigerator for up to two days. Keep in mind that they will lose their crisp exterior once refrigerated.
Reheating
Reheating scallops is tricky because they overcook so easily. Avoid the microwave, as it will turn them into rubber. Instead, gently warm them in a skillet over low heat with a teaspoon of water or butter, just until they are heated through. Alternatively, you can slice cold leftovers and toss them into a warm pasta dish at the very last second.
Final Thoughts
Mastering pan seared garlic butter scallops is a rewarding milestone for any home cook. It proves that you don’t need a long list of ingredients to create a world-class meal; you simply need good technique and respect for the ingredients. Once you understand the importance of a dry surface and a hot pan, you’ll be able to whip up this easy seafood recipe with total confidence. Serve these at your next dinner party, and your guests will certainly be asking which professional kitchen you’ve been moonlighting in.
Frequently Asked Questions
Can I use frozen scallops for this recipe?
Yes, you can use frozen scallops, but they must be completely thawed before cooking. The best way to thaw them is overnight in the refrigerator. Once thawed, it is even more important to pat them extremely dry, as frozen seafood tends to hold more moisture than fresh. Avoid thawing them in warm water, as this can ruin the delicate texture.
What is the difference between “wet” and “dry” scallops?
“Wet” scallops are treated with a solution of sodium tripolyphosphate, which helps them retain water and stay “fresh” longer. However, this causes them to shrink in the pan and prevents a good sear. “Dry” scallops are natural and untreated. They have a superior flavor and are much easier to sear to a golden brown perfection.
How do I know when the scallops are perfectly cooked?
Visual cues are your best friend here. A perfectly cooked scallop will have a dark golden-brown crust on the top and bottom, while the sides will have turned from translucent to an opaque white. If you press down on the center, it should feel firm but still have a bit of springiness, similar to the feel of a rare steak.
Can I use a non-stick pan for searing scallops?
While you can use a non-stick pan, it is not recommended for the best results. Non-stick coatings are generally not designed for the extremely high temperatures required to get a deep, caramelized crust. A stainless steel or cast-iron skillet is much more effective at transferring heat and creating that sought-after restaurant-style finish.
Is it necessary to remove the side muscle?
The “foot” or side muscle is a small, tough piece of tissue that attaches the scallop to its shell. While it is perfectly safe to eat, it doesn’t soften during the quick searing process and can feel chewy or “gristly” compared to the rest of the scallop. It usually peels off very easily with your fingers, so removing it is a small step that improves the overall dining experience.
Garlic Butter Scallops

Succulent sea scallops pan-seared to perfection and finished with a rich, lemony garlic butter sauce. This elegant dish takes less than 20 minutes to prepare and rivals any high-end steakhouse.
- 1 pound large sea scallops, patted dry
- Salt and freshly ground black pepper to taste
- 2 tablespoons unsalted butter, divided
- 1 tablespoon olive oil
- 3 cloves garlic, minced
- 1 tablespoon fresh lemon juice
- 1 tablespoon fresh parsley, chopped
- 1Remove the side muscle from the scallops if necessary. Pat them very dry with paper towels; this is crucial for a good sear.
- 2Season both sides of the scallops with salt and pepper.
- 3In a large cast-iron or stainless steel skillet, heat the olive oil and 1 tablespoon of butter over medium-high heat until the butter is foaming.
- 4Place scallops in the skillet, ensuring they do not touch. Sear for 2 to 3 minutes without moving them, until a deep golden crust forms.
- 5Flip the scallops and add the remaining tablespoon of butter and minced garlic to the skillet.
- 6Cook for another 1 to 2 minutes while spooning the melted garlic butter over the scallops.
- 7Remove the pan from heat, squeeze in the lemon juice, and sprinkle with fresh parsley before serving immediately.
Keywords: scallops, garlic butter, seafood, easy dinner, pan-seared scallops


