
Christmas Chocolate Candy Cups

There is something undeniably magical about the holiday season that brings out the inner confectioner in all of us. While store-bought tins are convenient, nothing compares to the velvety texture and rich flavor of homemade Christmas chocolate candy cups. These bite-sized treats offer a perfect balance of a snappy chocolate shell and a luscious, creamy center that melts away the moment it hits your tongue. Whether you are building a festive dessert platter or looking for a meaningful way to share the holiday spirit, these handcrafted candies stand out as a testament to the beauty of simple, high-quality ingredients treated with care.
Creating these treats at home allows you to bypass the waxy preservatives found in commercial candy, resulting in a much cleaner and more intense cocoa profile. This holiday candy recipe is surprisingly approachable, requiring no complex candy thermometers or advanced pastry skills. By mastering a few basic melting techniques and choosing your favorite festive fillings, you can produce a batch of professional-grade sweets that look like they came straight from a high-end boutique chocolatier. It is a rewarding kitchen project that fills your home with the scent of toasted cacao and holiday cheer.
Why You’ll Love This Recipe
- Complete Creative Control: Unlike pre-packaged assortments, you can customize every element of these DIY chocolate gifts, from the cocoa percentage of the shell to the specific sweetness and flavor of the interior filling.
- No-Bake Convenience: This recipe is perfect for when your oven is already occupied by turkeys or cookies, as it relies entirely on gentle melting and cooling rather than baking.
- Impressive Visual Appeal: With their clean ridges from the paper liners and vibrant holiday sprinkles, these cups look sophisticated and expensive despite being quite simple to assemble.
- Excellent Make-Ahead Potential: These candies stay fresh for weeks when stored properly, making them one of the most reliable no-bake Christmas desserts to prepare well in advance of the holiday rush.
Ingredients You’ll Need
To achieve the best results with your homemade Christmas chocolate candy cups, the quality of your base chocolate is the most important factor. Since the chocolate is the star of the show, choose a brand you enjoy eating on its own for the most delicious outcome.
- High-Quality Chocolate: Use chocolate bars or high-end chips with a high cocoa butter content. This ensures a smoother melt and a glossy finish that snaps beautifully when bitten into.
- Refined Coconut Oil: A small amount of oil mixed into the chocolate helps create a more manageable consistency for coating the liners and prevents the shell from becoming too brittle to bite through comfortably.
- Creamy Filling Base: Typically made from a mixture of nut butter, peppermint cream, or caramel, the filling provides the necessary contrast to the firm chocolate exterior.
- Confectioners’ Sugar: If you are using a nut butter filling, a touch of powdered sugar helps stabilize the texture so it doesn’t leak out of the chocolate shell.
- Festive Toppings: Red and green sprinkles, crushed peppermint candies, or a pinch of sea salt add the final holiday flourish and a hint of extra texture.
- Vanilla or Peppermint Extract: A drop of high-quality extract enhances the natural flavors of the chocolate and provides that classic holiday candy recipe aroma.
Variations and Smart Swaps
Dark Chocolate Peppermint: Swap the milk chocolate for a 70% dark cocoa and use a white chocolate peppermint ganache as the filling. This creates a sophisticated, refreshing treat that isn’t overly sweet.
White Chocolate Raspberry: Use white chocolate for the shells and a small dollop of seedless raspberry jam in the center. The tartness of the fruit perfectly balances the creamy sweetness of the white chocolate.
Almond Butter and Sea Salt: For a modern twist on the classic peanut butter cup, use roasted almond butter and finish the top of each cup with a few flakes of Maldon sea salt for a savory-sweet experience.
Crunchy Praline Cups: Mix finely chopped toasted hazelnuts or pecans into the filling to add a delightful crunch that mimics expensive European pralines.
How to Make Homemade Christmas Chocolate Candy Cups
Step 1: Prepare the Chocolate Shell Base
The foundation of any great tempering chocolate at home project begins with gentle heat. Place your chopped chocolate and a teaspoon of coconut oil in a heat-safe bowl. You can use a double boiler or the microwave in 30-second bursts, stirring vigorously between each interval. The goal is to reach a smooth, glossy consistency where no lumps remain. Stirring is vital as it distributes the heat evenly and prevents the chocolate from scorching, which can happen very quickly if left unattended.
Step 2: Coat the Festive Liners
Line a mini muffin tin with holiday-themed paper liners. Drop a small spoonful of the melted chocolate into the bottom of each liner. Using the back of the spoon or a small pastry brush, carefully push the chocolate up the sides of the paper, ensuring an even coating. This “painting” technique is the secret to a sturdy cup that won’t collapse when you peel the paper away later. Once coated, place the tray in the refrigerator for about 10 minutes to allow the base layer to set completely.
Step 3: Add the Creamy Center
Once the bottom shell is firm, it is time to add your chosen filling. Whether you are using a sweetened peanut butter mixture or a silky caramel, ensure the filling is at room temperature so it doesn’t “shock” the chocolate. Place a small dollop in the center of each cup, leaving enough room at the top for a final layer of chocolate. Gently tap the muffin tin on the counter to help the filling settle and remove any trapped air bubbles that could cause gaps in your homemade Christmas chocolate candy cups.
Step 4: Seal and Garnish
Spoon the remaining melted chocolate over the top of the filling, starting from the edges and moving toward the center. Use the back of a spoon to smooth the surface until the filling is completely encased. While the chocolate is still wet, immediately add your festive sprinkles or crushed candy canes. This ensures the decorations stick firmly to the surface. The wet chocolate provides a perfect canvas for your holiday creativity, making each cup look like a tiny work of art.
Step 5: Final Set and Release
Return the tray to the refrigerator for at least 30 to 60 minutes. It is crucial that the chocolate is fully hardened before you attempt to handle the cups. Once they feel cold and firm to the touch, you can either leave them in their liners for a pop of color on a platter or carefully peel the paper away to reveal the professional-looking ridges on the sides of the chocolate. This slow cooling process helps maintain the structural integrity of the DIY chocolate gifts.
Pro Tips for Success
- Avoid Water at All Costs: Even a single drop of water in your melting chocolate can cause it to “seize,” turning it into a grainy, clumpy mess that cannot be saved. Ensure all bowls and spoons are completely dry.
- Use a Mini Muffin Tin: This provides the necessary structure to keep the paper liners from splaying outward, ensuring your cups have perfectly uniform, straight sides.
- The Tapping Technique: Always tap your tray against the counter after filling. This forces air bubbles to the surface and creates a much smoother, professional finish on the top of the candy.
- Quality Matters: Avoid “chocolate-flavored” coating wafers if possible. Real chocolate containing cocoa butter provides a vastly superior mouthfeel and flavor for homemade Christmas chocolate candy cups.
- Controlled Melting: If using a microwave, stop when there are still a few small lumps left and stir until they melt from the residual heat. This prevents the chocolate from losing its temper and becoming dull.
Troubleshooting Common Problems
Why Did My Chocolate Turn White or Gray?
This is known as “bloom” and occurs when the fat or sugar in the chocolate separates due to temperature fluctuations. While it might look unappealing, the candy is still perfectly safe to eat. To prevent this, avoid overheating the chocolate during the melting phase and store the finished cups in a cool, stable environment rather than a spot that gets hit by direct sunlight or drafts.
Why Is the Filling Leaking Out?
Leaking usually happens if the side walls of the chocolate shell were too thin or if the top layer of chocolate didn’t fully connect with the edges of the bottom shell. When “painting” the liners, pay extra attention to the top rim to ensure there is a thick enough edge for the lid to grab onto. Also, make sure your filling isn’t too runny; if it is, stir in a little more powdered sugar to stiffen it up.
Why Won’t the Paper Liners Peel Off Cleanly?
If the paper is sticking or tearing the chocolate, the cups likely haven’t chilled long enough. The chocolate needs to be completely cold to contract slightly and pull away from the paper naturally. If you are still having trouble, try placing the cups in the freezer for five minutes right before peeling to give them an extra burst of firmness.
How to Serve Homemade Christmas Chocolate Candy Cups
Presentation is half the fun when it comes to holiday treats. These homemade Christmas chocolate candy cups look stunning when arranged on a tiered dessert stand or a dark wood serving board. To make the colors pop, mix and match different colored liners—bright reds, deep greens, and shimmering golds. If you are serving them at a party, consider placing them in small individual gold candy foils for an extra touch of elegance that makes them easy for guests to grab and enjoy.
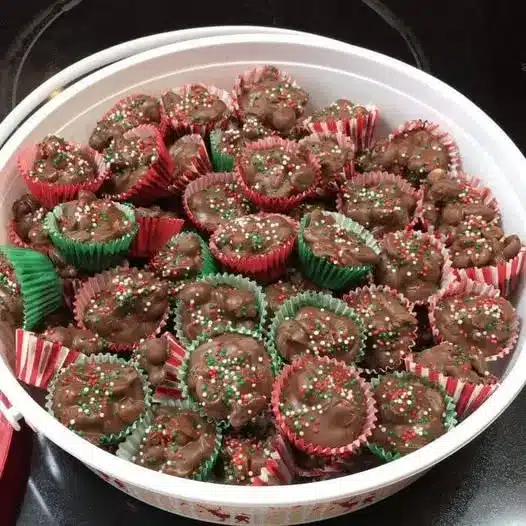
For those looking to give these as DIY chocolate gifts, they package beautifully in clear cellophane bags tied with a sprig of fresh rosemary and a red ribbon. You can also place them in small decorative tins lined with parchment paper. Because they are sturdy and don’t melt at the slight touch of a finger (thanks to the coconut oil and proper setting), they are excellent for holiday cookie swaps where they can be transported without fear of turning into a sticky mess.
Storage and Make-Ahead
Storing Leftovers
These chocolate cups should be stored in an airtight container to protect them from absorbing other odors in the kitchen or fridge. At room temperature (if your kitchen is cool), they will stay fresh for about a week. For longer storage, keep them in the refrigerator, where they will maintain their quality for up to three weeks. Always serve them at room temperature for the best flavor, as cold chocolate can mask some of the subtle cocoa notes.
Freezing Instructions
If you want to get your holiday prep done extremely early, these candies freeze beautifully. Place the finished cups in a single layer in a freezer-safe container, using parchment paper between layers to prevent sticking. They will last for up to three months. When you are ready to use them, move the container to the refrigerator for 24 hours to thaw slowly, which helps prevent condensation from forming on the surface of the chocolate.
Final Thoughts
Mastering the art of homemade Christmas chocolate candy cups is a surefire way to elevate your holiday dessert game. There is a deep sense of satisfaction that comes from peeling back a paper liner to reveal a perfect, ridged chocolate shell that you created from scratch. These candies are more than just a sweet treat; they are a canvas for your holiday spirit and a delicious way to show friends and family how much you care. By following these simple steps and focusing on quality ingredients, you’ll create a new holiday tradition that everyone will look forward to year after year.
Frequently Asked Questions
What is the best type of chocolate to use for candy cups?
For the best holiday candy recipe results, use couverture chocolate or high-quality baking bars found in the baking aisle. These contain higher levels of cocoa butter, which provides that professional snap and shine. Avoid standard chocolate chips if you want a truly gourmet texture, as chips often contain stabilizers that prevent them from melting as smoothly as bars do.
Do I have to use coconut oil?
While not strictly mandatory, coconut oil makes the chocolate much easier to work with. It thins the chocolate just enough to coat the liners thinly and evenly, and it gives the finished homemade Christmas chocolate candy cups a slightly softer bite so the shell doesn’t shatter into sharp shards when you bite into it. If you have an allergy, you can substitute with a teaspoon of vegetable shortening.
Can I make these vegan or dairy-free?
Absolutely. You can easily adapt this into a dairy-free holiday candy recipe by using high-quality vegan dark chocolate and ensuring your filling (like peanut butter or fruit preserves) is also dairy-free. Since the process relies on simple melting, vegan chocolates behave very similarly to traditional dairy chocolates in this specific application.
How do I stop the sprinkles from falling off?
The key is timing. You must add the decorations immediately after pouring the top layer of chocolate while it is still completely liquid. If the chocolate begins to set even slightly, the sprinkles will just bounce off the surface. If you are making a large batch, work in groups of five or six cups at a time to ensure the chocolate stays wet enough for the garnishes to adhere.
Can I use full-sized muffin tins?
While you certainly can, these candies are very rich, and a full-sized cup might be overwhelming as a single serving. The mini muffin size is the standard for homemade Christmas chocolate candy cups because it offers the perfect “two-bite” experience that fits perfectly on a holiday dessert plate alongside other cookies and treats.
Why is my chocolate grainy instead of smooth?
Graininess usually happens if the chocolate was overheated or if a tiny bit of moisture got into the bowl. When chocolate “burns,” the solids separate and become gritty. To avoid this, always melt your chocolate slowly on low power or over barely simmering water, and never let the bottom of your bowl touch the actual water in a double boiler.


