
Christmas Chocolate Candy Cups

Creating festive homemade christmas chocolate candy cups is one of the most rewarding ways to celebrate the season. These bite-sized treasures offer a rich, velvety texture paired with a satisfying snap of tempered chocolate, making them a standout addition to any dessert platter. Whether you choose to fill them with creamy peanut butter, gooey caramel, or a refreshing peppermint ganache, the versatility of these holiday dessert treats ensures they cater to every palate at your holiday gathering. They bring a professional, artisanal feel to your kitchen without the need for complicated candy-making equipment or professional pastry skills.
This recipe is surprisingly approachable and offers a wonderful opportunity to get the whole family involved in the kitchen. By focusing on high-quality chocolate and simple layering techniques, you can produce a batch of no-bake christmas candy that looks as beautiful as it tastes. These treats are particularly effective for holiday gifting, as they hold up well at room temperature and offer a luxurious, handcrafted experience that store-bought candies simply cannot match.
Why You’ll Love This Recipe
- Completely Customizable: You can easily adapt the fillings and toppings to suit your preferences, making these easy homemade chocolate cups the perfect canvas for your favorite holiday flavors.
- No-Bake Simplicity: This recipe requires zero oven time, which is a major win during the busy holiday season when oven space is at a premium for cookies and roasts.
- Excellent for Gifting: Because they are sturdy and visually stunning, these cups serve as fantastic DIY edible gifts for neighbors, teachers, or friends when tucked into a decorative tin.
- Kid-Friendly Activity: Children love helping with the layering and especially the decorating, making this a fun way to create lasting holiday memories together in the kitchen.
Ingredients You’ll Need
To ensure your homemade christmas chocolate candy cups have that signature professional finish, it is important to choose ingredients that melt smoothly and set firmly. Here is a look at the key components that make this recipe a success.
- High-Quality Chocolate: Use semi-sweet, milk, or dark chocolate chips or chopped bars. The quality of the chocolate directly impacts the final flavor and how well the cups snap when bitten.
- Coconut Oil: A small amount of coconut oil added to the chocolate helps it melt more smoothly and creates a glossy finish that looks beautiful on a dessert tray.
- Creamy Filling: Whether you prefer peanut butter, almond butter, or even a thick caramel, the filling provides the decadent center that defines these holiday dessert treats.
- Festive Sprinkles and Toppings: Crushed candy canes, sea salt, or red and green sprinkles add the holiday flair and a bit of textural contrast to the smooth chocolate.
- Mini Cupcake Liners: These provide the structure for your candy and make them easy to handle and serve without making a mess.
Variations and Smart Swaps
- Nut-Free Version: If you are making these no-bake christmas candy bites for a school event or a party with allergies, swap the nut butter filling for sunflower seed butter or a thick raspberry jam.
- White Chocolate Peppermint: Use white chocolate for the base and top layers, and fold crushed candy canes directly into the center for a bright, wintry flavor profile.
- Caramel Sea Salt: Fill the center with a small dollop of thick sea salt caramel and finish the top with a few extra flakes of Maldon salt for a sophisticated sweet-and-salty balance.
- Vegan-Friendly: Use dairy-free chocolate chips and ensure your fillings are plant-based to make these inclusive DIY edible gifts for everyone on your list.
How to Make Homemade Christmas Chocolate Candy Cups
Step 1: Prepare the Liners and Melt the Chocolate Base
Start by lining a mini muffin tin with festive paper liners. This provides stability when you are pouring the chocolate and ensures your cups have uniform sides. In a microwave-safe bowl or using a double boiler, melt your chocolate along with a teaspoon of coconut oil. If using the microwave, work in 30-second intervals, stirring thoroughly between each burst to prevent the chocolate from scorching. You are looking for a glossy, completely fluid consistency that flows easily off the spoon.
Step 2: Create the Bottom Chocolate Layer
Spoon approximately one to two teaspoons of the melted chocolate into the bottom of each liner. To ensure the chocolate reaches the edges and creates a flat base, gently tap the muffin tin against the counter several times. This action also helps release any trapped air bubbles that could create holes in your candy. Place the tin in the refrigerator for about 10 to 15 minutes, or until the chocolate is firm to the touch but not rock hard.
Step 3: Add the Decadent Filling
Once the base has set, it is time to add your chosen center. Place a small dollop—usually about half a teaspoon—of peanut butter, caramel, or peppermint cream into the center of each cup. It is crucial to keep the filling in the middle, leaving a small border of chocolate around the edges. This allows the top layer of chocolate to seal with the bottom layer, locking the filling inside so it doesn’t leak out when you peel off the paper.
Step 4: Top with Chocolate and Decorative Accents
Cover the filling with more melted chocolate, making sure to fill the gaps around the sides first before covering the top. You may need to gently nudge the chocolate with the back of a spoon to ensure a smooth, even surface. While the chocolate is still wet, immediately add your festive sprinkles, crushed candy canes, or sea salt. This is what gives your homemade christmas chocolate candy cups their iconic holiday look. Return the tin to the refrigerator for at least 30 minutes to allow the candy to fully set.
Pro Tips for Success
- Tip: Don’t overheat the chocolate. Chocolate can seize or become grainy if it gets too hot, so always melt it slowly and stop just before every last lump is gone—the residual heat will finish the job.
- Tip: Use a small piping bag or a zip-top bag with the corner snipped off to add the filling. This gives you much more control than a spoon and keeps the edges of the cups clean.
- Tip: If your filling is too runny, chill it in the fridge for 20 minutes before adding it to the cups. This ensures it stays in a neat mound rather than spreading to the edges.
- Tip: To get a perfectly flat top, give the tray one final gentle tap on the counter after adding the top chocolate layer but before adding the sprinkles.
- Tip: Use high-fat cocoa butter chocolate for the best “snap” when you bite into these easy homemade chocolate cups.
How to Serve Your Christmas Candy Cups
When it comes to serving these holiday dessert treats, presentation is everything. They look most impressive when arranged on a tiered dessert stand or a white ceramic platter that allows the festive colors of the sprinkles to pop. If you are serving them at a party, keep them in their paper liners to make it easier for guests to grab a single portion without getting chocolate on their hands. For a more formal look, you can carefully peel away the liners just before serving to reveal the ridged edges of the chocolate.
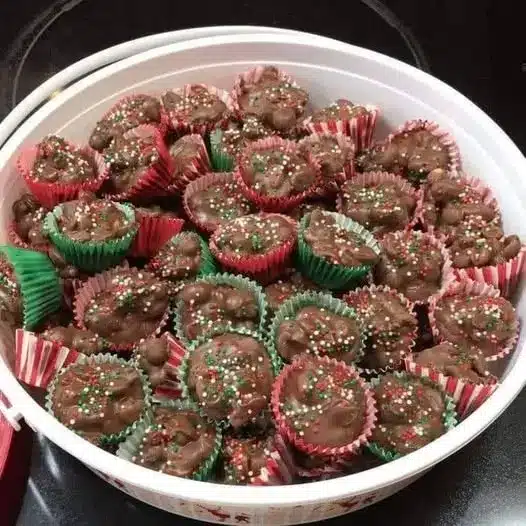
These cups also make wonderful additions to a hot cocoa bar. Guests can enjoy them alongside a warm mug of cocoa, or even drop a peppermint-filled cup into their drink for an extra-indulgent chocolate boost. If you are creating DIY edible gifts, place the cups into small cellophane bags tied with a red ribbon or nestle them into mini cupcake boxes. They are sturdy enough to be stacked slightly, provided the room isn’t too warm.
Storage and Make-Ahead
Storing Leftovers
Store your chocolate cups in an airtight container in the refrigerator for up to two weeks. While they can be kept at room temperature for several hours during a party, they maintain their best texture and “snap” when kept cool. If your house is particularly warm, the chocolate may soften, so the fridge is always the safest bet for long-term storage.
Freezing
These no-bake christmas candy treats freeze exceptionally well. Place them in a single layer in a freezer-safe container, separated by parchment paper to prevent sticking. They will stay fresh for up to three months. To serve, simply transfer them to the refrigerator the night before you need them so they can thaw slowly, which prevents condensation from forming on the chocolate.
Making It Ahead
Because these candies have a long shelf life, they are the perfect make-ahead project. You can easily whip up a double or triple batch in early December and keep them tucked away in the fridge, ready for unexpected guests or last-minute gift needs throughout the holiday season.
Final Thoughts
Mastering homemade christmas chocolate candy cups is a simple joy that pays off with every rich, chocolatey bite. They represent the best of holiday baking: minimal stress, high visual impact, and a flavor that everyone loves. By taking the time to layer the chocolate carefully and choosing festive toppings, you create a treat that feels truly special. Whether they end up in a gift box or on your own dessert table, these easy homemade chocolate cups are destined to become a new favorite tradition in your household.
Frequently Asked Questions
Can I use white chocolate instead of dark?
Absolutely! White chocolate works beautifully for this recipe, though it can be slightly more temperamental to melt. Be sure to use a very low heat and stir frequently. White chocolate pairs exceptionally well with peppermint or tart fruit fillings like raspberry or cranberry, offering a bright and creamy alternative to traditional dark chocolate versions.
Why did my chocolate turn white or cloudy after setting?
This is known as “bloom,” and it usually happens when the chocolate is heated too quickly or stored in an area with fluctuating temperatures. While it might not look as pretty, the chocolate is still perfectly safe to eat. To prevent this, melt your chocolate slowly and store your finished homemade christmas chocolate candy cups in a cool, stable environment.
How do I stop the filling from leaking out?
The secret is to ensure the filling is centered and that the top layer of chocolate completely meets the bottom layer around the edges. If the filling touches the paper liner, it creates a gap where the chocolate cannot seal. Using a piping bag to precisely place the filling is the best way to prevent this common mistake.
Do I have to use coconut oil?
While you can make these without coconut oil, the oil helps the chocolate melt into a thinner, more pourable consistency. This makes it much easier to create thin, even layers. If you don’t have coconut oil, a teaspoon of neutral vegetable oil can work, or you can omit it entirely if you are using high-quality couverture chocolate which has a high cocoa butter content.
What are the best fillings for gifting?
When making DIY edible gifts, it is best to choose stable fillings like peanut butter, almond butter, or firm ganache. Very thin caramels or fruit jams can be a bit messier if the cups are handled roughly. Nut butters are generally the most reliable choice as they hold their shape perfectly even if the chocolate softens slightly during transport.
Christmas Chocolate Candy Cups

These Christmas Chocolate Candy Cups are a festive and easy-to-make holiday treat. Combining rich semi-sweet chocolate with a creamy peanut butter filling, they are topped with colorful sprinkles for a perfect seasonal touch. Great for gifting or holiday dessert platters.
- 12 oz semi-sweet chocolate chips
- 1/2 cup creamy peanut butter
- 1/4 cup powdered sugar
- 1 tablespoon unsalted butter, softened
- 2 tablespoons festive holiday sprinkles
- 1Line a mini muffin tin with 24 festive paper liners.
- 2Place half of the chocolate chips in a microwave-safe bowl and heat in 30-second intervals, stirring until completely smooth.
- 3Spoon approximately 1 teaspoon of melted chocolate into each liner, using the back of the spoon to coat the bottom and halfway up the sides.
- 4Place the tin in the freezer for 10 minutes to allow the chocolate to set.
- 5In a small bowl, stir together the peanut butter, powdered sugar, and softened butter until the mixture is smooth and well combined.
- 6Remove the tin from the freezer and place a small dollop of the peanut butter filling into the center of each chocolate cup.
- 7Melt the remaining chocolate chips and spoon them over the filling in each cup, smoothing the tops to seal.
- 8Immediately decorate with holiday sprinkles while the chocolate is still wet.
- 9Refrigerate for at least 30 minutes or until the chocolate is firm before serving.
Keywords: Christmas candy, chocolate cups, peanut butter cups, holiday dessert, homemade candy, easy Christmas treats


