
Chocolate Peanut Nougat Bars

There is a specific kind of magic found in the combination of chewy nougat, salty roasted peanuts, and buttery caramel, all encased in a thick shell of tempered milk chocolate. While most of us grew up grabbing these treats from the checkout aisle, making homemade chocolate peanut nougat bars in your own kitchen elevates the experience to a whole new level of indulgence. The difference lies in the quality of the ingredients—real vanilla, fresh roasted nuts, and high-quality chocolate—which create a flavor profile that is significantly deeper and more satisfying than any mass-produced candy bar could ever hope to achieve.
Crafting these DIY candy bars might seem intimidating if you have never worked with sugar syrups before, but the process is remarkably rewarding once you understand the rhythm of candy making. By breaking the recipe down into distinct stages—whipping the airy nougat, simmering the golden caramel, and finally dipping the chilled bars—you can create a professional-grade confection that rivals the best boutiques. This guide will walk you through the nuances of temperature control and layering to ensure your homemade chocolate peanut nougat bars have the perfect balance of “snap” and “chew” in every single bite.
Why This Recipe Is a Keeper
- Superior Texture: Unlike store-bought versions that can sometimes feel waxy or overly stiff, these homemade chocolate peanut nougat bars feature a soft, marshmallow-like nougat and a caramel layer that pulls apart beautifully without being stuck to your teeth.
- Customizable Salt Balance: Making your own homemade Snickers style bars allows you to control the salt levels, using high-quality sea salt to perfectly offset the sweetness of the chocolate and sugar.
- Gifting Potential: Because these bars look so professional when sliced and dipped, they make incredible gifts for holidays, birthdays, or bake sales that truly stand out from standard cookies or brownies.
- No Artificial Preservatives: You can enjoy the peace of mind that comes with knowing exactly what went into your candy, using pure extracts and fresh dairy instead of corn-based fillers and artificial flavorings.
Ingredients You’ll Need
To achieve the iconic layers of these homemade chocolate peanut nougat bars, you need a combination of pantry staples and a few specific confectionery items that provide the necessary structural integrity for the candy.
- Granulated Sugar and Corn Syrup: This duo forms the backbone of both the nougat and the caramel. The corn syrup is vital because it acts as an “interfering agent,” preventing the sugar from recrystallizing and keeping your creamy peanut nougat smooth.
- Egg Whites: Whipped into a fluff, these provide the aerated, marshmallow-like structure for the nougat layer, giving it that characteristic light-yet-chewy bite.
- Peanut Butter: Adding a bit of creamy peanut butter into the nougat helps stabilize it and ensures the peanut flavor is infused throughout the entire bar, not just the top layer.
- Heavy Cream and Butter: These are essential for the caramel layer, providing the fat content needed for a rich, “melt-in-your-mouth” consistency that remains soft even after the bars are chilled.
- Roasted Salted Peanuts: These provide the essential crunch and saltiness. Using roasted peanuts is key, as the toasting process brings out the oils and deepens the nutty aroma.
- Milk or Dark Chocolate: High-quality chocolate with a high percentage of cocoa butter will melt more smoothly and provide a better “snap” once set. This is crucial for achieving that professional finish on your homemade chocolate peanut nougat bars.
- Vanilla Extract and Salt: These are the ultimate flavor enhancers. A splash of real vanilla bean paste or extract rounds out the sweetness of the sugar.
Simple Swaps and Variations
Dark Chocolate Sea Salt: For a more grown-up version of these homemade chocolate peanut nougat bars, swap the milk chocolate coating for a 70% dark chocolate and sprinkle the tops with flaky Maldon sea salt before the chocolate sets.
Almond Joy Style: If you aren’t a fan of peanuts, you can replace the peanut butter in the nougat with almond butter and use whole roasted almonds in the caramel layer instead. Dip the finished bars in dark chocolate for a sophisticated twist.
Honey Nougat: For a floral, complex sweetness, you can substitute a portion of the corn syrup in the nougat layer with a high-quality clover or wildflower honey. This creates a flavor profile similar to European-style torrone.
Peanut Butter Drizzle: After dipping the bars in chocolate, melt a small amount of peanut butter chips with a teaspoon of coconut oil and drizzle it over the top for a decorative and delicious finishing touch.
How to Make Homemade Chocolate Peanut Nougat Bars
Step 1: Prepare the Pan and Base Layer
Success in candy making starts with preparation. Line a square baking pan with parchment paper, ensuring there is enough overhang on the sides to use as “handles” later. Lightly grease the parchment with a neutral oil or non-stick spray. This step is non-negotiable, as the creamy peanut nougat is incredibly sticky while warm and will be nearly impossible to remove from the pan without a properly prepared parchment sling.
Step 2: Cook the Whipped Nougat
In a heavy-bottomed saucepan, combine your sugar, water, and corn syrup. Heat this mixture until it reaches the “soft crack” stage (approximately 270°F to 280°F) on a candy thermometer. While the syrup is boiling, whip your egg whites to stiff peaks. Once the syrup reaches temperature, slowly drizzle it into the egg whites while the mixer is running. This cooks the eggs and creates a stable, airy foam. Finally, fold in the peanut butter and vanilla to complete the base of your homemade chocolate peanut nougat bars.
Step 3: Simmer the Golden Caramel
The caramel layer requires patience and a watchful eye. Combine sugar, cream, and butter in a clean saucepan. You want to cook this mixture over medium heat until it reaches the “firm ball” stage (around 245°F). At this temperature, the caramel will be firm enough to hold its shape at room temperature but soft enough to chew comfortably. Once the temperature is reached, remove from heat and immediately stir in the roasted peanuts.
Step 4: Layer and Chill
Spread the warm peanut-caramel mixture evenly over the set nougat layer. Use an offset spatula to smooth the top as much as possible. The bars now need to chill thoroughly—usually for at least 2 to 4 hours, or even overnight. Proper chilling is the secret to getting clean, sharp cuts when you eventually slice the slab into individual DIY candy bars.
Step 5: Cut and Dip in Tempered Chocolate
Once the block is firm, lift it out of the pan and slice it into rectangular bars using a very sharp, slightly oiled knife. Melt your chocolate gently using a double boiler or short bursts in the microwave. For the best result, aim for tempering chocolate so that it stays shiny and firm at room temperature. Dip each bar into the chocolate, let the excess drip off, and place them on clean parchment paper to set completely.
Pro Tips for the Best Results
- Tip: Use a Digital Thermometer. Precision is everything in confectionery. A few degrees can be the difference between a nougat that is too soft to hold its shape and one that is unpleasantly hard.
- Tip: Humidity Matters. Try to make homemade chocolate peanut nougat bars on a dry day. High humidity can cause the sugar to absorb moisture from the air, making your nougat sticky and preventing the caramel from setting properly.
- Tip: Room Temperature Ingredients. When adding the peanut butter or vanilla to the nougat, ensure they are at room temperature. Adding cold ingredients to hot sugar syrup can cause the mixture to seize or create lumps.
- Tip: Oil Your Knife. When cutting the chilled layers, a light coating of neutral oil or cooking spray on your knife blade will prevent the caramel and nougat from sticking, resulting in much cleaner edges.
- Tip: Don’t Rush the Set. It is tempting to dip the bars as soon as they feel cold, but letting the layers sit for several hours ensures the moisture levels equalize, which prevents the caramel from “leaking” out after the chocolate coating is applied.
Troubleshooting Common Problems
Why Is My Nougat Too Soft?
If your nougat doesn’t hold its shape after chilling, the sugar syrup likely didn’t reach a high enough temperature. In candy making, the final temperature determines how much water is evaporated. If too much water remains, the nougat will stay “soupy.” To fix this next time, ensure your thermometer is calibrated and that you hit at least 275°F before pouring the syrup into the egg whites.
Why Did My Chocolate Bloom or Turn Grey?
This usually happens when the chocolate is overheated during the melting process or if it isn’t properly tempered. When chocolate gets too hot, the cocoa butter separates and then rises to the surface as it cools, creating white streaks. Always melt chocolate slowly and stop heating when there are still a few small lumps left—the residual heat will finish the job gently.
Why Is the Caramel Layer Grainy?
Graininess is caused by sugar crystallization. This often happens if sugar crystals on the side of the pot are stirred into the boiling mixture. To prevent this, you can use a wet pastry brush to wash down the sides of the pan while the syrup is heating, or simply ensure you don’t stir the mixture once it begins to boil.
How to Serve Homemade Chocolate Peanut Nougat Bars
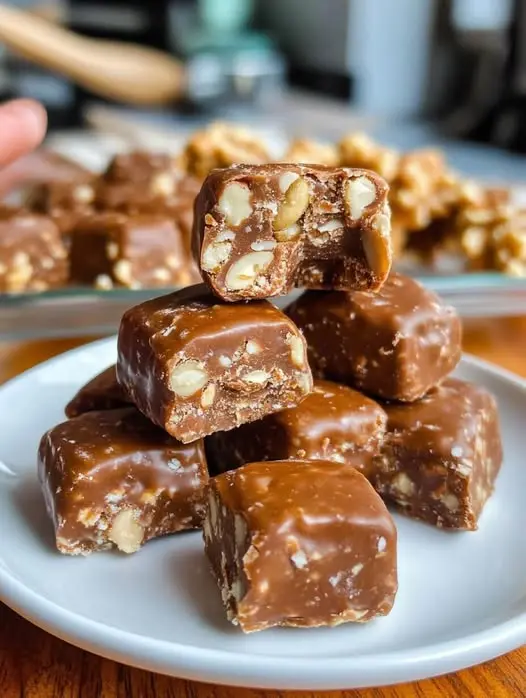
Presentation is half the fun when you have spent the time to make homemade chocolate peanut nougat bars. These bars look stunning when arranged on a simple white platter, which allows the dark richness of the chocolate to pop. For a more rustic, artisanal look, you can wrap individual bars in small strips of parchment paper and tie them with kitchen twine.
Garnishes
While the chocolate is still wet, you can add a few decorative touches to signal the flavors inside. A single roasted peanut pressed into the top, a tiny pinch of coarse sea salt, or a few shavings of white chocolate can make the bars look like they came straight from a high-end candy shop. These small details add a professional flair to your homemade candy bars.
Creative Ways to Serve It
If you have leftover scraps from trimming the edges of the bars, don’t throw them away! Chop them into small pieces and use them as a decadent topping for vanilla bean ice cream or fold them into a batch of brownie batter. You can also serve these bars as part of a “dessert charcuterie board” alongside fresh strawberries, apple slices, and pretzel knots to balance the intense sweetness with tartness and extra salt.
Storage and Make-Ahead
Storing Leftovers
Because these bars contain dairy in the caramel, they are best kept in an airtight container in a cool, dry place. At room temperature, they will stay fresh for about 5 to 7 days. If your kitchen is particularly warm, it is better to store them in the refrigerator to prevent the chocolate from softening and the layers from losing their definition.
Freezing
These homemade chocolate peanut nougat bars freeze remarkably well. Wrap individual bars tightly in plastic wrap and place them in a freezer-safe bag. They can be frozen for up to 3 months. When you are ready to eat one, let it thaw in the refrigerator for a few hours. Eating them straight from the freezer can be quite hard on the teeth, so patience is key!
Making It Ahead
This is an excellent make-ahead recipe because the chilling stages actually improve the texture. You can prepare the nougat and caramel layers up to two days in advance, keeping the slab in the refrigerator until you are ready to slice and dip them in chocolate. Once dipped, the chocolate shell acts as a seal, keeping the inside layers moist and fresh.
Final Thoughts
Mastering the art of homemade chocolate peanut nougat bars is a rite of passage for any serious home baker or candy enthusiast. While it requires a bit of technical precision and a reliable thermometer, the end result is a confection that far surpasses the quality of anything you can buy in a store. There is a deep sense of satisfaction in seeing those distinct layers of fluffy nougat and peanut-studded caramel finally come together under a glossy chocolate coating. Whether you share them with friends or keep them as a secret stash in your pantry, these bars are a true celebration of classic candy flavors made better by the touch of a home cook.
Frequently Asked Questions
Do I really need a candy thermometer for this recipe?
Yes, a candy thermometer is essential for homemade chocolate peanut nougat bars. Candy making is based on specific sugar concentrations that occur at exact temperatures. Without a thermometer, it is nearly impossible to tell the difference between the “soft ball” stage and the “hard ball” stage just by looking, which determines whether your bars will be chewy or rock-hard.
Can I use natural peanut butter in the nougat?
It is generally recommended to use standard processed peanut butter (like Jif or Skippy) for the nougat layer. Natural peanut butters that require stirring often have a higher oil content that can separate when mixed with hot sugar syrup, potentially causing the creamy peanut nougat to become greasy or fail to set properly.
Why did my chocolate turn out soft and melty at room temperature?
If your chocolate doesn’t stay firm, it likely wasn’t tempered. Tempering chocolate involves melting it to a specific temperature and then cooling it under controlled conditions to stabilize the cocoa butter crystals. If you find tempering too difficult, you can add a teaspoon of coconut oil to your chocolate; while it won’t be a true temper, it helps the chocolate set more smoothly in the fridge.
Can I make these bars vegan?
Transforming this specific recipe into a vegan version is quite complex because it relies heavily on egg whites for the nougat and heavy cream for the caramel. While you can use aquafaba (chickpea water) to replace egg whites and coconut cream for the caramel, the temperature points and structural integrity will change significantly, so it is best to follow a recipe specifically designed for vegan confectionery.
How do I get perfectly straight edges when I cut the bars?
The secret to clean cuts is temperature and a hot knife. Ensure the bars are very cold (straight from the fridge). Dip a long, sharp chef’s knife into a tall glass of hot water, wipe it dry, and then make one firm downward cut. Clean the knife and re-dip it in hot water between every single slice. This prevents the caramel from dragging and creates that beautiful, professional DIY candy bar look.
Chocolate Peanut Nougat Bars

These decadent Chocolate Peanut Nougat Bars are a perfect blend of chewy nougat, crunchy peanuts, and smooth milk chocolate. A homemade version of your favorite candy bar that is surprisingly easy to make!
- 1 cup granulated sugar
- 1/4 cup light corn syrup
- 1/4 cup water
- 1 large egg white, room temperature
- 1 cup creamy peanut butter
- 1 cup roasted salted peanuts
- 2 cups milk chocolate chips
- 1/4 cup creamy peanut butter (for topping)
- 1Line an 8x8-inch baking pan with parchment paper, leaving an overhang on the sides for easy removal.
- 2In a small saucepan over medium heat, combine the sugar, corn syrup, and water. Bring the mixture to a boil and cook without stirring until it reaches 250°F (121°C) on a candy thermometer.
- 3While the syrup is cooking, beat the egg white in a large bowl until stiff peaks form.
- 4Once the syrup reaches the target temperature, slowly pour it into the beaten egg white in a thin, steady stream while continuing to beat at high speed.
- 5Fold in 1 cup of peanut butter and the roasted peanuts until well combined. Press the mixture firmly into the prepared pan.
- 6In a microwave-safe bowl, melt the milk chocolate chips with the remaining 1/4 cup of peanut butter in 30-second intervals until completely smooth.
- 7Spread the chocolate mixture evenly over the nougat layer.
- 8Refrigerate for at least 2 hours or until the bars are completely firm before slicing.
Keywords: chocolate, peanut butter, nougat, candy bars, homemade sweets, dessert


