
Cheeseburger Sliders

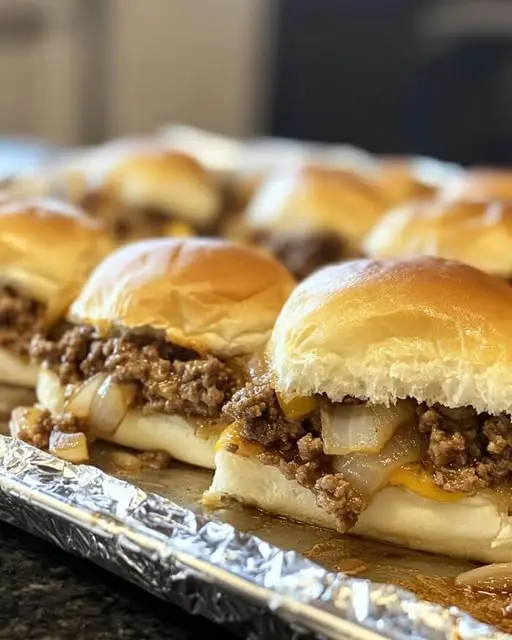
There is something uniquely satisfying about a tray of easy baked cheeseburger slider recipe pulls, where the steam rises from a layer of melted cheese and savory beef. Unlike traditional burgers that require individual patty shaping and constant attention at the grill, these sliders offer a streamlined way to feed a crowd without sacrificing that classic diner-style flavor. The combination of soft, slightly sweet rolls and a well-seasoned ground beef base creates a texture that is both comforting and addictive, making them a staple for everything from casual Sunday lunches to high-energy game day gatherings.
This method focuses on efficiency and consistency, ensuring every bite is perfectly balanced with savory meat, sharp cheese, and a buttery, toasted exterior. By preparing the beef as a single seasoned layer rather than individual patties, you achieve a much juicier result that stays intact inside the bun. Whether you are hosting a large party or just looking for a ground beef party snacks solution that the whole family will enjoy, this approach simplifies the process while delivering maximum flavor impact.
Why This Recipe Is a Keeper
- Effortless Batch Cooking: Because you are baking the entire tray at once, you can serve a dozen people simultaneously rather than flipping burgers in shifts, making it the ultimate easy weeknight dinner.
- Superior Texture: Using Hawaiian roll sliders provides a soft, pillowy contrast to the savory beef, while the seasoned butter glaze creates a satisfyingly crisp top.
- Highly Customizable: The base recipe is a blank canvas that easily accommodates different cheeses, extra toppings, or spicy additions to suit your specific cravings.
- Make-Ahead Friendly: You can prepare the meat filling in advance, allowing you to assemble and bake the sliders in minutes when you are ready to serve.
Ingredients You’ll Need
The success of these sliders relies on a few key components that build layers of flavor. While the ingredients are humble, choosing the right versions of each ensures the final dish tastes like it came from a professional kitchen.
- Ground Beef: Opt for a lean-to-fat ratio of 80/20 or 85/15. This provides enough fat for a juicy filling without making the bottom buns overly greasy.
- Slider Rolls: Sweet Hawaiian rolls are the gold standard here because their density holds up well to the moisture of the beef and cheese.
- Onions and Garlic: Finely diced onions sautéed with the beef provide essential moisture and a classic “white castle” aromatic profile.
- Worcestershire Sauce: This adds a deep, umami-rich saltiness that enhances the natural flavor of the beef.
- Cheese Slices: Sharp cheddar provides great flavor, but American cheese is prized for its superior melting capabilities in a slider format.
- Unsalted Butter: Melted and brushed over the tops, this helps the buns brown and serves as the glue for your seasonings.
- Sesame Seeds and Garlic Powder: These are sprinkled over the butter glaze to give the rolls that iconic burger aesthetic and a boost of toasted flavor.
- Pickle Chips: Adding these before or after baking provides a necessary vinegary crunch to cut through the richness of the meat and cheese.
Variations and Smart Swaps
The Bacon Burger Twist: Stir crumbled cooked bacon directly into the beef mixture before assembling. This ensures every bite has a smoky, salty crunch without the bacon strips sliding out of the small buns.
Spicy Jalapeño Sliders: Swap the cheddar for pepper jack cheese and add a layer of diced pickled jalapeños over the meat. You can also add a pinch of cayenne pepper to the butter glaze for an extra kick of heat.
Mushroom and Swiss Version: For a more gourmet feel, replace the cheddar with Swiss cheese and top the beef with a layer of sautéed cremini mushrooms and caramelized onions.
Turkey or Chicken Sliders: You can easily substitute the ground beef for ground turkey or chicken. If using leaner meats, add an extra teaspoon of Worcestershire sauce or a tablespoon of tomato paste to ensure the filling stays moist.
How to Make This Easy Baked Cheeseburger Slider Recipe
Step 1: Brown and Season the Beef Base
Start by browning your ground beef in a large skillet over medium-high heat. As the meat cooks, use a wooden spoon to break it into very small crumbles; smaller crumbles make for a more cohesive slider that doesn’t fall apart. Add your finely diced onions halfway through the browning process so they soften and become translucent without burning. Once the beef is fully cooked, drain the excess grease thoroughly. This is a critical step to prevent soggy bottom buns. Stir in your salt, pepper, garlic powder, and Worcestershire sauce, ensuring the seasoning is evenly distributed throughout the meat.
Step 2: Prepare the Slider Rolls
Using a long serrated knife, slice the entire block of rolls in half horizontally. Do not pull the rolls apart individually yet; keeping them as a single sheet makes assembly much faster and helps the sliders cook more evenly. Place the bottom half of the rolls into a lightly greased baking dish or onto a parchment-lined sheet pan cheeseburgers setup. If you prefer a sturdier base, you can toast the bottom halves in the oven for about 3 minutes before adding the toppings to create a moisture barrier.
Step 3: Layer the Meat and Cheese
Spread the seasoned beef mixture in an even layer across the bottom rolls, pressing down slightly with a spatula to compact it. This helps the sliders stay together when you eventually slice them. Next, lay your cheese slices over the beef, overlapping them slightly so that every square inch is covered. If you are using pickles or extra onions, place them directly on top of the cheese now. Place the top half of the rolls back onto the assembly, aligning them perfectly with the bottoms.
Step 4: Apply the Savory Butter Glaze
In a small bowl, whisk together the melted butter, a splash of Worcestershire, and a hint of garlic powder. Use a pastry brush to generously coat the tops of the rolls, making sure the butter drips slightly into the crevices between the buns. Sprinkle the sesame seeds over the wet butter. This glaze doesn’t just add flavor; it protects the bread from drying out in the oven and creates that beautiful golden-brown sheen that makes this easy baked cheeseburger slider recipe so visually appealing.
Step 5: Bake Until Melty and Golden
Cover the baking dish loosely with aluminum foil. This allows the cheese to melt and the beef to heat through without the tops of the buns burning. Bake in a preheated oven at 350°F for about 10 to 12 minutes. For the final 3 to 5 minutes, remove the foil to allow the tops to crisp up and reach a deep golden hue. You’ll know they are ready when the cheese is bubbling at the edges and the buns feel firm to the touch.
Pro Tips for Success
- Drain the Beef Twice: For the cleanest flavor and best texture, drain the grease after browning, and then give the meat a quick pat with a paper towel. This is the best way to avoid “soggy bun syndrome.”
- Use a Serrated Knife: When slicing the rolls in half, use a sawing motion with a long serrated bread knife. A straight blade will squash the soft rolls rather than cutting through them cleanly.
- Compact the Meat: When spreading the beef, use the back of a large spoon to press it into the rolls. This prevents the meat from spilling out when the sliders are cut and served.
- The Foil Trick: Always start with foil. It creates a steam chamber that melts the cheese perfectly. If you skip the foil, the tops will often brown too quickly before the center of the tray is hot.
How to Serve Your Sliders
Once the tray comes out of the oven, let it rest for about two to three minutes. This brief resting period allows the cheese to set slightly, which makes it much easier to slice through the rolls without the filling sliding out. Use a sharp knife to follow the natural lines of the rolls, cutting them into individual squares. These are best served warm while the cheese is still stretchy.
To turn these into a complete meal, consider classic game day appetizer pairings. They go beautifully with a side of crispy seasoned fries, a tangy coleslaw, or even a simple green salad to balance the richness. For a party spread, place a variety of dipping sauces on the side, such as honey mustard, spicy mayo, or a classic fry sauce. If you want to lean into the diner theme, serve them with a pile of extra dill pickle spears and some kettle-cooked potato chips.
Storage and Make-Ahead
Storing Leftovers
If you have leftover sliders, wrap them tightly in aluminum foil or place them in an airtight container. They will stay fresh in the refrigerator for up to 3 days. Because of the moisture in the beef and cheese, the buns may soften over time, so proper reheating is key to reviving their texture.
Reheating
Avoid the microwave if possible, as it can make the bread rubbery. Instead, place the sliders on a baking sheet, cover them with foil, and heat in a 350°F oven for about 8 to 10 minutes. This will melt the cheese again and crisp up the exterior of the rolls.
Making It Ahead
You can prepare the ground beef mixture up to 24 hours in advance and store it in the fridge. When you are ready to serve, simply assemble the sliders and increase the covered baking time by about 5 minutes to ensure the cold meat is heated through completely. You can also assemble the entire tray (without the butter glaze), wrap it in plastic, and refrigerate for a few hours before baking.
Final Thoughts
The beauty of this easy baked cheeseburger slider recipe lies in its simplicity and the joy of sharing. There is no need to stand over a hot stove for an hour when you can produce a dozen high-quality cheeseburgers in one go. By focusing on small details like draining the meat and using a seasoned butter glaze, you elevate a simple snack into a memorable meal. Whether it’s for a busy Tuesday night or a crowded football Saturday, these sliders are guaranteed to disappear quickly from the serving tray.
Frequently Asked Questions
Can I use different types of bread for these sliders?
While Hawaiian rolls are the most popular choice due to their sweetness and texture, you can certainly use small brioche buns or even mini dinner rolls. Just keep in mind that thinner or softer rolls may require a shorter baking time, and more crusty rolls might need a bit more butter glaze to stay moist.
How do I prevent the bottom of the sliders from getting soggy?
The best way to prevent sogginess is to thoroughly drain the ground beef after browning. Additionally, you can lightly toast the inner sides of the bottom buns in the oven for a few minutes before adding the meat. This creates a toasted crust that acts as a barrier against the juices from the beef and cheese.
What is the best cheese to use for melting?
For that classic, gooey cheeseburger experience, American cheese is hard to beat because it has a low melting point and stays creamy. However, sharp cheddar, Monterey Jack, or even fontina are excellent choices if you prefer a stronger flavor profile or a more natural cheese pull.
Can I freeze these sliders for later?
You can freeze the cooked and cooled sliders, though the texture of the bread may change slightly upon thawing. Wrap them individually in plastic wrap and then place them in a freezer bag for up to two months. To serve, thaw them in the refrigerator overnight and reheat in the oven as directed above.
Can I add raw vegetables like lettuce or tomatoes?
It is best to add fresh, crunchy vegetables like lettuce or sliced tomatoes *after* the sliders have finished baking. If you bake them with the meat, they will wilt and release moisture, making the buns soggy. Simply lift the top of the warm buns after baking and tuck in your fresh toppings before serving.
Vegetarian Cheeseburger Sliders

These Vegetarian Cheeseburger Sliders use savory plant-based grounds, melted cheddar, and sweet Hawaiian rolls for a crowd-pleasing dinner or appetizer.
- 1 pack (12 count) Hawaiian sweet rolls
- 1 lb plant-based burger grounds
- 1/2 cup yellow onion, finely diced
- 1 tsp garlic powder
- 6 slices sharp cheddar cheese
- 1/4 cup dill pickle chips
- 2 tbsp melted unsalted butter
- 1 tbsp sesame seeds
- 1Preheat your oven to 350°F (175°C) and grease a 9x13 inch baking dish.
- 2In a skillet over medium heat, sauté the diced onions and plant-based grounds until browned and cooked through, seasoning with garlic powder.
- 3Slice the entire block of Hawaiian rolls in half horizontally and place the bottom slab into the prepared baking dish.
- 4Distribute the cooked meat substitute evenly over the rolls, then layer with cheddar cheese slices and pickles.
- 5Place the top half of the rolls over the cheese. Brush the tops with melted butter and sprinkle with sesame seeds.
- 6Cover with foil and bake for 10 minutes, then remove foil and bake for another 5-10 minutes until the cheese is melted and the tops are golden brown.
Keywords: cheeseburger sliders, vegetarian dinner, party food, hawaiian roll sliders


