
Chocolate Peanut Butter Cake

There is arguably no flavor combination more iconic than the marriage of deep, dark chocolate and salty-sweet peanut butter. Finding the best chocolate peanut butter cake means striking a perfect balance between a crumb that is intensely chocolaty and moist, and a frosting that is light enough to spread but rich enough to stand up to the cocoa. This cake delivers on all fronts, offering a sophisticated take on a classic childhood favorite that feels equally at home at a casual birthday party or a festive dinner gathering. Each bite offers a sensory contrast between the velvet-like sponge and the silky, nutty buttercream that coats the palate.
This recipe focuses on building layers of flavor rather than just adding sugar. By using high-quality cocoa powder and a touch of hot coffee, we bloom the chocolate to its fullest potential, creating a base that is sophisticated and bold. When paired with a whipped peanut butter frosting that tastes like the center of a premium peanut butter cup, this moist chocolate cake becomes a showstopper. It is approachable for home bakers but yields a result that looks and tastes like it came from a professional patisserie, making it a reliable staple for your dessert repertoire.
Why You’ll Love This Recipe
- Perfect Flavor Balance: The bitterness of the dark chocolate base perfectly offsets the salty sweetness of the peanut butter buttercream, ensuring the cake never feels cloying.
- Superior Texture: Thanks to the inclusion of buttermilk and oil, the cake remains incredibly soft and tender for days, avoiding the dryness often associated with homemade sponges.
- Crowd-Pleasing Appeal: From kids to adults, the chocolate and peanut butter duo is a universal favorite that rarely leaves behind leftovers at any gathering.
- Beginner-Friendly Technique: While the result looks complex, the mixing method is straightforward and doesn’t require advanced pastry skills to achieve a professional crumb.
Ingredients You’ll Need
The secret to a truly exceptional cake lies in the quality of the pantry staples you choose. Each component plays a specific role in ensuring the structure is sound while the flavor remains intense and memorable. Here is what you will need to gather before you start baking.
- All-Purpose Flour: This provides the necessary structure. Using a standard all-purpose flour ensures the cake has enough protein to hold the heavy frosting without being tough.
- Unsweetened Cocoa Powder: For the deepest color and flavor, use a high-quality Dutch-processed cocoa. It provides a smooth, dark chocolate profile that defines this decidant dessert recipe.
- Granulated Sugar: Beyond sweetness, sugar helps tenderize the crumb and keeps the cake moist by locking in water molecules during the baking process.
- Buttermilk: The acidity in buttermilk reacts with the leavening agents to create a light lift, while also contributing a subtle tang that balances the richness of the chocolate.
- Hot Coffee: You won’t taste the coffee in the final product, but the heat “blooms” the cocoa powder, releasing its full aromatic potential and deepening the chocolate flavor.
- Creamy Peanut Butter: Stick to a standard commercial brand rather than “natural” varieties that separate, as this ensures a stable and fluffy peanut butter buttercream.
- Unsalted Butter: This allows you to control the salt content of your frosting. High-fat European-style butter can add an extra layer of richness to the buttercream.
- Powdered Sugar: Finely sifted sugar is essential for a frosting that is smooth on the tongue without any graininess or grit.
Variations and Smart Swaps
- Chocolate Ganache Drip: For an extra layer of decadence, pour a simple 1:1 mixture of warm heavy cream and semi-sweet chocolate over the top edges of the cake to create a dramatic drip effect.
- Crunchy Texture: If you prefer a bit of a bite, fold half a cup of crushed roasted peanuts or chopped chocolate chips into the batter just before pouring it into the pans.
- Gluten-Free Option: You can substitute the all-purpose flour with a high-quality 1:1 gluten-free baking blend. Ensure the blend contains xanthan gum for the best structural results.
- Mocha Twist: Increase the coffee flavor by adding a teaspoon of espresso powder to the dry ingredients, which will push the flavor profile toward a rich mocha-peanut butter hybrid.
How to Make the Best Chocolate Peanut Butter Cake
Step 1: Sift and Combine the Dry Ingredients
In a large mixing bowl, whisk together the flour, sugar, cocoa powder, baking soda, and salt. Sifting the cocoa powder is a vital step here, as it tends to clump and can leave pockets of dry powder in your finished cake. By ensuring these ingredients are perfectly aerated and combined, you create a uniform foundation that allows the leavening agents to work evenly throughout the batter, resulting in a consistent moist chocolate cake crumb.
Step 2: Incorporate the Wet Ingredients
Add the eggs, buttermilk, oil, and vanilla extract to the dry mixture. Use a hand mixer or a stand mixer on medium speed to beat the ingredients together until the batter is smooth and well-incorporated. The oil in this recipe is key for longevity; unlike butter, oil remains liquid at room temperature, which translates to a cake that feels soft and moist even if it has been sitting out or stored in the fridge.
Step 3: Bloom the Cocoa with Hot Coffee
Lower the mixer speed and carefully pour in the hot coffee. The batter will become quite thin and liquid, but do not be alarmed—this is exactly the consistency you want. The hot liquid dissolves the cocoa particles and melts any remaining sugar, ensuring a deep, dark color and a silky texture. Continue mixing just until the liquid is fully integrated, being careful not to over-mix, which could develop the gluten and make the cake tough.
Step 4: Bake to Perfection
Divide the batter evenly between your prepared cake pans. Bake in a preheated oven until a toothpick inserted into the center comes out clean or with just a few moist crumbs attached. It is better to pull the cakes out a minute early than a minute late; carry-over cooking will finish the process as the cakes cool in their pans. This careful monitoring is what ensures you achieve the best chocolate peanut butter cake texture possible.
Step 5: Prepare the Whipped Peanut Butter Frosting
While the cakes cool completely, whip the butter and peanut butter together until the mixture is pale and extremely fluffy. Gradually add the powdered sugar and a splash of heavy cream, beating on high speed. This process incorporates air, turning a heavy nut butter into a cloud-like peanut butter buttercream. The frosting should be stiff enough to hold its shape but soft enough to glide over the delicate cake layers without tearing them.
Step 6: Assemble and Frost the Layers
Once the cakes are entirely cold, place the first layer on a stand and spread a generous amount of frosting over the top. Add the second layer and apply a thin “crumb coat” of frosting over the entire cake. Chill for 20 minutes to set this layer before applying the final, thicker layer of buttercream. This technique ensures that no dark chocolate crumbs mar the beautiful, tan finish of your peanut butter frosting.
Pro Tips for the Best Results
- Tip: Always use room temperature ingredients, especially the eggs and buttermilk. This allows the batter to emulsify properly, leading to a more even bake and a better rise.
- Tip: Don’t skip the hot coffee. Even if you aren’t a coffee drinker, it is the primary secret to getting that professional, deep cocoa flavor without any coffee taste remaining.
- Tip: Weigh your ingredients using a kitchen scale. Baking is a science, and measuring flour by volume can vary by as much as 20%, which can lead to a dry or dense cake.
- Tip: Ensure your cake layers are completely cold before frosting. Even a slightly warm cake will melt the butter in the frosting, causing the layers to slide and the buttercream to turn greasy.
- Tip: For perfectly flat layers, use cake strips around the outside of your pans. This prevents the edges from cooking too much faster than the center, eliminating the “dome” on top.
Troubleshooting Common Problems
Why Is My Cake Falling Apart?
If the cake is too fragile to handle, it may be because it hasn’t cooled long enough. This moist chocolate cake is very tender when warm. Let the layers rest in the pans for 10 minutes, then move them to a wire rack to cool completely. Chilling the layers in the fridge for an hour before assembly can also make them much easier to stack and frost.
Why Is the Frosting Too Runny?
Runny frosting usually happens if the butter was too soft or if too much cream was added. To fix this, gradually beat in more sifted powdered sugar until the desired consistency is reached. Alternatively, place the frosting bowl in the fridge for 15 minutes to firm up the fats, then re-whip it to restore the fluffy texture.
Why Did the Cake Bake with a Large Dome?
A large dome usually indicates the oven temperature was too high, causing the edges to set before the middle could rise. Check your oven temperature with a separate thermometer. If you already have domes, simply use a serrated knife to level the tops of the cakes before you begin the layering process so the cake stands straight.
How to Serve This Cake
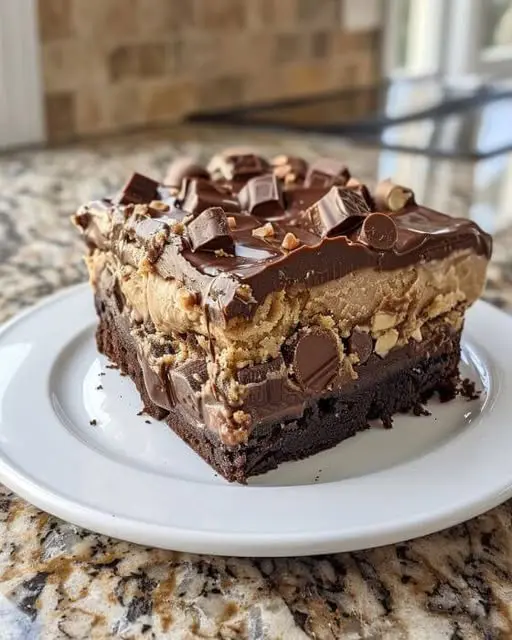
Presentation is half the fun when it comes to such a decidant dessert recipe. For a classic look, use an offset spatula to create rustic swirls in the frosting, which catch the light and provide a homemade feel. You can garnish the top with chopped peanut butter cups, a sprinkle of flaky sea salt, or even a handful of roasted peanuts for added crunch. If you want a more modern aesthetic, leave the sides “naked” so the dark chocolate layers peek through the pale frosting.
When it comes to beverage pairings, a cold glass of milk is the traditional choice, but a strong cup of black coffee or a glass of tawny port can also complement the richness of the chocolate. Serve the cake at room temperature to ensure the buttercream is at its silkiest consistency. If the cake has been refrigerated, take it out at least 30 to 60 minutes before serving to allow the flavors to open up and the textures to soften.
Storage and Make-Ahead Guidance
Storing Leftovers
Because of the high moisture content in this cake, it keeps remarkably well. Store any leftovers in an airtight container or under a cake dome. At room temperature, the cake will stay fresh for up to two days. If you need to store it longer, it can be kept in the refrigerator for up to five days, though you should cover the sliced edges with plastic wrap to prevent them from drying out.
Freezing and Make-Ahead
You can easily prepare the cake layers up to a month in advance. Wrap the completely cooled layers tightly in two layers of plastic wrap and a layer of foil before freezing. Thaw them in the refrigerator overnight while still wrapped. You can also freeze the fully assembled cake; flash-freeze it for an hour until the frosting is hard, then wrap it securely. This makes it a fantastic option for stress-free party planning.
Final Thoughts
Mastering the best chocolate peanut butter cake is a rewarding experience that results in a dessert that feels truly special. By focusing on quality ingredients like Dutch-processed cocoa and creamy peanut butter, and utilizing techniques like blooming the chocolate with coffee, you create a multi-dimensional flavor profile that far exceeds anything from a box. Whether you are celebrating a milestone or simply indulging a craving, this cake stands as a testament to why chocolate and peanut butter remain the ultimate pair. The balance of the moist chocolate cake and the airy frosting is sure to make this a requested favorite in your kitchen.
Frequently Asked Questions
Can I use natural peanut butter for the frosting?
It is generally not recommended to use “natural” peanut butter (the kind that requires stirring) for peanut butter buttercream. The oil separation in natural peanut butter can cause the frosting to break, become grainy, or turn out too soft to hold the weight of the cake layers. For a stable, fluffy frosting, traditional creamy commercial brands work best.
Do I have to use coffee in the batter?
While the coffee is highly recommended for its ability to enhance the chocolate, you can substitute it with boiling water if you prefer to avoid caffeine. The goal is the heat, which helps bloom the cocoa powder and create a smooth batter. However, rest assured that the cake will not taste like coffee at all; the flavor simply becomes richer and more intense.
How do I get my cake layers to be perfectly even?
The most accurate way to get even layers is to use a kitchen scale to weigh the batter as you pour it into the pans. If you don’t have a scale, use a large measuring cup to distribute the batter. Also, make sure your oven racks are level and avoid opening the oven door too frequently during the first 20 minutes of baking.
Can I make this into cupcakes instead?
Yes, this batter works beautifully for cupcakes. Simply line a muffin tin with paper liners and fill them about two-thirds full. Bake at the same temperature for 18 to 22 minutes, or until a toothpick comes out clean. This recipe will typically yield about 24 to 30 cupcakes, providing a perfect bite-sized version of the best chocolate peanut butter cake.
Is this cake sturdy enough for a tiered wedding cake?
This cake is very moist and tender, which makes it delicious but slightly less stable than a traditional pound cake. If you plan to use it for a tiered cake, ensure you use proper internal supports like dowels and cake boards. Chilling the layers before assembly will also help maintain the structure during the stacking process.
Decadent Chocolate Peanut Butter Cake

A rich, moist dark chocolate cake layered with a velvety smooth peanut butter buttercream and topped with chocolate ganache.
- 2 cups all-purpose flour
- 2 cups granulated sugar
- 3/4 cup unsweetened cocoa powder
- 2 tsp baking soda
- 1 tsp baking powder
- 1 tsp salt
- 1 cup buttermilk, room temperature
- 1/2 cup vegetable oil
- 2 large eggs
- 2 tsp vanilla extract
- 1 cup hot coffee
- Peanut Butter Frosting:
- 1 cup creamy peanut butter
- 1/2 cup unsalted butter, softened
- 2 cups powdered sugar
- 3 tbsp heavy cream
- 1Preheat oven to 350°F (175°C) and grease two 9-inch round cake pans with butter and cocoa powder.
- 2In a large mixing bowl, whisk together flour, sugar, cocoa, baking soda, baking powder, and salt.
- 3Add buttermilk, vegetable oil, eggs, and vanilla. Mix on medium speed until well combined.
- 4Reduce speed and carefully pour in the hot coffee. Stir by hand until the batter is smooth (it will be thin).
- 5Divide batter evenly between pans and bake for 30-35 minutes or until a toothpick comes out clean.
- 6For the frosting: Beat peanut butter and butter until smooth. Gradually add powdered sugar and cream, beating until light and fluffy.
- 7Once cake layers are completely cool, frost the top of one layer, stack the second layer on top, and frost the exterior.
Keywords: chocolate cake, peanut butter frosting, layer cake, dessert, baking


