
Soft Dinner Rolls

There is nothing quite like the aroma of fresh bread wafting through the house, especially when it involves a batch of best homemade soft dinner rolls. These rolls are the quintessential comfort food, offering a cloud-like texture that pulls apart in delicate, feathery layers. Whether you are preparing a festive holiday feast or looking to elevate a simple weeknight soup, a basket of warm, buttery rolls is often the most anticipated part of the meal. Achieving that perfect balance of a golden-brown crust and a pillowy interior is simpler than many home bakers realize, requiring just a bit of patience and the right technique.
Making bread from scratch can feel intimidating, but these fluffy yeast rolls are designed to be approachable even for beginners. The secret lies in a rich, enriched dough that uses milk and butter to ensure every bite is tender and flavorful. This guide will walk you through the nuances of yeast fermentation, the importance of proper kneading, and the cues to look for so you can bake with confidence. By the time these come out of the oven, you will have a versatile recipe that outshines anything you can find in a plastic bag at the grocery store.
Why You’ll Love This Recipe
- Unmatched Texture: These rolls are incredibly soft and airy, thanks to the addition of milk and butter which breaks up the gluten strands for a more tender crumb.
- Versatile Pairing: They serve as the perfect holiday side dishes for Thanksgiving or Christmas, yet they are simple enough to accompany a casual Sunday roast.
- Make-Ahead Friendly: You can easily prep the dough in advance, allowing you to enjoy fresh-baked bread without the stress of same-day preparation.
- Simple Ingredients: This recipe relies on pantry staples you likely already have on hand, proving that you don’t need fancy equipment to achieve bakery-quality results.
Ingredients You’ll Need
The beauty of the best homemade soft dinner rolls lies in the transformation of a few basic ingredients into something spectacular. Each component plays a specific role in the chemistry of the dough, affecting how it rises, how it tastes, and how long it stays fresh.
- All-Purpose Flour: This provides the necessary structure. While bread flour can be used for more chew, all-purpose flour keeps the rolls light and delicate.
- Active Dry Yeast: This is the leavening agent that makes the rolls rise. It requires blooming in warm liquid to ensure it is alive and ready to work.
- Whole Milk: Unlike water, milk adds fat and natural sugars, resulting in a softer crust and a richer flavor profile in your fluffy yeast rolls.
- Unsalted Butter: Butter provides richness and that classic “melt-in-your-mouth” quality. Using unsalted allows you to control the exact seasoning of the dough.
- Granulated Sugar: A small amount of sugar feeds the yeast and helps the crust caramelize into a beautiful golden brown during baking.
- Egg: An egg adds structure and color to the dough, helping the rolls hold their shape while contributing to a brioche-like richness.
- Salt: Essential for flavor, salt also regulates the yeast activity to prevent the dough from rising too quickly and becoming airy and flavorless.
Easy Ways to Change It Up
Once you master the base recipe, you can adapt these rolls to suit any menu or flavor preference. The dough is a blank canvas for both savory and sweet additions.
- Garlic Herb Rolls: Brush the tops with a mixture of melted butter, minced garlic, and fresh parsley or rosemary immediately after they come out of the oven.
- Honey Whole Wheat: Replace half of the all-purpose flour with whole wheat flour and swap the granulated sugar for honey for a heartier, nuttier version.
- Cheesy Center: Tuck a small cube of mozzarella or sharp cheddar into the center of each roll during the shaping process for a gooey surprise.
- Sweet Cinnamon Rolls: Use the same dough base but brush with butter and sprinkle with cinnamon sugar before rolling them up for a breakfast-style treat.
How to Make Best Homemade Soft Dinner Rolls
Step 1: Activate the Yeast and Mix the Base
Start by warming your milk to about 110°F; it should feel like warm bath water. If it is too hot, it will kill the yeast, and if it is too cold, the yeast won’t wake up. Stir in the sugar and sprinkle the yeast on top. Let it sit for about five to ten minutes until it becomes foamy and fragrant. This step is crucial because it confirms your yeast is active before you commit the rest of your ingredients. Once foamy, whisk in the melted butter and the egg until well combined.
Step 2: Incorporate Flour and Knead the Dough
Gradually add the flour and salt to the wet mixture. If using a stand mixer, use the dough hook on low speed until a shaggy mass forms. Increase the speed and knead for about 5-7 minutes. If kneading by hand, turn the dough onto a lightly floured surface and work it until it is smooth, elastic, and slightly tacky but not sticking to your fingers. Proper kneading develops the gluten network, which is what allows the best homemade soft dinner rolls to trap air and rise into light, airy spheres.
Step 3: The First Rise for Flavor and Volume
Place the kneaded dough into a lightly greased bowl and cover it with a clean kitchen towel or plastic wrap. Set it in a warm, draft-free spot. You want the dough to double in size, which usually takes about 60 to 90 minutes depending on the temperature of your kitchen. This fermentation period is where the flavor develops. A slow, steady rise creates a better depth of taste than a rushed rise in a hot environment.
Step 4: Shape the Individual Rolls
Gently punch down the risen dough to release the air. Turn it out onto a surface and divide it into equal portions—usually 12 to 15 pieces for standard-sized rolls. To shape them, tuck the edges of a piece underneath itself to create a smooth top, then roll it in the palm of your hand against the counter in a circular motion. This creates surface tension, which helps the rolls rise upward rather than spreading out flat. Arrange them in a greased baking dish so they are just barely touching.
Step 5: Second Rise and Baking to Perfection
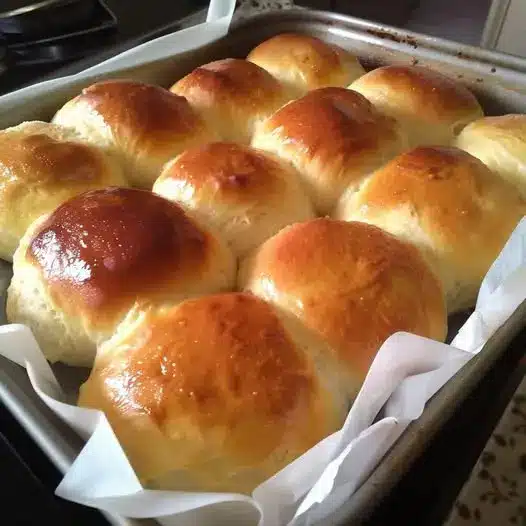
Cover the shaped rolls and let them rise again for about 30-45 minutes. They should look puffy and be touching each other. Preheat your oven to 375°F. Bake for 15-20 minutes until the tops are a deep golden brown. For an extra touch of luxury, brush the tops with melted butter the moment they come out of the oven. This softens the crust and gives them a professional, glossy finish that makes these the best homemade soft dinner rolls you’ve ever tasted.
Pro Tips for Success
- Use a Kitchen Scale: For perfectly even rolls that bake at the same rate, weigh your dough pieces. This ensures no one gets a tiny roll while someone else gets a giant one.
- Don’t Over-Flour: It is tempting to add more flour if the dough feels sticky, but too much flour leads to dense, dry rolls. Use just enough to make the dough manageable.
- Temperature Matters: Ensure your egg is at room temperature so it doesn’t chill the warm milk and slow down the yeast activity.
- The Windowpane Test: To check if you’ve kneaded enough, stretch a small piece of dough. If it stretches thin enough to see light through it without tearing, the gluten is ready.
- Steam for Softness: If you prefer an ultra-soft crust, you can place a small pan of water on the bottom rack of the oven to create a moist baking environment.
Troubleshooting Common Problems
Why Are My Rolls Dense and Heavy?
Dense rolls usually happen for two reasons: either the dough wasn’t kneaded enough to develop gluten, or it wasn’t allowed to rise long enough. If the yeast doesn’t have time to produce enough gas, the bread will be compact. Additionally, check your yeast expiration date; old yeast won’t provide the lift needed for fluffy yeast rolls.
Why Didn’t My Dough Rise?
The most common culprit is the temperature of the liquid. If the milk was over 120°F, it likely killed the yeast. Conversely, if your kitchen is very cold, the rise will take much longer. Try placing the bowl inside a turned-off oven with the oven light on to provide a gentle, consistent warmth.
Why Is the Bottom Burnt but the Top Is Pale?
This often happens if the baking dish is placed too low in the oven or if you are using a dark-colored metal pan, which absorbs heat faster. Try moving your rack to the center position and consider using a glass or light-colored ceramic dish for more even heat distribution.
How to Serve Best Homemade Soft Dinner Rolls
These rolls are best served warm, ideally within thirty minutes of leaving the oven. The contrast between the slightly crisp outer skin and the steamy, soft interior is at its peak right after baking. Place them in a basket lined with a cloth napkin to trap the heat and keep them soft throughout the meal.
Complementary Spreads
While these rolls are delicious on their own, they are elevated by high-quality spreads. Consider serving them with salted honey butter, a roasted garlic spread, or even a simple herb-infused olive oil. For holiday side dishes, a cranberry-orange butter can add a festive flare that ties the bread into the rest of the meal.
What to Serve Them With
These rolls are the perfect vehicle for soaking up juices and gravies. Pair them with a hearty beef stew, a creamy tomato soup, or a classic roast chicken. They also make excellent mini-sliders the next day; simply slice them in half and fill them with leftover ham or turkey and a bit of dijon mustard.
Storage and Make-Ahead
Storing Leftovers
If you have leftovers, store them in an airtight bag at room temperature for up to two days. To maintain the best homemade soft dinner rolls texture, avoid the refrigerator, as it can actually cause bread to go stale faster by crystallizing the starches.
Freezing Instructions
These rolls freeze beautifully. Once completely cool, wrap them tightly in foil and place them in a freezer bag for up to three months. To reheat, thaw them at room temperature and then warm them in a 300°F oven for 5-10 minutes until they feel soft again.
Making the Dough Ahead
You can prepare overnight dinner rolls by letting the first rise happen in the refrigerator. After kneading, place the dough in a greased bowl, cover tightly, and refrigerate for up to 15 hours. The cold environment slows the yeast, resulting in a deeper flavor. When ready to bake, shape the cold dough and let the second rise happen in a warm spot before baking as directed.
Final Thoughts
Mastering the best homemade soft dinner rolls is a skill that will serve you well for years to come. There is a specific kind of magic in taking flour, water, and yeast and turning them into something that brings everyone to the table. While it takes a few hours from start to finish, most of that time is hands-off, allowing the yeast to do the heavy lifting. Once you taste the difference between a homemade roll and a store-bought one, you’ll find yourself looking for any excuse to get into the kitchen and start baking.
Frequently Asked Questions
Can I use instant yeast instead of active dry yeast?
Yes, you can substitute instant yeast in equal amounts. The main difference is that instant yeast does not require blooming in warm milk; you can mix it directly with the dry ingredients. However, blooming it anyway doesn’t hurt and still serves as a good “insurance policy” to make sure your yeast is still fresh and active before you start.
Can I make these rolls in a bread machine?
Absolutely. To make bread machine rolls, simply add the ingredients to your machine in the order recommended by the manufacturer. Run the “Dough” cycle, which will handle the mixing, kneading, and first rise. Once the cycle is finished, remove the dough, shape the rolls, and proceed with the second rise and baking in a conventional oven.
How do I keep the rolls soft for the next day?
The best way to keep them soft is to ensure they are stored in a truly airtight environment. You can also brush them with a little extra melted butter while they are still warm, which creates a barrier that helps lock in moisture. When you are ready to eat them the next day, a quick 10-second zap in the microwave will restore that “just-baked” pillowy feel.
Can I use bread flour instead of all-purpose flour?
You certainly can. Bread flour has a higher protein content, which will result in a roll with more “chew” and a slightly sturdier structure. It won’t be quite as delicate as a roll made with all-purpose flour, but many people prefer the more substantial texture that bread flour provides. If the dough feels too stiff, you might need to add an extra tablespoon of milk.
What if I don’t have a warm spot for the dough to rise?
If your house is chilly, you can create a “proofing box” by putting a bowl of boiling water in the bottom of your oven (turned off) and placing your dough on the rack above it. The steam provides both the warmth and the humidity that yeast loves. Just be sure the oven stays off so you don’t accidentally start cooking the dough prematurely.
Soft and Fluffy Homemade Dinner Rolls

These soft dinner rolls are pillowy, buttery, and the perfect addition to any meal. Made with simple ingredients, they stay fresh and tender for days.
- 1 cup warm milk (110°F)
- 1/4 cup granulated sugar
- 2 1/4 tsp active dry yeast
- 1 large egg, room temperature
- 1/4 cup unsalted butter, melted
- 3 1/2 cups all-purpose flour
- 1 tsp salt
- 2 tbsp melted butter (for brushing)
- 1In a large bowl, whisk together warm milk, sugar, and yeast. Let sit for 5-10 minutes until foamy.
- 2Add the egg, melted butter, salt, and 2 cups of flour. Mix until combined.
- 3Gradually add the remaining flour until a soft dough forms. Knead for 5-7 minutes until smooth and elastic.
- 4Place dough in a greased bowl, cover, and let rise in a warm place for 1 hour or until doubled in size.
- 5Punch down the dough and divide into 12-15 equal pieces. Shape into balls and place in a greased 9x13 inch baking dish.
- 6Cover and let rise for another 30-45 minutes.
- 7Bake at 375°F (190°C) for 15-18 minutes or until golden brown.
- 8Brush with melted butter immediately after removing from the oven.
Keywords: dinner rolls, homemade bread, yeast rolls, fluffy rolls, baking


