
Creamy No-Bake Dessert

There is something truly magical about the simplicity of easy creamy no bake desserts, especially when you want a decadent treat without the stress of monitoring an oven. Whether you are hosting a summer backyard gathering or simply craving a velvety sweet finish to a weeknight meal, a classic no-bake cheesecake represents the pinnacle of refrigerator treats. This recipe focuses on a cloud-like texture that balances the tanginess of premium cream cheese with the airy richness of whipped cream, all nestled atop a buttery, salted graham cracker crust. It is a sophisticated yet approachable dish that proves you do not need heat to create a masterpiece.
The beauty of this no-bake cheesecake recipe lies in its structural integrity and mouthfeel. Unlike baked versions that can sometimes become dense or crack under high heat, this version remains consistently silky and light. By mastering a few simple folding techniques and allowing for a proper chill time, you can achieve a professional-grade dessert that looks as beautiful as it tastes. This guide will walk you through the essential nuances of temperature, aeration, and flavor balancing to ensure your creamy refrigerator desserts turn out perfectly every single time you make them.
Why You’ll Love This Recipe
- No-Oven Convenience: You can keep your kitchen cool and avoid the hassle of water baths or worrying about surface cracks, making this one of the most stress-free easy summer dessert ideas available.
- Superior Texture: The combination of whipped heavy cream and softened cream cheese creates a mousse-like consistency that is significantly lighter and more refreshing than traditional baked heavy custards.
- Make-Ahead Friendly: Because this dessert requires several hours to set in the refrigerator, it is the ultimate choice for entertaining, allowing you to finish your prep work a full day in advance.
- Endless Customization: The neutral, sweet-tart base acts as a blank canvas for fresh fruit, decadent chocolate ganache, or a swirl of salted caramel, fitting any season or occasion.
Ingredients You’ll Need
Success with easy creamy no bake desserts starts with choosing the right components. Since there is no cooking involved to alter the flavors, the quality and temperature of your ingredients will directly impact the final flavor profile and the structural set of the filling.
- Full-Fat Cream Cheese: Use the brick-style variety rather than the whipped tub version. It provides the necessary fat content and stability to help the dessert hold its shape once sliced.
- Heavy Whipping Cream: This must be very cold to whip into stiff peaks. It provides the “lift” and airy volume that distinguishes this from a dense pudding or a baked cake.
- Graham Cracker Crumbs: These form the foundation of your crust. Fine crumbs ensure a tight, cohesive base that does not crumble away when you transition the slices to a plate.
- Granulated Sugar: It sweetens the filling and the crust, but it also helps slightly macerate the cream cheese for a smoother blend.
- Unsalted Butter: Melted butter acts as the binding agent for your crust. Using unsalted allows you to control the exact level of savory balance in the base.
- Lemon Juice and Vanilla: These aromatics provide the essential high notes. The lemon juice reacts with the proteins in the cheese to help it firm up while adding a bright, classic tang.
Variations and Smart Swaps
Chocolate Lovers Variation: To transform this into a rich cocoa treat, fold in a half-cup of high-quality cooled, melted chocolate into the cream cheese mixture before adding the whipped cream. You can also swap the graham crackers for crushed chocolate sandwich cookies.
Berry Swirl Adaptation: Puree fresh raspberries or strawberries with a touch of sugar and strain the seeds. Drop spoonfuls of the puree onto the top of the filling before chilling and use a toothpick to create elegant marble swirls.
Nutty Crust Alternative: For a gluten-aware option or simply a different flavor profile, replace half of the graham cracker crumbs with finely ground toasted pecans or walnuts. The earthy flavor pairs beautifully with the tangy filling.
Citrus Zest Explosion: If you prefer a more puckery dessert, add the zest of two limes or one large orange to the cream cheese. This is a fantastic way to brighten up no-bake dessert recipes for tropical-themed parties.
How to Make a Master No-Bake Cheesecake
Step 1: Press the Buttery Crust Foundation
In a medium bowl, combine your fine graham cracker crumbs with melted butter and a pinch of salt. Stir until the mixture resembles wet sand. Press this firmly into the bottom and slightly up the sides of a springform pan. Use the flat bottom of a measuring cup to ensure the crust is packed tightly; this prevents the crust from falling apart later. Place the pan in the freezer for about 10 minutes to firm up while you prepare the filling.
Step 2: Cream the Cheese and Aromatics
In a large mixing bowl, beat the room-temperature cream cheese and sugar together until the mixture is completely smooth and no lumps remain. It is vital that the cheese is soft before you start; otherwise, your easy creamy no bake desserts will have tiny white flecks throughout. Once smooth, add the vanilla extract and lemon juice, beating for another minute until the mixture is glossy and fragrant.
Step 3: Whip the Cream to Stiff Peaks
In a separate chilled bowl, pour in your cold heavy whipping cream. Use a hand mixer or stand mixer to beat the cream on medium-high speed. Watch closely as the liquid transitions from soft bubbles to soft peaks, and finally to stiff peaks. Stiff peaks mean the cream stands straight up when the beaters are lifted. Do not over-beat, or the cream will turn into butter, losing its airy quality.
Step 4: Fold the Filling with Precision
Gently transfer about one-third of the whipped cream into the cream cheese mixture. Use a rubber spatula to fold it in using a “cut and turn” motion. This lightens the base without deflating the air. Once incorporated, fold in the remaining whipped cream very gently until no white streaks remain. This technique is what gives the dessert its signature mousse-like body and luxurious mouthfeel.
Step 5: Chill for the Perfect Set
Pour the filling over the prepared crust and use an offset spatula to smooth the top into an even layer. Cover the pan loosely with plastic wrap, ensuring it does not touch the surface of the cheesecake. Refrigerate for at least 6 to 8 hours, though overnight is preferred. This time allows the fats to solidify and the flavors to meld, ensuring the cake is stable enough to yield clean, beautiful slices.
Pro Tips for Success
- Tip: Always use room-temperature cream cheese. If the cheese is even slightly cold, it will not emulsify with the sugar correctly, resulting in a grainy texture that ruins the “creamy” promise of the dish.
- Tip: Chill your mixing bowl and whisk attachment in the freezer for 15 minutes before whipping the heavy cream. This helps the cream reach its maximum volume more quickly and stay stable.
- Tip: For the cleanest slices, dip a sharp knife into hot water and wipe it dry between every single cut. This prevents the filling from sticking to the blade and tearing the edges of the cake.
- Tip: Don’t skip the lemon juice. Even if you don’t want a “lemon” flavor, the acidity is a chemical necessity that helps the proteins in the dairy tighten and set firmly without gelatin.
- Tip: Use a springform pan for easy removal. Running a thin knife around the edge of the pan before releasing the spring will ensure the sides stay perfectly smooth.
Troubleshooting Common Problems
Why is my no-bake cheesecake too soft?
If your filling doesn’t hold its shape, it is usually due to one of two things: the heavy cream wasn’t whipped to stiff enough peaks, or the cheesecake didn’t chill for long enough. Always ensure you give it at least 6 hours in the refrigerator. If you are in a rush, you can pop it in the freezer for 45 minutes to help it firm up, but the refrigerator is best for long-term stability.
How do I fix a lumpy filling?
Lumps happen when the cream cheese is too cold. If you find yourself with a lumpy mixture before you’ve added the whipped cream, you can gently warm the bowl over a pot of simmering water (double-boiler style) for just a minute to soften the cheese, then beat it again until smooth. Once the whipped cream is folded in, however, you cannot fix lumps without deflating the air, so prep is key.
How to Serve Your Dessert
Presentation is key when serving easy creamy no bake desserts. Because the filling is so pale and smooth, adding a pop of color and texture through toppings can elevate the entire experience. Fresh berries are the most classic choice—raspberries, blueberries, and sliced strawberries provide a tart contrast to the rich filling.
Garnishes and Toppings
For a more indulgent finish, drizzle the top with a homemade chocolate ganache or a warm berry coulis. A sprinkle of crushed graham crackers or toasted nuts can also add a much-needed crunch. If you want to keep it simple, a few sprigs of fresh mint and a light dusting of powdered sugar create a professional, “bakery-style” aesthetic with minimal effort.
Creative Serving Ideas
Instead of a traditional round cake, you can prepare the crust and filling in individual glass jars for creamy refrigerator desserts that are perfect for parties. This eliminates the need for slicing and makes for a charming, portable presentation. You can also serve slices alongside a scoop of lemon sorbet to emphasize the bright, acidic notes of the cheesecake.
Storage and Make-Ahead
Storing Leftovers
This cheesecake should always be kept in the refrigerator. Store any leftovers in an airtight container or tightly wrapped in plastic for up to 5 days. Because it contains high amounts of dairy, it will begin to absorb other odors from the fridge if not sealed properly, so keep it away from pungent foods like onions or garlic.
Freezing Instructions
Surprisingly, this dessert freezes beautifully. To freeze, let the cake set in the fridge first, then wrap the entire pan (or individual slices) in a double layer of plastic wrap followed by aluminum foil. It will stay fresh for up to 3 months. Thaw in the refrigerator for several hours before serving to maintain that signature creamy texture.
Making It Ahead
This is the ultimate make-ahead dish. In fact, it actually tastes better on day two because the crust has time to soften slightly and the vanilla flavors deepen. Prepare the entire cake 24 hours before your event for the best results, adding your fresh garnishes and toppings just before serving.
Final Thoughts
Mastering easy creamy no bake desserts is a rewarding skill that every home cook should have in their repertoire. This cheesecake is proof that you don’t need a complicated recipe or a hot oven to produce a dessert that is sophisticated, delicious, and visually stunning. By focusing on the quality of your ingredients and the gentle folding of your whipped cream, you’ll create a treat that rivals any restaurant offering. It is cooling, luxurious, and infinitely adaptable—the perfect sweet conclusion to any meal.
Frequently Asked Questions
Can I use low-fat cream cheese for this recipe?
It is not recommended to use low-fat or “light” cream cheese for no-bake dessert recipes. These varieties often have a higher water content and different stabilizers, which can prevent the cheesecake from setting properly. For the best creamy texture and a slice that holds its shape, always stick with full-fat brick cream cheese.
How long can I leave the cheesecake out at room temperature?
Because this is a dairy-based dessert that relies on cold temperatures for its structure, it should not sit out for more than 2 hours. If you are serving this at an outdoor summer event, keep the cheesecake on a bed of ice or bring it out only when it is time to serve and slice. Once it gets too warm, the whipped cream will begin to lose its stability and the cake may become soft.
Can I use whipped topping (like Cool Whip) instead of heavy cream?
Yes, you can substitute stabilized whipped topping for the heavy cream if you prefer a sweeter, even lighter texture. However, keep in mind that whipped topping contains added sugars and stabilizers, so you may want to reduce the granulated sugar in the cream cheese mixture slightly. Most purists prefer the rich, clean flavor of real heavy whipping cream.
Why did my graham cracker crust fall apart?
A crumbly crust usually means there wasn’t enough “glue” to hold the crumbs together or they weren’t pressed firmly enough. Ensure your crumbs are finely ground and thoroughly coated in the melted butter. Using the bottom of a heavy glass to pack the mixture into the pan is the best way to ensure a solid foundation that can withstand slicing.
Do I need to add gelatin to make it set?
While some recipes use gelatin for a very firm, almost rubbery set, this recipe relies on the natural thickening of full-fat cream cheese and the aeration of whipped cream. As long as you use the correct ingredients and allow for a full 6 to 8 hours of chilling, the cheesecake will be perfectly sliceable without the need for gelatin, maintaining a much more pleasant, melt-in-your-mouth texture.
Creamy No-Bake Dessert

A rich and velvety no-bake dessert featuring layers of buttery graham cracker crust and a fluffy cream cheese filling. This easy, crowd-pleasing treat is perfect for summer parties or any time you want a sweet treat without turning on the oven.
- 2 cups graham cracker crumbs
- 1/2 cup unsalted butter, melted
- 1/4 cup granulated sugar
- 16 oz cream cheese, softened
- 1 cup powdered sugar
- 1 tsp vanilla extract
- 8 oz whipped topping, thawed
- 1 cup fresh berries for garnish
- 1In a medium bowl, combine graham cracker crumbs, melted butter, and granulated sugar. Mix well until crumbs are evenly moistened.
- 2Press the mixture firmly into the bottom of a 9x13-inch baking dish to create an even crust layer.
- 3In a large mixing bowl, beat the softened cream cheese, powdered sugar, and vanilla extract until the mixture is smooth and free of lumps.
- 4Gently fold the whipped topping into the cream cheese mixture using a spatula until fully incorporated.
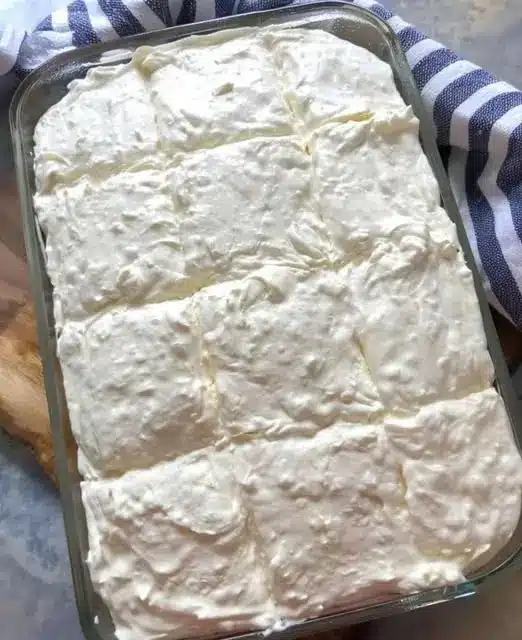
- 5Spread the creamy filling evenly over the prepared crust.
- 6Cover and refrigerate for at least 4 hours, or overnight, to allow the dessert to set properly.
- 7Garnish with fresh berries before slicing and serving.
Keywords: no-bake dessert, creamy dessert, easy cheesecake, summer dessert, chilled treats


