
Christmas Chocolate Candy Cups

When the holiday season hits full swing, finding a treat that is as impressive to look at as it is simple to prepare feels like a true Christmas miracle. These easy christmas chocolate candy cups are the perfect answer to the frantic pace of December, offering a sophisticated, bite-sized confection that requires absolutely no oven time. With their glossy chocolate shells and festive decorations, they capture the essence of holiday cheer in every single bite, making them a staple for cookie exchanges and dessert platters alike.
The beauty of this recipe lies in its approachability; you don’t need to be a professional chocolatier to achieve a high-end finish. By focusing on quality ingredients and a few simple melting techniques, you can create holiday chocolate treats that rival any gourmet candy shop. Whether you are looking for a quick activity to do with the kids or a refined addition to your holiday spread, these chocolate cups deliver maximum impact with minimal effort.
Why You’ll Love This Recipe
- No-Bake Simplicity: You can keep your oven free for heavy-duty roasting or traditional cookies while these no-bake Christmas desserts set up perfectly on your counter or in the fridge.
- Highly Customizable: From the type of chocolate used to the festive toppings, this recipe acts as a blank canvas for your favorite holiday flavors and colors.
- Perfect for Gifting: These sturdy little cups hold up beautifully when packaged in cellophane bags or decorative tins, making them ideal homemade candy gifts for teachers, neighbors, and friends.
- Make-Ahead Friendly: You can prepare these days in advance, allowing you to check one more thing off your holiday to-do list well before the guests arrive.
Ingredients You’ll Need
To create the best easy christmas chocolate candy cups, the quality of your ingredients is paramount. Since there are only a few components, each one plays a significant role in the final flavor and texture of the candy. Here is what you will need to gather before you start the melting process.
- High-Quality Chocolate Chips: Whether you prefer semi-sweet, milk, or dark chocolate, choose a brand that melts smoothly. Semi-sweet is often the favorite for these festive chocolate cups because it balances the sweetness of the toppings.
- White Chocolate: This is excellent for creating a contrasting “snowy” layer or a decorative drizzle on top. Look for white chocolate that contains cocoa butter for the best melting results.
- Refined Coconut Oil: A tiny amount of oil added to the chocolate helps it melt more fluidly and gives the finished cups a professional, glossy sheen that snaps when you bite into it.
- Crushed Candy Canes: Nothing says Christmas quite like peppermint. The crunch of the candy canes provides a wonderful textural contrast to the smooth chocolate.
- Holiday Sprinkles and Nonpareils: Use a mix of red, green, and gold sprinkles to give each cup a unique, celebratory look.
- Sea Salt (Optional): A tiny pinch of flaky sea salt can enhance the richness of the dark chocolate and balance the sugary elements.
Variations and Smart Swaps
- Peppermint Mocha Cups: Stir a teaspoon of instant espresso powder into the melted chocolate before pouring it into the liners for a sophisticated coffee-flavored twist.
- Nut Butter Centers: For a more substantial candy, fill the cups halfway with chocolate, let it set, add a small dollop of peanut or almond butter, and then top with more chocolate.
- White Chocolate Peppermint: Use exclusively white chocolate for the base and fold in crushed peppermint for a “peppermint bark” inspired cup that looks beautiful on a dark dessert plate.
- Dairy-Free Alternative: Use high-quality dairy-free chocolate chips and ensure your sprinkles are vegan-friendly to make these accessible to everyone at your holiday gathering.
How to Make Easy Christmas Chocolate Candy Cups
Step 1: Prepare Your Workstation
The key to success with chocolate work is organization. Begin by lining a mini muffin tin with festive paper liners. If you don’t have a mini muffin tin, you can simply place the liners on a flat baking sheet, though the tin helps them keep a perfectly round shape. Ensure all your toppings—sprinkles, crushed candy canes, and sea salt—are in small bowls and ready to go, as chocolate can set quickly depending on the temperature of your kitchen.
Step 2: Melt the Chocolate Gently
Combine your chocolate chips and a small amount of coconut oil in a microwave-safe bowl. Heat in 30-second intervals, stirring thoroughly between each session. This “low and slow” approach is vital; chocolate can seize or burn if overheated. Continue until the mixture is completely smooth and glossy. If you prefer the stove, a double boiler works beautifully to provide gentle, indirect heat that protects the integrity of the easy christmas chocolate candy cups.
Step 3: Fill the Liners
Carefully spoon the melted chocolate into each liner, filling them about halfway to two-thirds full. For a perfectly flat top, gently tap the muffin tin against the counter several times. This action releases any trapped air bubbles and helps the chocolate level out into a smooth, professional-looking surface. If you are doing a layered effect with white chocolate, allow the first layer to set for about 10 minutes in the fridge before adding the second color.
Step 4: Garnish and Set
While the chocolate is still wet, generously apply your festive toppings. This is where you can get creative with patterns and color combinations. Once decorated, let the cups sit at room temperature for about an hour, or place them in the refrigerator for 20 minutes if you are in a hurry. The goal is for the chocolate to be completely firm to the touch before you attempt to remove them from the tin or serve them.
Pro Tips for Success
- Avoid Water at All Costs: Even a single drop of water in your melting chocolate can cause it to “seize,” turning it into a grainy, clumpy mess. Make sure your bowls and spatulas are bone-dry.
- Use a Toothpick for Swirls: If you are using two types of chocolate, drop a small amount of the second color on top and use a toothpick to create a marbled, artisanal effect.
- Check Your Sprinkles: Some larger sprinkles can be quite hard. For the best eating experience, use a mix of fine nonpareils and smaller decorative shapes.
- Control the Shine: If your kitchen is very warm, the chocolate may lose its shine or “bloom.” Setting the cups in a cool, dry place (rather than a humid fridge if possible) helps maintain that beautiful gloss.
How to Serve Easy Christmas Chocolate Candy Cups
Presentation is everything during the holidays. These festive chocolate cups look stunning when arranged on a tiered dessert stand or a simple wooden serving board. To make them pop, try mixing and matching the liners—using patterns like holly, snowflakes, or simple red and green foil.
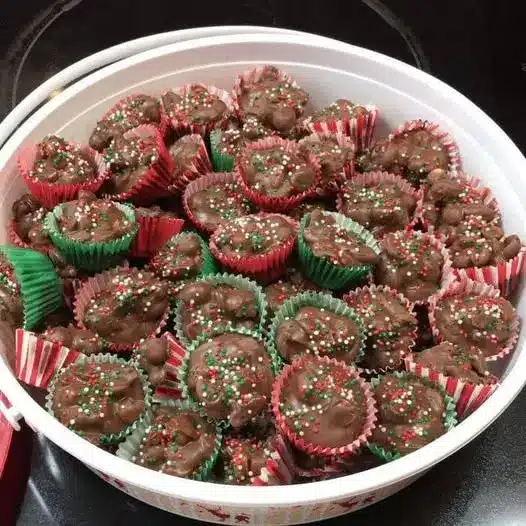
Garnishes and Presentation
To elevate the serving experience, you can lightly dust the finished platter with powdered sugar to mimic the look of freshly fallen snow. If you are serving these at a party, place them next to a hot cocoa bar or a selection of holiday teas. The peppermint notes in the candy cups complement the warmth of a rich winter beverage perfectly.
Creative Ways to Serve It
Beyond a standard platter, these cups can be used as edible decorations. Place one at each setting of your Christmas dinner table as a sweet “thank you” for your guests, or use them to decorate the edges of a larger holiday cake. They also make fantastic additions to a holiday-themed charcuterie board, nestled between dried cranberries, walnuts, and slices of sharp cheddar cheese.
Storage and Make-Ahead
Storing Leftovers
These easy christmas chocolate candy cups should be stored in an airtight container in a cool, dry place. If your home is kept at a standard temperature, they will stay fresh on the counter for up to two weeks. If it is particularly warm, the refrigerator is a safer bet, though you may notice a slight loss of shine on the chocolate over time.
Making It Ahead
Because chocolate is naturally shelf-stable, you can easily make these a week before your big event. To keep them looking their best, avoid stacking them directly on top of each other; use a layer of parchment paper between tiers to prevent the decorations on the bottom layer from being crushed or marking the bottoms of the top layer.
Final Thoughts
Creating homemade holiday magic doesn’t have to involve hours of labor over a hot stove. These easy christmas chocolate candy cups offer a delightful combination of rich chocolate, festive crunch, and effortless preparation. By taking the time to melt your chocolate properly and choosing bright, cheerful decorations, you can produce a batch of candies that look like they came straight from a high-end confectionery. Whether you are sharing them with family or gifting them to friends, these holiday chocolate treats are sure to become a new favorite tradition in your household.
Frequently Asked Questions
Can I use white chocolate chips instead of dark chocolate?
Absolutely! White chocolate works beautifully for this recipe and provides a very festive, snowy appearance. However, be aware that white chocolate has a lower melting point and can be more temperamental than dark chocolate. Be extra cautious not to overheat it, and consider adding a tiny bit more coconut oil to keep it fluid for pouring into the liners.
Why did my chocolate turn white or cloudy?
This is known as “bloom” and usually happens when the chocolate is exposed to temperature fluctuations or high humidity. While it might not look as pretty, the chocolate is still perfectly safe to eat. To prevent this, try to let the easy christmas chocolate candy cups set in a cool, consistent environment and store them in an airtight container away from direct sunlight or heat sources.
How do I get the candy canes so finely crushed?
The easiest way to crush candy canes without making a mess is to place them in a heavy-duty zip-top bag and gently tap them with a rolling pin or the flat side of a meat tenderizer. You want a mix of fine powder and small, crunchy pieces to give your festive chocolate cups the best texture and visual appeal.
Can I freeze these chocolate candy cups?
While you can freeze them, it is generally not recommended because the moisture in the freezer can cause the sugar in the chocolate to crystallize, leading to a grainy texture and “sugar bloom.” Since they stay fresh at room temperature for quite a while, freezing is usually unnecessary. If you must freeze them, wrap the container in several layers of plastic wrap and thaw them slowly in the refrigerator before bringing them to room temperature.
What if I don’t have a mini muffin tin?
If you don’t have a tin, you can use doubled-up paper liners placed on a flat baking sheet. Using two liners for each cup provides extra stability so the weight of the melted chocolate doesn’t cause the sides to bow out. Alternatively, silicone candy molds are a fantastic option and allow for even easier removal once the chocolate has fully set.
Christmas Chocolate Candy Cups

Delightful and festive Christmas Chocolate Candy Cups are the perfect homemade holiday treat. These bite-sized confections feature smooth milk chocolate filled with a creamy peanut butter center and topped with festive holiday sprinkles.
- 12 oz milk chocolate melting wafers
- 1/2 cup creamy peanut butter
- 1/4 cup powdered sugar
- 1 tbsp unsalted butter, softened
- 2 tbsp Christmas-themed sprinkles
- 24 miniature paper cupcake liners
- 1Line a mini muffin tin with 24 paper cupcake liners.
- 2Place half of the milk chocolate wafers in a microwave-safe bowl and heat in 30-second intervals, stirring until completely smooth.
- 3Spoon approximately one teaspoon of melted chocolate into the bottom of each paper liner.
- 4In a small mixing bowl, combine the creamy peanut butter, powdered sugar, and softened butter until the mixture is smooth and pliable.
- 5Take a small amount of the peanut butter mixture (about 1/2 teaspoon) and flatten it slightly, then place it into the center of each chocolate-filled liner.
- 6Melt the remaining chocolate wafers and spoon the chocolate over the top of the peanut butter centers, smoothing it out to the edges.
- 7Top immediately with festive sprinkles while the chocolate is still wet.
- 8Refrigerate for at least 30 minutes until the chocolate is firm and set.
Keywords: Christmas candy, chocolate cups, homemade peanut butter cups, holiday treats, easy dessert


