
Raspberry Cheesecake Bars

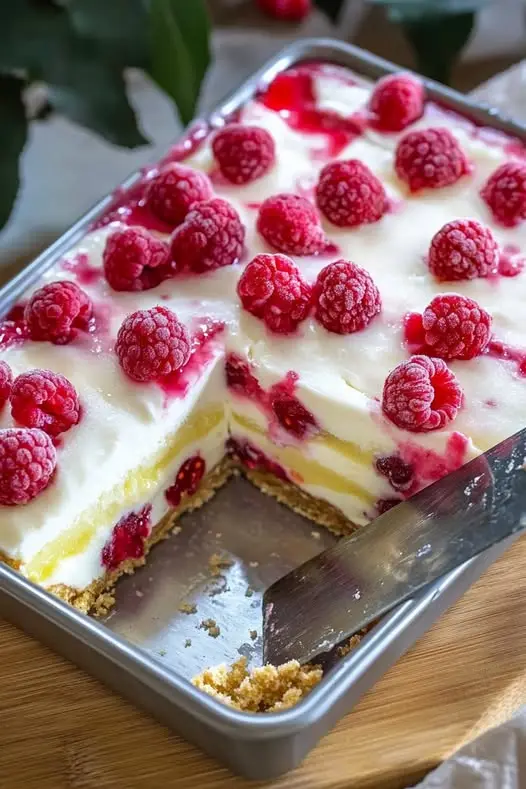
There is something inherently special about a dessert that manages to be both strikingly beautiful and incredibly simple to prepare. This easy raspberry cheesecake bars recipe captures that perfect balance, offering the rich, velvety indulgence of a classic New York-style cheesecake in a portable, finger-food format. Whether you are hosting a summer backyard gathering or looking for a bright, tangy treat to liven up a weekend afternoon, these bars deliver a sophisticated flavor profile that appeals to both kids and adults alike. The contrast between the buttery, crisp base and the smooth, fruit-swirled center makes every bite a multi-textured experience.
The beauty of this make-ahead dessert lies in its accessibility. Unlike a full-sized cheesecake that requires a finicky water bath and carries the constant risk of cracking, these bars are much more forgiving and straightforward. By utilizing a standard baking pan and focusing on a few high-quality components, you can achieve professional-looking results without the stress of traditional pastry techniques. This guide will walk you through the essential steps to ensure your cheesecake is perfectly set, your crust is sturdy, and your fruit swirl looks like a work of art.
Why You’ll Love This Recipe
- Perfect Flavor Balance: The natural tartness of the raspberries cuts through the dense richness of the cream cheese, creating a creamy cheesecake bars experience that isn’t overly sweet.
- Easier Than Traditional Cheesecake: You can skip the springform pan and the water bath; these bars bake evenly in a regular square or rectangular pan, making them much more approachable for beginners.
- Stunning Visual Appeal: The deep pink raspberry coulis swirled into the white cheesecake batter creates a marbled effect that looks like it came straight from a high-end bakery.
- Excellent Portability: Once chilled and sliced, these bars are sturdy enough to be served at potlucks, picnics, or bake sales without needing a fork and plate for every guest.
Ingredients You’ll Need
Creating a successful easy raspberry cheesecake bars recipe relies on using the right building blocks. Each component, from the base to the swirl, plays a specific role in the structural integrity and flavor of the final dessert.
- Cream Cheese: For the best texture, always use full-fat, brick-style cream cheese. Low-fat or spreadable versions contain more water and can lead to a runny or grainy filling.
- Graham Crackers: These provide the classic graham cracker crust flavor. Their subtle honey sweetness and sandy texture are the ideal foundation for the creamy topping.
- Fresh or Frozen Raspberries: While fresh berries are wonderful for garnish, frozen raspberries work perfectly for the swirl as they are often processed at peak ripeness and release their juices easily.
- Granulated Sugar: Used in both the crust and the filling, sugar provides sweetness and helps the cream cheese aerate during the mixing process.
- Large Eggs: The eggs act as the primary binding agent, giving the cheesecake its structure and helping it “set” during the baking and cooling process.
- Lemon Juice: A small amount of acidity brightens the fruit flavors and helps to stabilize the proteins in the cream cheese for a smoother mouthfeel.
- Pure Vanilla Extract: Vanilla acts as a flavor enhancer, bridging the gap between the tangy cheese and the sweet berries.
- Unsalted Butter: Melted butter binds the cracker crumbs together, creating a crust that holds its shape when sliced but remains tender to the bite.
Variations and Smart Swaps
Different Fruit Swirls: While raspberries are the star here, you can easily adapt this into a homemade fruit swirl using blackberries, blueberries, or even a combination of mixed berries. If you are in a rush, a high-quality seedless jam can be used in place of the fresh fruit reduction.
Alternative Crusts: For a deeper, chocolatey flavor, swap the graham crackers for crushed Oreo cookies or chocolate wafers. This “black and white” cheesecake style pairs exceptionally well with the tartness of the raspberries.
Citrus Infusion: To lean into the bright notes, add the zest of a full lemon or lime into the cream cheese batter. This turns the bars into a “raspberry lemonade” inspired dessert that is incredibly refreshing in the summer heat.
Nutty Foundation: If you want more crunch in your base, replace half of the graham cracker crumbs with finely ground pecans or almonds. This adds a toasted, nutty aroma that complements the creamy filling beautifully.
How to Make Easy Raspberry Cheesecake Bars
Step 1: Prepare and Pre-Bake the Crust
Begin by pulsing your graham crackers into fine crumbs and mixing them with melted butter and a touch of sugar. Press this mixture firmly into the bottom of a lined baking pan to create an even layer. Pre-baking the crust for about 10 minutes is a non-negotiable step; it toasts the crumbs and ensures the base stays crisp rather than becoming soggy once the wet cheesecake batter is added on top.
Step 2: Create the Raspberry Coulis
While the crust cools, simmer your raspberries with a little sugar and lemon juice until they break down into a thick sauce. Strain this mixture through a fine-mesh sieve to remove the seeds, leaving you with a smooth, vibrant red liquid. This reduction concentrates the raspberry flavor, ensuring that even a small swirl provides a powerful punch of fruitiness throughout the creamy cheesecake bars.
Step 3: Mix the Cream Cheese Filling
In a large bowl, beat the softened cream cheese and sugar until completely smooth and fluffy. It is vital to scrape down the sides of the bowl frequently to avoid lumps. Add the eggs one at a time on low speed, mixing just until combined. Over-mixing at this stage incorporates too much air, which can cause the cheesecake to puff up and then sink or crack as it cools.
Step 4: Assemble and Create the Marble Swirl
Pour the cheesecake batter over the cooled crust and smooth the top with a spatula. Drop small spoonfuls of the raspberry coulis across the surface. Using a toothpick or a thin knife, gently swirl the fruit into the batter in a figure-eight motion. Do not over-swirl, or the colors will muddy together; you want distinct, beautiful ribbons of red against the white background.
Step 5: Bake, Cool, and Set
Bake the bars until the edges are slightly puffed and set, but the center still has a slight jiggle when the pan is gently shaken. This jiggle is the secret to a creamy texture. The most difficult part of this easy raspberry cheesecake bars recipe is the waiting; the bars must cool to room temperature and then chill in the refrigerator for at least four hours (or overnight) to fully set before slicing.
Pro Tips for Success
- Room Temperature Ingredients: Always ensure your cream cheese and eggs are at room temperature before mixing. Cold cream cheese is the primary cause of lumps that are impossible to smooth out once the liquid eggs are added.
- Lining the Pan: Use parchment paper with an overhang on two sides. This allows you to lift the entire block of cheesecake out of the pan once chilled, making it much easier to cut into clean, perfect squares.
- Clean Slices: To get professional-looking edges, use a sharp knife and dip it in hot water, then wipe it dry between every single cut. This prevents the filling from dragging across the crust.
- Avoid Over-Baking: Cheesecake continues to cook as it cools. If the center is completely firm when you take it out of the oven, it will likely be overdone and dry once it reaches fridge temperature.
- Seedless is Better: Taking the extra two minutes to strain the raspberry seeds out of your coulis makes a significant difference in the refined texture of the final dessert.
How to Serve Raspberry Cheesecake Bars
When it comes to presentation, these bars are naturally elegant on their own, but a few simple garnishes can take them to the next level. Serving them chilled is essential, as the cold temperature highlights the tanginess of the cream cheese and keeps the texture firm and satisfying.
Garnishes
For a beautiful finishing touch, place a single fresh raspberry on top of each square right before serving. A light dusting of powdered sugar adds a touch of sweetness and a professional “finished” look. If you want to lean into the indulgence, a small dollop of homemade whipped cream provides a light, airy contrast to the dense cheesecake.
Plating Ideas
If you are serving these as a plated dessert rather than a hand-held bar, consider drizzling any leftover raspberry coulis around the plate for a restaurant-style presentation. They also pair wonderfully with a sprig of fresh mint, which adds a pop of green and a refreshing aroma that cuts through the richness.
Storage and Make-Ahead
Storing Leftovers
Because of the dairy content, these bars must be stored in the refrigerator. Place them in an airtight container to prevent them from absorbing any other odors from the fridge. They will stay fresh and delicious for up to 5 days, making them a great option for meal prep or planning for a multi-day event.
Freezing
This is a fantastic recipe for freezing. You can freeze the entire slab or individual slices. Wrap them tightly in plastic wrap and then a layer of aluminum foil to prevent freezer burn. They can be frozen for up to 3 months. When you are ready to eat, thaw them in the refrigerator overnight for the best texture.
Making It Ahead
This is the ultimate make-ahead dessert. In fact, these bars actually taste better on the second day because the flavors have had more time to meld and the crust has softened slightly into the filling. I highly recommend making them 24 hours before you plan to serve them.
Final Thoughts
Mastering this easy raspberry cheesecake bars recipe is a fantastic way to build your confidence in the kitchen while producing a dessert that is guaranteed to impress. By following the tips for room-temperature ingredients and proper cooling times, you can create a treat that rivals any bakery offering. The combination of the graham cracker crust and the vibrant homemade fruit swirl offers a timeless appeal that never goes out of style. Whether it’s a holiday, a birthday, or just a Tuesday treat, these bars are the perfect way to bring a little extra sweetness to your day.
Frequently Asked Questions
Can I use raspberry jam instead of making the sauce?
Yes, you can certainly use jam if you are short on time. To ensure it swirls properly, heat the jam in the microwave for 10-15 seconds until it reaches a more liquid consistency. If the jam has seeds, you may want to strain it first for the smoothest texture. Use a high-quality fruit preserve for the best flavor results.
Why did my cheesecake bars crack on top?
Cracks are usually caused by two things: over-mixing the batter (which incorporates too much air) or over-baking. When the eggs are beaten too vigorously, the cheesecake rises like a souffle and then collapses, causing cracks. Additionally, if the oven is too hot or the bars stay in too long, the moisture evaporates, leading to a split surface. Fortunately, the raspberry swirl helps hide small imperfections!
Can I make these gluten-free?
Absolutely. To make this a gluten-free dessert, simply swap the standard graham crackers for your favorite gluten-free graham cracker brand or a gluten-free digestive biscuit. The filling itself is naturally gluten-free as long as you ensure your vanilla extract and other flavorings are certified. The texture remains virtually identical, making it a safe and delicious option for guests with dietary restrictions.
How do I know exactly when the bars are done baking?
The “jiggle test” is your best friend here. When you gently nudge the pan, the edges of the cheesecake should be set and look matte, but the center 2 inches should still wobble slightly like Jell-O. Do not wait for the center to become firm, as the residual heat will continue to cook the bars as they sit on the counter. Taking them out at the “jiggle stage” ensures a creamy, non-rubbery texture.
Do I really have to chill them for 4 hours?
Yes, the chilling time is critical for the structure of the cheesecake. If you try to cut them while they are still warm or even at room temperature, the filling will be soft and may collapse, and you won’t get those clean, sharp edges. The refrigeration process allows the fats in the cream cheese and the proteins in the eggs to fully stabilize, resulting in the perfect “bite.”
Raspberry Cheesecake Bars

These Raspberry Cheesecake Bars are the perfect blend of creamy, sweet, and tart. Featuring a buttery graham cracker crust, a velvety cheesecake layer, and a fresh raspberry swirl, they are sure to be a hit.
- 1.5 cups graham cracker crumbs
- 1/4 cup granulated sugar
- 6 tablespoons unsalted butter, melted
- 24 oz cream cheese, softened
- 1 cup granulated sugar
- 3 large eggs
- 1 teaspoon vanilla extract
- 1/2 cup raspberry preserves or fresh raspberry puree
- 1 teaspoon lemon juice
- 1Preheat your oven to 325°F (160°C) and line an 8x8 inch baking pan with parchment paper, leaving an overhang for easy removal.
- 2In a bowl, combine the graham cracker crumbs, 1/4 cup sugar, and melted butter. Press the mixture firmly into the bottom of the prepared pan.
- 3In a large mixing bowl, beat the softened cream cheese and 1 cup sugar until light and fluffy.
- 4Add the eggs one at a time, beating well after each addition. Stir in the vanilla extract until smooth.
- 5Pour the cheesecake batter over the crust in the pan.
- 6Mix the raspberry preserves with lemon juice to thin it slightly. Drop small dollops of the raspberry mixture onto the cheesecake batter.
- 7Using a toothpick or a knife, gently swirl the raspberry dollops into the cheesecake to create a marbled effect.
- 8Bake for 45 to 50 minutes, or until the edges are set but the center still has a slight jiggle.
- 9Cool completely at room temperature, then refrigerate for at least 4 hours before slicing into bars.
Keywords: raspberry cheesecake bars, dessert, baking, cream cheese bars, fruit swirl cheesecake


