
Chocolate Chip Cookies

There is a nearly universal quest in the baking world to uncover the best chocolate chip cookie recipe, one that delivers that elusive balance of a shattering crisp edge and a soft, molten center. Most of us grew up with the back-of-the-bag version, but this elevated take moves beyond the basics by focusing on the science of flavor and texture. By utilizing a few professional techniques—like browning the butter and allowing the dough to mature—you transform a simple pantry staple into bakery-style cookies that boast a deep, toffee-like complexity and perfectly puddly chocolate.
The beauty of this recipe lies in its approachability despite the gourmet results. You do not need specialized equipment or rare ingredients to achieve a professional finish; instead, it is about how you treat the butter and sugars to create a chewy chocolate chip cookies experience that stays fresh for days. Whether you are baking for a holiday exchange or simply treating yourself on a rainy afternoon, these cookies offer a reliable, high-quality result that will likely make this the only recipe you ever need to reach for again.
Why This Recipe Is a Keeper
- Incredible Depth of Flavor: By taking the extra few minutes to brown the butter, you introduce notes of toasted hazelnuts and caramel that elevate the dough far beyond standard sweetness.
- Superior Textural Contrast: These bakery-style cookies feature a ring of golden, crispy edges that give way to a dense, chewy center filled with layers of melted chocolate.
- Foolproof Make-Ahead Logic: The dough is designed to be chilled, which not only improves the flavor but makes it the perfect recipe for preparing days in advance of a party.
- Customizable Chocolate Ratios: Whether you prefer dark, milk, or semi-sweet, this base recipe is sturdy enough to handle various chocolate percentages and formats, from chips to hand-chopped chunks.
Ingredients You’ll Need
Creating the best chocolate chip cookie recipe starts with understanding how each component interacts. We are looking for high-fat content and specific sugars to ensure the cookies spread just enough while maintaining their structure.
- Unsalted Butter: We use unsalted butter to control the sodium levels perfectly. Browning it removes water and toasts the milk solids, creating a concentrated, nutty flavor profile.
- Dark Brown Sugar: The high molasses content in dark brown sugar is the secret to chewy chocolate chip cookies. It provides moisture and a deep, acidic sweetness that reacts with the leavening.
- Granulated Sugar: While brown sugar provides chew, white sugar is essential for achieving those sought-after crisp, caramelized edges that provide the necessary structural crunch.
- All-Purpose Flour: This provides the standard protein content needed for a soft yet sturdy crumb. Measuring by weight is highly recommended to avoid a dry, cakey cookie.
- Baking Soda: This acts as our primary leavener, reacting with the molasses in the brown sugar to help the cookies rise and brown beautifully in the oven.
- Chocolate Chunks or Discs: Using hand-chopped chocolate or professional-grade discs creates “pools” of chocolate rather than the isolated bumps created by standard stabilized chocolate chips.
- Vanilla Bean Paste or Extract: A generous amount of vanilla rounds out the savory notes of the butter and the richness of the chocolate for a balanced finish.
- Flaky Sea Salt: A final sprinkle of salt on top cuts through the sugar and highlights the complexity of the brown butter cookies base.
Easy Ways to Change It Up
Once you have mastered the base dough, you can easily adapt it to suit your personal preferences or what you have available in your pantry.
- The Nutty Variation: Add half a cup of toasted, chopped pecans or walnuts during the final folding stage to add a crunchy texture that complements the browned butter.
- Double Chocolate Version: Replace a quarter cup of the all-purpose flour with high-quality Dutch-processed cocoa powder for a deeply dark and decadent chocolate dough experience.
- Espresso Infusion: Mix one teaspoon of instant espresso powder into the warm browned butter to intensify the chocolate flavor and add a sophisticated, mocha-like undertone.
- Toffee Crunch: Fold in a handful of toffee bits alongside the chocolate chunks for extra caramelization and a candy-bar-like texture that shatters with every bite.
How to Make the Best Chocolate Chip Cookie Recipe
Step 1: Brown the Butter for Maximum Flavor
Place your unsalted butter in a light-colored skillet over medium heat. As the butter melts, it will begin to foam and crackle; this is the water evaporating. Stir constantly until the crackling subsides and you see small, golden-brown bits forming at the bottom of the pan. Immediately remove the pan from the heat and pour the butter—including all those toasted brown bits—into a heat-proof bowl to cool slightly. This step is the foundation of brown butter cookies, providing a savory depth that standard softened butter simply cannot match.
Step 2: Cream the Sugars and Fats
Once the butter has cooled but is still in a liquid state, whisk in the dark brown sugar and granulated sugar. You want to mix vigorously for about two minutes until the mixture looks like wet sand and is fully emulsified. Add the eggs and vanilla, whisking again until the batter lightens in color and becomes slightly glossy. This aeration process ensures that your chewy chocolate chip cookies have the right amount of lift without becoming overly airy or cake-like.
Step 3: Incorporate the Dry Ingredients
Sift your all-purpose flour, baking soda, and fine sea salt directly into the bowl with the wet ingredients. Use a sturdy spatula to fold the mixture together gently. It is crucial to stop mixing the moment you no longer see streaks of dry flour. Over-mixing at this stage develops too much gluten, which can turn a tender, bakery-style cookies texture into something tough and bread-like. The dough should be thick, heavy, and very fragrant.
Step 4: Fold in the Chocolate and Chill
Gently fold in your chocolate chunks or discs until they are evenly distributed throughout the dough. At this point, the dough will be quite soft because of the liquid butter. Cover the bowl tightly with plastic wrap and refrigerate for at least two hours, though 24 to 48 hours is ideal. This chilling period allows the flour to fully hydrate and the fats to solidify, which prevents the cookies from spreading too thin and concentrates the flavors significantly.
Step 5: Scoop and Bake to Perfection
Preheat your oven to 350°F and line a heavy-duty baking sheet with parchment paper. Use a large cookie scoop to portion out the chilled dough, placing the mounds about three inches apart to allow for spreading. Bake for 10 to 12 minutes, or until the edges are set and golden brown but the centers still look slightly underbaked and soft. The cookies will continue to firm up on the hot pan after you remove them from the oven, which is the secret to a perfect texture.
Step 6: The Finishing Touch
As soon as the baking sheet comes out of the oven, sprinkle each cookie with a pinch of flaky sea salt. If the cookies have spread into irregular shapes, you can use a large circular glass or cookie cutter to gently “scoot” them back into perfect circles while they are still hot and pliable. Let them rest on the pan for at least 10 minutes before transferring them to a wire rack. This resting period is vital for the structure to set so they don’t break when lifted.
Pro Tips for the Best Results
- Tip: Measure by Weight: Using a digital scale for your flour is the only way to guarantee consistency. Volume measurements with cups can vary by up to 20%, leading to dry or flat cookies.
- Tip: Use Quality Chocolate: Since chocolate is the star, avoid standard chips which contain stabilizers. Chopping a high-quality chocolate bar creates varied sizes and those iconic chocolate “puddles.”
- Tip: Do Not Skip the Chill: Chilling the dough is non-negotiable for the best chocolate chip cookie recipe. It prevents excessive spreading and allows the sugar to break down for a better crust.
- Tip: Check Oven Calibration: Most home ovens run slightly hot or cold. Use an oven thermometer to ensure you are truly baking at 350°F to get the perfect edge-to-center ratio.
- Tip: Pan-Banging for Ripples: For extra-chewy ripples, gently tap the baking sheet against the oven rack halfway through baking. This collapses the air bubbles and creates a denser, wrinkled texture.
Troubleshooting Common Problems
Why Are My Cookies Flat and Greasy?
This usually happens if the butter was too hot when mixed with the sugars, or if the dough wasn’t chilled long enough. If the fat is too liquid when it enters the oven, it will melt faster than the flour structure can set. Always ensure your browned butter has cooled to room temperature and give the dough ample time in the fridge to firm up before baking.
Why Did My Cookies Come Out Cakey?
A cakey texture is typically the result of too much flour or too many eggs. If you scoop flour directly from the bag with a measuring cup, it becomes packed down, leading to an over-measurement. Furthermore, over-beating the eggs can incorporate too much air, which causes the dough to rise like a sponge rather than remaining dense and chewy.
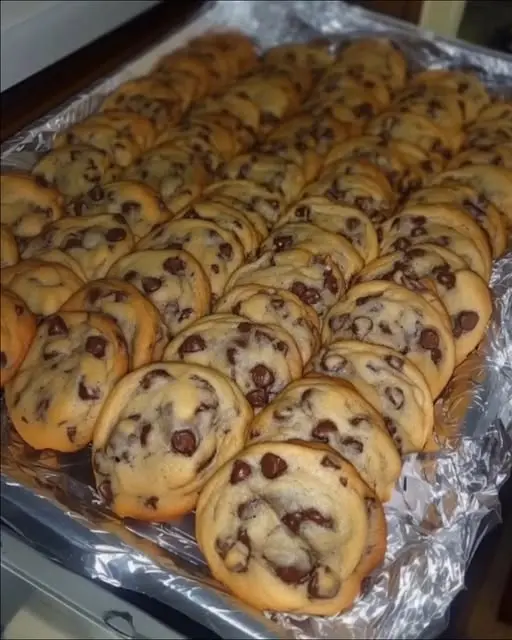
How to Serve These Cookies
While these cookies are a masterpiece on their own, how you serve them can turn a simple snack into a memorable dessert experience. Serving them warm is the gold standard, as the chocolate remains in a semi-liquid state, providing the ultimate sensory experience.
Garnishes and Pairings
Beyond the flaky sea salt, you can serve these cookies alongside a cold glass of whole milk or a hot cup of dark roast coffee. The bitterness of the coffee provides a beautiful contrast to the caramelized sugars in the brown butter cookies. For a more formal presentation, serve a warm cookie in a shallow bowl topped with a scoop of high-quality vanilla bean ice cream. The heat from the cookie will create a delicious sauce as the ice cream melts into the chocolate puddles.
Creative Presentation
If you are serving these at a party, consider a “cookie board” featuring different types of milk, fresh berries, and perhaps a small dish of extra sea salt. You can also use this best chocolate chip cookie recipe to create incredible ice cream sandwiches. Simply bake the cookies slightly longer so they are sturdy, let them cool completely, and sandwich a thick layer of salted caramel or espresso ice cream between two rounds.
Storage and Make-Ahead Guidance
Storing Leftovers
To keep your chewy chocolate chip cookies soft, store them in an airtight container at room temperature. A common trick is to include a small piece of plain white bread in the container; the cookies will absorb the moisture from the bread, keeping them from becoming stale or crunchy for up to four or five days.
Freezing the Dough
This is the perfect recipe for “emergency” baking. Scoop the dough into balls and place them on a tray in the freezer. Once frozen solid, transfer the balls to a zip-top bag. You can bake them directly from the freezer; just add an extra one to two minutes to the total baking time. This ensures you always have access to fresh, bakery-style cookies at a moment’s notice.
Final Thoughts
Mastering the best chocolate chip cookie recipe is a milestone for any home baker, and it all comes down to respecting the ingredients and the process. By embracing the nutty richness of brown butter and the patience required for chilling the dough, you move away from generic sweets and toward a professional-grade dessert. These cookies are more than just a treat; they are a testament to how small technical shifts can yield massive flavor rewards. Once you see the golden edges and smell the toasted aroma filling your kitchen, you’ll understand why this version is a permanent favorite.
Frequently Asked Questions
Can I use salted butter instead of unsalted?
Yes, you can use salted butter if that is all you have on hand. However, you should reduce the added fine sea salt in the dough by half to ensure the cookies don’t become overly salty. Keep in mind that salted butter has a higher water content, so your brown butter might yield slightly less liquid than unsalted butter would.
Why do I need to chill the dough for so long?
Chilling serves two purposes: it solidifies the fat, which controls the spread, and it allows for “enzymatic activity.” As the dough sits, the starches in the flour break down into simple sugars, and the moisture is evenly distributed. This results in a much deeper caramel flavor and a more uniform, bakery-style cookies texture that isn’t possible with room-temperature dough.
Can I use chocolate chips instead of chopped bars?
While you can use chips, the results will differ. Chocolate chips contain stabilizers like soy lecithin that help them keep their shape under high heat. Chopped chocolate or professional discs lack these stabilizers, allowing them to melt into wide, silky pools. If you want that classic best chocolate chip cookie recipe look with melting layers, chopped chocolate is the way to go.
My cookies didn’t spread at all; what happened?
If your cookies stayed in thick mounds, it is likely that too much flour was used or the dough was too cold when it went into the oven. If your kitchen or fridge is exceptionally cold, let the dough balls sit at room temperature for 10 minutes before sliding them into the oven. Also, ensure you aren’t over-measuring your flour by using a kitchen scale for accuracy.
How do I get those perfect wrinkly ripples?
The ripples are a result of the dough rising and then collapsing. To encourage this, you can use the “pan-banging” method: every few minutes during the last half of the baking process, lift one side of the baking sheet and let it drop against the oven rack. This forces the air out and creates those beautiful, chewy ridges that are a hallmark of bakery-style cookies.
Classic Soft and Chewy Chocolate Chip Cookies

The ultimate recipe for soft, buttery chocolate chip cookies with perfectly crisp edges and a chewy center. This timeless classic is easy to make and always a crowd-pleaser.
- 1 cup unsalted butter, softened
- 3/4 cup granulated white sugar
- 3/4 cup packed light brown sugar
- 1 teaspoon vanilla extract
- 2 large eggs
- 2 1/4 cups all-purpose flour
- 1 teaspoon baking soda
- 1/2 teaspoon salt
- 2 cups semi-sweet chocolate chips
- 1Preheat your oven to 375°F (190°C) and line a baking sheet with parchment paper.
- 2In a large bowl, cream together the softened butter, white sugar, and brown sugar until the mixture is smooth and fluffy.
- 3Beat in the eggs one at a time, then stir in the vanilla extract until well combined.
- 4In a separate bowl, whisk together the flour, baking soda, and salt.
- 5Gradually add the dry ingredients to the wet ingredients, mixing until just combined.
- 6Fold in the chocolate chips by hand.
- 7Drop rounded tablespoons of dough onto the prepared baking sheet, spaced 2 inches apart.
- 8Bake for 9 to 11 minutes or until the edges are golden brown.
- 9Let the cookies cool on the baking sheet for 5 minutes before transferring them to a wire rack to cool completely.
Keywords: chocolate chip cookies, baking, easy dessert, homemade cookies, classic treats


