
Fresh Strawberry Pie

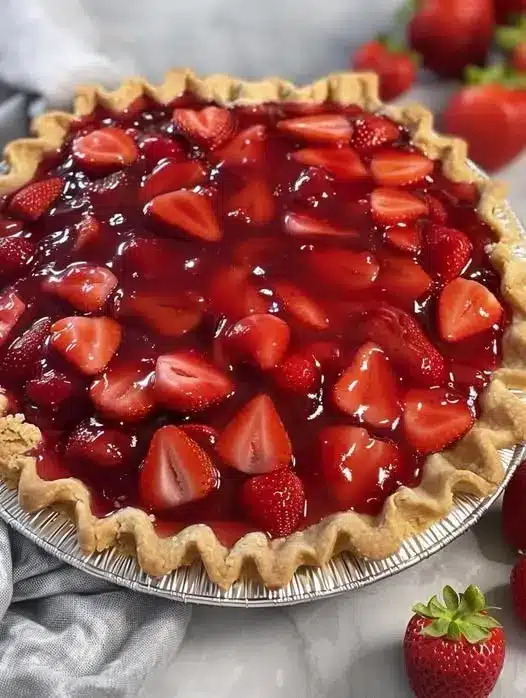
There is nothing quite like the sight of a vibrant, glistening pile of berries sitting atop a perfectly flaky crust to signal the official start of summer. This best fresh strawberry pie recipe captures the essence of peak strawberry season, focusing on the natural sweetness and juicy texture of the fruit rather than masking it with heavy fillers. Unlike traditional fruit pies that are baked until the fruit breaks down into a jam-like consistency, this version keeps the berries whole and raw, suspended in a translucent, ruby-red glaze that allows every bite to burst with fresh flavor.
The beauty of this summer dessert lies in its simplicity and the contrast between the crisp, buttery pastry and the cool, refreshing filling. By using a pre-baked shell and a quick stovetop glaze, you avoid the common pitfall of a soggy bottom, ensuring a clean slice every time. Whether you are hosting a backyard barbecue or looking for a show-stopping centerpiece for a holiday brunch, this homemade strawberry pie is a timeless classic that never fails to impress with its bright color and nostalgic appeal.
Why You’ll Love This Recipe
- Pure Fruit Flavor: Because the strawberries aren’t baked, they retain their natural brightness and firm texture, making this the ultimate treat for true berry lovers.
- Stunning Presentation: The glossy, deep red glaze creates a professional bakery-style look that makes this glazed strawberry pie the star of any dessert table.
- Textural Contrast: You get a satisfying crunch from the flaky pie crust paired with a smooth, melt-in-your-mouth fruit filling and a cloud of soft whipped cream.
- Minimal Oven Time: Since only the crust needs baking, your kitchen stays cool, making this an ideal project for those hot July afternoons when you want a gourmet result with minimal heat.
Ingredients You’ll Need
To achieve the best results, selecting high-quality produce is the most important step in this process. Here is what you will need to assemble this seasonal masterpiece.
- Fresh Strawberries: Look for berries that are deep red all the way to the stem. Since they are the main event, their natural sweetness dictates the final flavor of the pie.
- Granulated Sugar: This provides the base for the glaze, balancing the slight acidity of the berries without making the filling cloyingly sweet.
- Cornstarch: This is the essential thickening agent that transforms the liquid base into a clear, sturdy gel that holds the berries in place during slicing.
- Strawberry Gelatin: A small amount of gelatin adds a boost of concentrated fruit flavor and ensures the glaze has that iconic, vibrant red hue and a reliable set.
- Water: This serves as the liquid medium for dissolving the sugar and cornstarch into a smooth, pourable consistency.
- Pre-baked Pie Shell: A standard 9-inch crust acts as the structural foundation. You can use a traditional pastry crust or even a graham cracker base for a different flavor profile.
Variations and Smart Swaps
While the classic version is hard to beat, there are several ways to customize this recipe to suit your preferences or dietary needs.
Graham Cracker Crust: If you prefer a sweeter, crunchier base, swap the traditional pastry for a no-bake strawberry filling inside a thick graham cracker or digestive biscuit crust. This adds a honey-like note that complements the berries beautifully.
Mixed Berry Twist: Though strawberries are the star, you can replace a third of the fruit with fresh raspberries or blueberries. This creates a “bumbleberry” effect and adds different levels of tartness to the filling.
Cream Cheese Layer: For a richer experience, spread a thin layer of sweetened cream cheese or mascarpone over the bottom of the baked crust before adding the strawberries. This creates a moisture barrier and adds a cheesecake-like decadence to every slice.
How to Make the Best Fresh Strawberry Pie Recipe
Step 1: Prepare and Blind Bake the Crust
Since the filling is not baked, you must start with a fully cooked and cooled pie shell. If using a traditional dough, roll it out and fit it into your pan, then prick the bottom with a fork to prevent air bubbles. Line it with parchment paper and pie weights, baking until the edges are golden brown. Removing the weights for the final few minutes ensures the bottom is crisp and dry, providing a sturdy vessel for the juicy fruit.
Step 2: Wash and Prep the Berries
Wash your strawberries and pat them thoroughly dry with paper towels. Any excess moisture on the surface of the fruit will thin out your glaze and prevent it from sticking properly. Remove the green hulls and either leave the berries whole if they are small, or halve them if they are particularly large. Arrange them tightly inside the cooled pie shell, pointing the tips upward for a professional, tiered appearance.
Step 3: Simmer the Ruby-Red Glaze
In a small saucepan, whisk together the sugar, cornstarch, and water until smooth. Bring the mixture to a boil over medium heat, stirring constantly. As the cornstarch cooks, the liquid will transition from a cloudy white to a clear, thick syrup. Once thickened, remove it from the heat and whisk in the strawberry gelatin powder until completely dissolved. This step creates the “glue” that will hold your best fresh strawberry pie recipe together.
Step 4: Assemble and Chill to Set
Slowly pour the warm glaze over the arranged strawberries, ensuring that it seeps into the crevices between the fruit. Use a spoon or a pastry brush to coat any exposed berry surfaces. Transfer the pie to the refrigerator and let it chill for at least three to four hours. This resting period is crucial; it allows the gelatin and cornstarch to fully set, ensuring that the pie holds its shape when you go to cut the first slice.
Pro Tips for Success
- Tip: Always dry your berries completely. If the fruit is damp, the glaze will slide off the strawberries and pool at the bottom of the crust, leading to a messy presentation.
- Tip: Apply a “sealant” to the crust. Brushing the inside of the baked crust with a little melted chocolate or a thin layer of egg wash before baking can help prevent the glaze from softening the pastry.
- Tip: Wait to add the whipped cream. Only garnish the pie with whipped cream right before serving to prevent the cream from deflating or becoming watery while sitting in the fridge.
- Tip: Choose uniform berries. Try to use strawberries of a similar size so the pie looks even and is easier to slice through without hitting large obstructions.
How to Serve Your Pie
Presentation is half the fun with a dessert this beautiful. For a classic look, pipe large swirls of homemade whipped cream around the perimeter of the pie once it has fully set. If you prefer a more rustic feel, place a generous dollop of cream directly onto each individual slice. The richness of the dairy perfectly balances the sweet-tart profile of the glaze.
If you want to take things a step further, consider serving each slice with a side of premium vanilla bean ice cream. The cold, creamy texture of the ice cream melting against the firm berries creates a delightful sensory experience. For a touch of elegance, a few sprigs of fresh mint can add a pop of green that makes the red berries stand out even more on the plate.
Storage and Make-Ahead
Storing Leftovers
Because this pie relies on fresh, raw fruit, it is best enjoyed within 24 to 48 hours of assembly. Store any leftovers in the refrigerator, loosely covered with plastic wrap or a pie dome. After the second day, the strawberries may begin to release their juices, which can make the crust soften, though it will still taste delicious.
Making It Ahead
You can bake the pie crust up to two days in advance and keep it in an airtight container at room temperature. The glaze can also be made a day ahead, though you will need to gently reheat it to make it pourable again. For the best texture, assemble the pie the morning of the day you plan to serve it, allowing it the afternoon to set in the fridge.
Final Thoughts
Mastering the best fresh strawberry pie recipe is a rite of passage for any home baker who loves seasonal fruit. It is a dish that celebrates the simplicity of ingredients and the joy of summer harvests. By following the techniques for a clear, firm glaze and a crisp crust, you can create a dessert that is as reliable as it is beautiful. Whether it’s your first time making a glazed pie or a yearly tradition, the combination of bright berries and buttery pastry is a guaranteed winner that brings a taste of sunshine to any meal.
Frequently Asked Questions
Can I use frozen strawberries for this pie?
It is strongly recommended to use fresh berries for this specific recipe. Frozen strawberries release a significant amount of liquid as they thaw, which will prevent the glaze from setting properly and result in a mushy texture. The appeal of this pie is the firm, snappy texture of fresh fruit, which cannot be replicated with frozen alternatives.
How do I prevent my pie crust from getting soggy?
To keep your crust crisp, ensure it is fully baked and cooled before adding the filling. You can also try “blind baking” with a very light coating of egg wash during the last few minutes of baking to create a moisture-proof barrier. Additionally, making sure your berries are bone-dry before adding the glaze is essential for a crunchy base.
Can I make this recipe without strawberry gelatin?
Yes, you can substitute the gelatin with more cornstarch or a splash of lemon juice and strawberry puree to maintain the flavor. However, the gelatin provides a specific translucent “look” and a very reliable set that is difficult to achieve with cornstarch alone. If you skip the gelatin, your glaze may be slightly more opaque and softer in texture.
Why did my glaze turn out cloudy?
A cloudy glaze usually happens if the cornstarch and water mixture wasn’t brought to a full, rolling boil. Cornstarch needs to reach a specific temperature to “gelatinize,” which is the point where it becomes clear and thick. Ensure you see large bubbles and a change in transparency before removing the pan from the heat and adding your gelatin.
How long does the pie need to chill before slicing?
For clean, beautiful slices, you should chill the pie for at least 3 to 4 hours. If you try to cut into it too early, the glaze may still be too fluid, causing the berries to tumble out of the crust. If you have the time, chilling it overnight produces the sturdiest results and allows the flavors to meld perfectly.


