
Vanilla Layer Cake

Finding the ultimate best vanilla layer cake recipe is often considered the holy grail of home baking. While many recipes claim to be the best, a truly exceptional vanilla cake must strike a delicate balance between a light, fluffy vanilla cake texture and a rich, buttery flavor that stands on its own. This isn’t just a base for frosting; it is a centerpiece dessert that offers a tender, moist crumb and a fragrant aroma that fills the entire kitchen. Whether you are preparing for a milestone celebration or simply want to master a foundational skill, this recipe provides the structural integrity needed for stacking without sacrificing that melt-in-your-mouth quality we all crave.
The beauty of this birthday cake recipe lies in its reliability and classic profile. By utilizing specific mixing techniques and high-quality staples, you can achieve a professional-level result that rivals any high-end bakery. This guide will walk you through the nuances of the creaming method, the importance of ingredient temperatures, and the subtle secrets to ensuring your layers bake up perfectly level and golden every single time. It is a rewarding process that turns a few simple pantry items into a magnificent dessert that will be the highlight of any gathering.
Why This Recipe Is a Keeper
- Perfect Texture: This recipe results in a moist crumb that is sturdy enough for multi-layer stacking but remains incredibly soft and velvety on the palate.
- Superior Flavor: By focusing on high-quality vanilla and real butter, the flavor is deep, nuanced, and far superior to any boxed mix or standard store-bought alternative.
- Versatile Application: While it is the best vanilla layer cake recipe for birthdays, it also serves as a canvas for various fillings, from fruit preserves to rich ganache.
- Foolproof Technique: The steps are designed to minimize common baking pitfalls, such as overmixing or uneven rising, making it approachable for bakers of all levels.
Ingredients You’ll Need
Success in baking starts with understanding your components. For a fluffy vanilla cake, every ingredient serves a functional purpose, from providing structure to ensuring the fat is properly emulsified for a smooth batter. Selecting the right versions of these staples will significantly impact the final height and tenderness of your cake layers.
- Cake Flour: Unlike all-purpose flour, cake flour has a lower protein content, which prevents excess gluten development and ensures the finest, softest texture possible.
- Unsalted Butter: Using unsalted butter allows you to control the salt content precisely. Ensure it is softened to room temperature so it can properly trap air during the creaming process.
- Granulated Sugar: Beyond sweetness, sugar aerates the butter and helps retain moisture, contributing to that sought-after moist crumb.
- Egg Whites: Using primarily egg whites (or a specific ratio of whole eggs and whites) keeps the cake color bright white and the texture light and airy rather than dense.
- Whole Milk: The fat content in whole milk adds richness and helps dissolve the sugar, creating a cohesive and smooth batter.
- Pure Vanilla Extract: Since vanilla is the star, use a high-quality extract or vanilla bean paste to provide those classic floral and earthy notes.
- Baking Powder: This is the primary leavening agent that reacts with heat and moisture to give your layers the necessary lift and volume.
- Sour Cream: A secret weapon in many professional recipes, sour cream adds acidity to tenderize the gluten and provides extra moisture without making the batter too thin.
Simple Swaps and Variations
- Almond Infusion: Swap half of the vanilla extract for almond extract to create a “wedding cake” flavor profile that pairs beautifully with raspberry filling.
- Confetti Cake: Fold in half a cup of high-quality rainbow sprinkles to the finished batter to transform this into a festive birthday cake recipe for children.
- Lemon Vanilla: Add two tablespoons of fresh lemon zest to the sugar before creaming to give the cake a bright, citrusy lift that cuts through the richness.
- Dairy-Free Option: While it alters the flavor slightly, you can use a high-quality vegan butter stick and room-temperature oat milk for a dairy-free version that still maintains a decent rise.
How to Make the Best Vanilla Layer Cake Recipe
Step 1: Cream the Butter and Sugar for Aeration
The foundation of a fluffy vanilla cake is the creaming process. Start by beating your softened butter and granulated sugar together on medium-high speed for at least 3 to 5 minutes. You are looking for the mixture to turn pale, almost white, and look noticeably light and fluffy. This step incorporates tiny air bubbles into the fat, which the leavening agents will later expand in the oven. Skipping this or rushing through it will result in a heavy, dense cake that lacks the characteristic lift of a professional layer cake.
Step 2: Emulsify the Liquid Ingredients
Once the butter and sugar are aerated, it is time to add your eggs and vanilla. Add the eggs one at a time, beating well after each addition to ensure they are fully incorporated. If the mixture looks curdled, your eggs might be too cold; continue beating until it smooths out. This stage creates a stable emulsion that holds the structure of the cake together. Stir in the sour cream and vanilla extract at the end, ensuring everything is uniform before moving to the dry components.
Step 3: Sift and Prepare the Dry Base
Sifting the cake flour, baking powder, and salt is a non-negotiable step for the best vanilla layer cake recipe. Sifting removes any clumps and aerates the flour, making it easier to fold into the wet ingredients without overworking the batter. In a separate small bowl or measuring cup, whisk your room-temperature milk so it is ready for the alternating mixing method. Having all your components prepared prevents the batter from sitting too long, which can deflate the air you’ve worked so hard to incorporate.
Step 4: The Alternating Addition Method
To maintain the emulsion and prevent the flour from developing too much gluten, add the dry ingredients and the milk in stages. Start by adding one-third of the flour mixture, then half of the milk, followed by another third of the flour, the rest of the milk, and finally the remaining flour. Mix on the lowest speed just until the streaks of flour disappear. Overmixing at this stage is the leading cause of “tough” cakes. Finishing the last few strokes with a rubber spatula ensures you reach the bottom of the bowl without over-beating the top.
Step 5: Bake Until Golden and Set
Divide the batter evenly between prepared cake pans—weighing them on a kitchen scale is the best way to ensure perfectly even layers. Bake in the center of the oven until the tops are springy to the touch and a toothpick inserted into the center comes out clean or with just a few moist crumbs. The edges should just begin to pull away from the sides of the pan. Avoid opening the oven door too early, as the rush of cool air can cause the delicate centers to collapse before they have fully set.
Step 6: Cool and Level the Layers
Allow the cakes to cool in their pans for about 10 to 15 minutes before carefully inverting them onto a wire rack. This initial cooling period allows the structure to firm up so the cakes don’t break. Once completely cool, use a serrated knife or a cake leveler to trim any domed tops. Having flat, level layers is essential for a stable birthday cake recipe, as it prevents the cake from leaning or sliding once you begin the frosting process.
Pro Tips for the Best Results
- Use Room Temperature Ingredients: This is critical. Butter, eggs, and milk must be at room temperature to form a stable emulsion. Cold ingredients will cause the batter to break and result in an uneven moist crumb.
- Measure by Weight: Flour is easily compacted in measuring cups. Using a kitchen scale ensures you use the exact amount of flour required, preventing a dry or crumbly cake.
- Don’t Overbake: Check your cakes 5 minutes before the timer goes off. Even a few extra minutes in the oven can turn a fluffy vanilla cake into a dry one.
- Bang the Pans: Before sliding the pans into the oven, give them a firm tap on the counter to release any large air bubbles that could create holes in your finished cake layers.
- Prep the Pans Properly: Grease the pans with butter, line the bottoms with parchment paper, and grease the parchment. This triple-threat method ensures your layers pop out perfectly every time.
Troubleshooting Common Problems
Why Did My Cake Sink in the Middle?
A cake usually sinks in the center for three reasons: the oven door was opened too early, the cake was underbaked, or there was too much leavening agent. If the structure hasn’t set, the air bubbles will collapse. Ensure your baking powder is fresh and that you wait until at least 80% of the bake time has passed before checking for doneness.
Why Is My Cake Texture Dense and Heavy?
Density is often the result of improper creaming or overmixing the flour. If the butter and sugar weren’t beaten long enough, there isn’t enough air to help the cake rise. Conversely, if you mixed the batter too vigorously after adding the flour, you developed too much gluten, which creates a bread-like, heavy texture rather than a moist crumb.
Why Are My Layers Dry?
Dryness is typically caused by overbaking or using too much flour. If you didn’t sift the flour or used the “scoop and level” method with a measuring cup, you likely added too much bulk. Always use a scale and pull the cakes out the moment they pass the toothpick test.
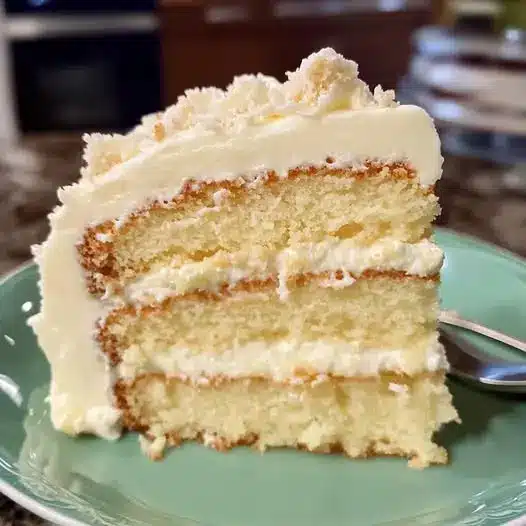
How to Serve This Vanilla Cake
Once your layers are baked and cooled, the real fun begins. To truly honor the best vanilla layer cake recipe, pair it with a homemade vanilla buttercream. A Swiss Meringue buttercream offers a silky, less-sweet finish that highlights the cake’s buttery notes, while an American buttercream provides that classic, nostalgic sweetness often found at birthday parties.
Garnishes and Presentation
For a sophisticated look, keep the frosting smooth and add a simple garnish of fresh berries or edible flowers. If you are serving this as a birthday cake recipe, a generous coating of sprinkles or a custom piped border adds a festive touch. Always slice the cake with a long, thin serrated knife dipped in warm water and wiped dry between cuts to ensure clean, professional-looking slices that showcase the beautiful internal layers.
Flavor Pairings
Vanilla is incredibly versatile. You can fill the layers with lemon curd for a tart contrast, or spread a thin layer of strawberry jam beneath the frosting. If you prefer a richer experience, a white chocolate ganache or a whipped mascarpone filling can elevate the cake for a more “grown-up” dessert occasion.
Storage and Make-Ahead
Storing Leftovers
Because of the high fat and sugar content, this cake stays moist for several days. Store leftovers in an airtight container at room temperature for up to two days. If your kitchen is particularly warm or you are using a perishable filling like fresh fruit, store the cake in the refrigerator. To maintain the moist crumb, always bring refrigerated slices to room temperature for 30 minutes before serving.
Freezing and Making Ahead
The layers for this best vanilla layer cake recipe freeze beautifully. Once the layers are completely cool, wrap them tightly in two layers of plastic wrap and a layer of aluminum foil. They can be frozen for up to three months. Thaw the layers in the refrigerator overnight while still wrapped. Many professional bakers actually prefer frosting cakes while they are slightly chilled, as it makes them easier to handle and reduces crumbs.
Final Thoughts
Mastering the best vanilla layer cake recipe is a milestone for any home baker. It provides a sense of accomplishment that goes far beyond the kitchen, as you now have the skills to create the centerpiece for your family’s most cherished celebrations. While it requires a bit of patience and attention to detail—specifically regarding ingredient temperatures and mixing times—the result is undeniably worth the effort. A slice of truly fluffy vanilla cake with a moist crumb and homemade vanilla buttercream is a timeless treat that never goes out of style. Enjoy the process, and soon you’ll find yourself reaching for this recipe every time a special occasion arises.
Frequently Asked Questions
Can I use all-purpose flour instead of cake flour?
You can, but the texture will change. All-purpose flour has more protein, which results in a slightly heartier, denser cake. If you must use it, you can create a substitute by removing two tablespoons of flour from every cup and replacing them with two tablespoons of cornstarch, then sifting the mixture together multiple times to ensure it is thoroughly combined and aerated.
How do I get my cake layers to bake flat?
To avoid a “dome” on your cake, try using cake strips. These are fabric bands that you soak in water and wrap around the outside of your pans. They keep the edges of the pan cooler, allowing the entire cake to rise at the same rate. Additionally, ensure your oven temperature is accurate; an oven that is too hot will cause the center to burst upward before the edges have set.
Can I turn this recipe into cupcakes?
Yes, this best vanilla layer cake recipe works excellently for cupcakes. Fill your cupcake liners about two-thirds full and reduce the baking time to approximately 18 to 22 minutes. Because cupcakes have a smaller surface area, they bake much faster, so keep a close eye on them to prevent drying out. The result will be a very light and fluffy vanilla cake in miniature form.
How long can I store the frosted cake?
A fully frosted cake can sit at room temperature (if using American buttercream) for about 24 hours. After that, it should be moved to the refrigerator. It will stay fresh for 4 to 5 days if kept in a cake carrier or airtight container. If you have already sliced into the cake, press a piece of plastic wrap directly against the exposed cake surface to prevent the moist crumb from drying out in the fridge.
Why is my vanilla buttercream grainy?
Grainy buttercream usually happens when the powdered sugar hasn’t been sifted or if the butter wasn’t whipped long enough before the sugar was added. For a homemade vanilla buttercream that is silky smooth, always sift your sugar and add a tablespoon or two of heavy cream or whole milk at the end to help dissolve any remaining crystals and achieve a spreadable consistency.
Classic Vanilla Layer Cake

This moist and tender vanilla layer cake features a delicate crumb and rich vanilla flavor, finished with a smooth, velvety buttercream frosting.
- 2 1/2 cups cake flour
- 1 1/2 teaspoons baking powder
- 1/2 teaspoon baking soda
- 1/2 teaspoon salt
- 3/4 cup unsalted butter, softened
- 1 3/4 cups granulated sugar
- 2 large eggs, room temperature
- 1 tablespoon pure vanilla extract
- 1 cup whole milk, room temperature
- Vanilla Buttercream
- 1 cup unsalted butter, softened
- 4 cups powdered sugar
- 3 tablespoons heavy cream
- 2 teaspoons vanilla extract
- 1Preheat your oven to 350°F (175°C). Grease and flour two 9-inch round cake pans.
- 2In a medium bowl, whisk together the cake flour, baking powder, baking soda, and salt.
- 3In a large bowl or stand mixer, cream the butter and sugar together until light and fluffy. Beat in the eggs one at a time, then stir in the vanilla extract.
- 4Add the dry ingredients to the wet ingredients in three parts, alternating with the milk, beginning and ending with the flour mixture. Mix until just combined.
- 5Divide the batter evenly between the prepared pans and bake for 30-35 minutes, or until a toothpick inserted into the center comes out clean.
- 6Let the cakes cool in the pans for 10 minutes before transferring them to a wire rack to cool completely before frosting.
Keywords: vanilla cake, layer cake, birthday cake, dessert, baking, homemade cake


