
Chocolate-Covered Brownie Bars

There is something undeniably decadent about the contrast between a dense, fudgy center and a crisp, snappy chocolate shell. These best chocolate covered brownie bars take the classic brownie experience and elevate it into a gourmet treat that feels like it belongs in a high-end confectionery shop. While a standard brownie is excellent on its own, adding a layer of rich chocolate glaze transforms the texture, providing a satisfying bite that gives way to a melt-in-your-mouth interior. Whether you are preparing these for a holiday dessert table or simply looking to satisfy a serious cocoa craving, the combination of deep chocolate notes and buttery richness makes these bars an absolute standout.
Making these bars at home is surprisingly straightforward, yet the results look professional enough for any special occasion. The secret lies in balancing the sweetness of the brownie base with a high-quality chocolate coating that isn’t overly sugary. By mastering a few simple techniques—like ensuring the base is perfectly cooled before dipping—you can achieve fudgy chocolate brownies that are consistently impressive. This recipe is designed for those who appreciate the finer details of baking, from the glossy finish of the chocolate to the chewy, concentrated crumb of the brownie itself.
Why You’ll Love This Recipe
- Unmatched Texture: These bars offer a brilliant structural contrast, featuring a rich chocolate glaze that snaps when bitten, followed by a soft, fudgy center.
- Crowd-Pleasing Appeal: Whether it’s a birthday, a potluck, or a gift for a neighbor, these chewy brownie bars are always the first dessert to disappear from the platter.
- Make-Ahead Friendly: Because the chocolate coating helps seal in moisture, these bars actually stay fresh and fudgy longer than traditional uncovered brownies, making them perfect for advanced prep.
- Customizable Canvas: While they are perfect in their purest form, the chocolate coating provides the ideal surface for adding sea salt, crushed nuts, or festive sprinkles to suit any theme.
Ingredients You’ll Need
To achieve the best chocolate covered brownie bars, every ingredient plays a specific role in building flavor and structure. Using high-quality fats and cocoa ensures the bars have a complex profile rather than just being “sweet.”
- Unsalted Butter: This provides the necessary fat for a tender, melt-in-your-mouth crumb while allowing you to control the salt content of the overall recipe.
- Granulated and Brown Sugar: A combination of both sugars creates the perfect balance; granulated sugar helps achieve that classic crackly top, while brown sugar adds moisture and a hint of molasses.
- High-Quality Cocoa Powder: Since chocolate is the star, using a Dutch-processed cocoa powder will result in a darker color and a smoother, more mellow chocolate flavor.
- All-Purpose Flour: This provides just enough structure to keep the bars from falling apart without making them cakey or dry.
- Eggs: Acting as the primary binder, eggs provide the lift and the protein structure needed to hold the fudgy chocolate brownies together.
- Semisweet Chocolate Wafers: For the coating, wafers or high-quality chocolate bars are preferred over standard chips because they melt more smoothly and create a professional-looking rich chocolate glaze.
- Coconut Oil or Shortening: Adding a small amount of fat to the melting chocolate ensures the coating remains slightly flexible so it doesn’t shatter completely when you take a bite.
Variations and Smart Swaps
- Salted Caramel Layer: For an extra layer of indulgence, spread a thin layer of chilled salted caramel over the baked brownies before applying the chocolate coating.
- Nutty Crunch: Fold toasted walnuts or pecans into the batter, or sprinkle crushed hazelnuts over the wet homemade ganache topping for added texture.
- Peppermint Twist: Add a teaspoon of peppermint extract to the brownie batter and top the finished bars with crushed candy canes for a festive holiday variation.
- Dairy-Free Option: Substitute the butter with a high-quality vegan butter stick and use dairy-free chocolate melting wafers to make these accessible for those with dietary restrictions.
How to Make the Best Chocolate Covered Brownie Bars
Step 1: Melt the Butter and Mix the Cocoa
Begin by melting your unsalted butter in a medium saucepan or heat-proof bowl. While the butter is still hot, whisk in the cocoa powder. This “blooms” the cocoa, a process that releases the oils and intensifies the chocolate flavor. The mixture should look dark, glossy, and smooth. Allowing the cocoa to hydrate in the hot fat ensures that there are no grainy clumps in your final fudgy chocolate brownies, leading to a much more refined mouthfeel.
Step 2: Whisk the Sugars and Eggs
In a separate large bowl, combine the granulated and brown sugars with the eggs and vanilla. Whisk vigorously for about two to three minutes. You are looking for the mixture to lighten in color and become slightly aerated. This step is crucial for creating that coveted shiny, papery thin crust on top of the brownie. Once the egg mixture is ready, slowly fold in the cooled cocoa-butter mixture until the batter is a uniform, deep mahogany color.
Step 3: Fold in Dry Ingredients and Bake
Gently sift the flour and salt into the wet ingredients. Use a spatula to fold the mixture together until just combined. Over-mixing at this stage can develop too much gluten, which would turn your best chocolate covered brownie bars from fudgy to bread-like. Pour the batter into a parchment-lined pan and bake until the edges are set but the center still has a slight wiggle. This ensures the bars remain moist after they have cooled completely.
Step 4: Cool Completely and Slice
This is perhaps the most difficult step: waiting. The brownies must cool to room temperature and then ideally chill in the refrigerator for at least an hour. Chilling firms up the fats and sugars, making it significantly easier to slice them into clean, uniform bars. If the brownies are too warm or soft when you try to coat them, they may crumble or melt into the rich chocolate glaze, ruining the clean aesthetic of the final product.
Step 5: Apply the Chocolate Coating
Melt your chocolate wafers with a small amount of coconut oil using a double boiler or short bursts in the microwave. Once the chocolate is completely smooth, you can either dip each individual bar into the chocolate or pour the glaze over the entire slab. If dipping, use a fork to lift the bars and let the excess drip off. Place the coated chewy brownie bars on a wire rack or parchment paper and allow the coating to set completely at room temperature or in the fridge.
Pro Tips for Success
- Tip: Use parchment paper with a “sling” or overhang on the sides. This allows you to lift the entire block of brownies out of the pan easily for perfect slicing.
- Tip: For the cleanest cuts, use a sharp chef’s knife and wipe it clean with a warm, damp cloth between every single slice. This prevents the chocolate from smearing.
- Tip: Don’t skip the salt. A pinch of fine sea salt in the batter—and perhaps a sprinkle of flaky salt on top—balances the sugar and makes the chocolate flavor “pop.”
- Tip: If your chocolate coating is too thick, add half a teaspoon of coconut oil at a time until it reaches a pourable, honey-like consistency.
- Tip: Temper your eggs by making sure they are at room temperature before adding them to the batter; this helps them emulsify more effectively with the fats.
Troubleshooting Common Problems
Why Did My Chocolate Coating Turn White?
If you see white streaks or spots on your chocolate, this is known as “bloom.” It usually happens if the chocolate was overheated during melting or if it was stored in an environment with high humidity. To avoid this, melt the chocolate slowly and gently, and store your best chocolate covered brownie bars in a cool, dry place rather than a fluctuating temperature environment.
Why Are My Brownies Too Crumbly to Dip?
Crumbly brownies are usually a result of over-baking or not allowing them to chill sufficiently. The chilling process is vital because it sets the structure. If you find they are still too fragile, place the sliced bars in the freezer for 20 minutes before dipping them into the rich chocolate glaze. The cold surface will also help the chocolate set faster.
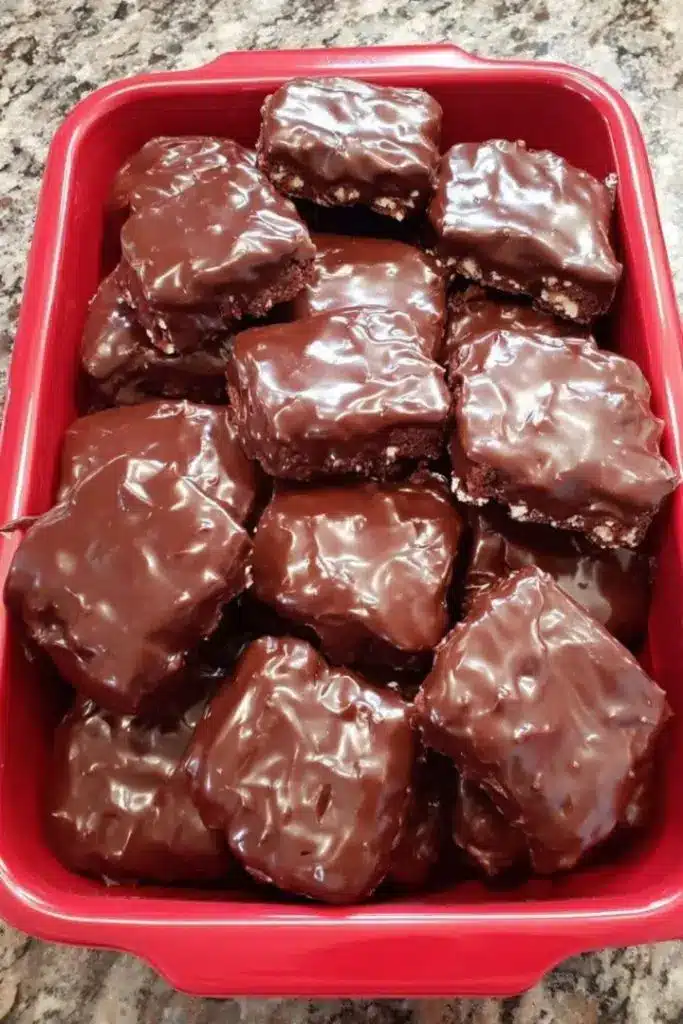
How to Serve These Brownie Bars
When it comes to presentation, these best chocolate covered brownie bars are versatile enough for both casual and formal settings. For a simple family dessert, serving them at room temperature allows the flavors of the cocoa and butter to be most prominent. If you prefer a firmer, snappier texture, serve them directly from the refrigerator.
Garnishes and Toppings
To make the bars look even more professional, consider drizzling a contrasting chocolate—like white or milk chocolate—over the dark coating. A light dusting of edible gold luster dust or a few dried rose petals can turn these into a stunning wedding or shower dessert. If you are serving them as part of a plated dessert, a dollop of unsweetened whipped cream or a side of fresh raspberries provides a bright acidity that cuts through the richness of the homemade ganache topping.
Creative Serving Ideas
You can also turn these into “brownie pops” by inserting a wooden treat stick into the base before dipping them into the chocolate. This makes them an excellent portable option for outdoor parties or children’s events. For a decadent sundae, chop one of the bars into smaller chunks and use it as a topping for high-quality vanilla bean ice cream, drizzling extra rich chocolate glaze over the top.
Storage and Make-Ahead
Storing Leftovers
Keep your best chocolate covered brownie bars in an airtight container. At room temperature, they will stay fresh for about 3 to 4 days. If you live in a warm climate, it is better to store them in the refrigerator to prevent the chocolate coating from softening or blooming. In the fridge, they will maintain their quality for up to a week.
Freezing Instructions
These bars freeze exceptionally well. Wrap individual bars in plastic wrap and then place them in a heavy-duty freezer bag. They can be frozen for up to 3 months. To serve, thaw them in the refrigerator overnight. Avoid thawing them at room temperature while still in the bag, as condensation can form on the chocolate and make the surface sticky.
Final Thoughts
Mastering the best chocolate covered brownie bars is a rewarding experience for any home baker. By focusing on the quality of your cocoa and the precision of your cooling times, you create a dessert that is far superior to anything found in a box. These bars are a celebration of chocolate in all its forms—fudgy, smooth, and snappy. They are a testament to the fact that sometimes, the most simple combinations of butter, sugar, and cocoa, when handled with care, result in the most extraordinary treats. Enjoy the process of dipping and decorating, and even more, enjoy the satisfied silence that follows the first bite.
Frequently Asked Questions
What is the best chocolate to use for the coating?
For the best results, use high-quality melting wafers or couverture chocolate. These products contain a higher percentage of cocoa butter, which allows the chocolate to melt smoothly and set with a beautiful shine. Standard chocolate chips often contain stabilizers that prevent them from melting into a perfectly fluid rich chocolate glaze, though they can work in a pinch if combined with a little coconut oil.
Can I make these brownies gluten-free?
Yes, you can easily adapt this recipe by using a high-quality 1-to-1 gluten-free flour blend. Ensure the blend contains xanthan gum, which helps mimic the structure provided by gluten. Because fudgy chocolate brownies rely more on fats and sugars than on a complex flour structure, the transition to gluten-free is usually very successful and rarely affects the final taste.
How do I get a perfectly smooth chocolate finish?
The key to a smooth finish is ensuring your chocolate is completely melted and free of any air bubbles. After melting, give the chocolate a few gentle taps on the counter to release trapped air. When dipping the chewy brownie bars, use a smooth, continuous motion and allow the excess to drain off completely before setting them down. Chilling the brownies beforehand also helps the chocolate set quickly and smoothly.
Why did my chocolate seize while melting?
Chocolate seizes when even a tiny amount of moisture—like a drop of water or steam—comes into contact with it while it is melting. This causes the sugar and cocoa to clump together. To prevent this, ensure all your bowls and spatulas are completely dry. If you are using a double boiler, make sure the water is simmering gently and not touching the bottom of the bowl, as excessive heat can also cause the chocolate to become grainy.
Do I need to refrigerate these bars?
While not strictly necessary if your kitchen is cool, refrigeration helps maintain the integrity of the rich chocolate glaze. If the bars are left in a warm room, the chocolate may soften and become messy to handle. For the best experience, store them in the fridge but let them sit at room temperature for about 10 minutes before eating to allow the fudgy center to soften slightly.
Chocolate-Covered Brownie Bars

Rich, fudgy brownie bars topped with a smooth, velvety chocolate ganache. These decadent treats are a chocolate lover's dream and are perfect for parties or a special dessert.
- 1 cup unsalted butter, melted
- 2 cups granulated sugar
- 4 large eggs
- 1 tsp vanilla extract
- 3/4 cup unsweetened cocoa powder
- 1 cup all-purpose flour
- 1/2 tsp salt
- 1 cup semi-sweet chocolate chips
- 1/4 cup heavy cream
- 1Preheat your oven to 350°F (175°C) and grease a 9x9 inch baking pan.
- 2In a large bowl, whisk together the melted butter and sugar. Add the eggs and vanilla, beating until the mixture is smooth and well combined.
- 3Gently stir in the cocoa powder, flour, and salt until just combined.
- 4Pour the batter into the prepared pan and spread it evenly.
- 5Bake for 25-30 minutes, or until a toothpick inserted into the center comes out with a few moist crumbs.
- 6Allow the brownies to cool completely in the pan.
- 7In a small microwave-safe bowl, combine the chocolate chips and heavy cream. Heat in 30-second intervals, stirring until completely smooth and glossy.
- 8Pour the chocolate coating over the cooled brownies and spread evenly. Let the topping set before slicing into bars.
Keywords: chocolate, brownies, dessert, ganache, baking, fudge bars


