
Wisconsin Fairy Food

If you grew up in the Midwest, specifically around Milwaukee or throughout the state of Wisconsin, the sight of a golden, aerated confection drenched in thick chocolate likely sparks instant nostalgia. Known locally as wisconsin fairy food sponge candy, this treat is more than just a sweet; it is a seasonal tradition that bridges the gap between a crisp toffee and a melt-in-your-mouth cloud. The magic lies in its unique internal structure—a porous, bubbly honeycomb that shatters with a satisfying crunch before dissolving into a deep, caramelized syrup on the tongue.
Making this old fashioned sponge candy at home is a rewarding culinary experiment that feels like a chemistry lesson in the best possible way. While the ingredient list is surprisingly short, the process relies on precise temperature control and a dramatic chemical reaction between boiling sugar and baking soda. The result is a batch of honeycomb toffee that rivals the best candy shops in the state, offering a sophisticated balance of toasted sugar and smooth chocolate that is impossible to resist.
Why This Recipe Is a Keeper
- Unique Texture Profile: Unlike hard toffee or chewy caramels, this candy features a distinct “sponge” texture that is light, airy, and crisp all at once.
- Nostalgic Appeal: This is a quintessential regional specialty that brings the authentic taste of a Wisconsin confectionery right into your own kitchen.
- Gifting Potential: Because it looks so professional and tastes so decadent, it makes for an impressive holiday gift or a standout addition to a dessert platter.
- Simple Ingredients: You likely already have the pantry staples needed—sugar, corn syrup, and baking soda—to create this high-end homemade chocolate covered candy.
Ingredients You’ll Need
The beauty of wisconsin fairy food sponge candy lies in how humble ingredients transform through heat and aeration. Each component plays a vital role in ensuring the candy reaches the correct structural integrity and flavor depth.
- Granulated Sugar: This provides the bulk of the candy and undergoes caramelization to create that characteristic toasted, golden flavor.
- Dark Corn Syrup: While light corn syrup works, the dark variety adds a hint of molasses flavor and a richer amber hue to the finished sponge.
- Baking Soda: The most critical ingredient; when whisked into the hot syrup, it releases carbon dioxide, causing the mixture to foam and create the “bubbles.”
- Chocolate Coating: High-quality melting chocolate or tempered bars provide the necessary seal to protect the moisture-sensitive interior from becoming sticky.
- Vinegar: A small amount of white vinegar helps stabilize the sugar crystals and reacts with the baking soda to enhance the foaming action.
- Vanilla Extract: Added at the very end, this rounds out the sweetness with a warm, aromatic finish that complements the chocolate shell.
Easy Ways to Change It Up
Chocolate Varieties: While milk chocolate is the traditional choice for wisconsin fairy food sponge candy, dipping the pieces in a high-percentage dark chocolate creates a sophisticated, less-sweet version that adults adore.
Sea Salt Topping: To lean into the modern “salted caramel” trend, sprinkle a few flakes of Maldon sea salt over the chocolate before it sets. This cuts through the intense sweetness of the honeycomb center.
Flavor Infusions: You can replace the vanilla extract with almond extract or even a tiny drop of orange oil to give the candy a citrusy undertone that pairs beautifully with dark chocolate.
How to Make Wisconsin Fairy Food Sponge Candy
Step 1: Prepare the Equipment and Lining
Before you even turn on the stove, you must have your workstation ready. This recipe moves incredibly fast once the sugar reaches the target temperature. Line an 8×8 or 9×9 inch baking pan with parchment paper, ensuring it hangs over the sides for easy removal. Most importantly, calibrate your candy thermometer. Success in honeycomb toffee depends on hitting the “hard crack” stage perfectly, so ensure your thermometer is accurate and ready to be clipped to the side of your heavy-bottomed saucepan.
Step 2: Dissolve and Boil the Sugar Mixture
Combine the sugar, dark corn syrup, and vinegar in your saucepan over medium heat. Stir the mixture constantly until the sugar crystals have completely dissolved and the liquid is smooth. Once it begins to boil, stop stirring entirely. Stirring during the boiling phase can induce crystallization, which will turn your smooth candy into a grainy mess. Allow the mixture to climb steadily in temperature, watching the thermometer closely as it approaches the 300°F to 310°F range.
Step 3: The Dramatic Foaming Reaction
As soon as the thermometer hits 300°F (the hard crack stage), remove the pan from the heat immediately. This is where the old fashioned sponge candy gets its name. Quickly whisk in the sifted baking soda and vanilla. The mixture will violently foam up, increasing in volume by four or five times. Do not over-whisk; you want to incorporate the soda thoroughly but stop before you deflate those precious air bubbles. The goal is a thick, pale-gold foam that looks like a literal sponge.
Step 4: The Hands-Off Pour and Cool
Pour the foaming mixture into your prepared pan. A vital tip here is to let the candy fall naturally into the corners. Do not spread it with a spatula, as the weight of the tool will crush the delicate air pockets you just created. Let the pan sit undisturbed at room temperature for at least two hours. As it cools, the bubbles will “set” into a rigid, crisp structure. Attempting to cut or move it too early will result in a collapsed, sticky center.
Step 5: Breaking and Chocolate Dipping
Once the block is completely cold and hard, lift the parchment paper out of the pan. Use a sharp knife or simply your hands to break the wisconsin fairy food sponge candy into bite-sized, irregular shards. Melt your chocolate along with a teaspoon of shortening or coconut oil to create a smooth, dip-able consistency. Submerge each piece of sponge candy into the chocolate, ensuring every pore is sealed. This chocolate coating isn’t just for flavor; it acts as a barrier against humidity, which is the natural enemy of sponge candy.
Pro Tips for the Best Results
- Tip: Sift Your Baking Soda. Even small clumps of baking soda will result in bitter, dark spots in your candy. Always run it through a fine-mesh sieve before adding it to the hot syrup.
- Tip: Avoid Humidity. Never attempt to make wisconsin fairy food sponge candy on a rainy or particularly humid day. The sugar is hygroscopic and will pull moisture from the air, turning your crisp candy into a sticky, chewy puddle.
- Tip: Use a Large Pot. The foaming reaction is significant. Always use a pot that looks much too large for the initial ingredients to prevent the boiling sugar from overflowing onto your stove.
- Tip: Seal the Edges. When dipping, ensure the chocolate completely covers the cut edges of the sponge. If any of the internal “honeycomb” is exposed to the air, it will soften and lose its crunch within hours.
Troubleshooting Common Problems
Why Is My Candy Chewy Instead of Crisp?
If the interior of your wisconsin fairy food sponge candy sticks to your teeth, it likely didn’t reach a high enough temperature. Ensure your thermometer hits at least 300°F. If the temperature is too low, the sugar remains in the “soft crack” stage, which results in a taffy-like texture rather than a brittle, airy shatter.
Why Does My Candy Taste Bitter?
Bitterness usually comes from two sources: over-caramelizing the sugar or using too much baking soda. If the syrup gets too dark (past 315°F), the sugar begins to burn. Additionally, ensure you measure the baking soda precisely; an excess of leavener leaves behind a metallic, soapy aftertaste.
Why Did the Center Collapse?
The most common cause for a collapsed center is over-stirring the foam or spreading the mixture into the pan. You must be very gentle once the baking soda is added. The bubbles are incredibly fragile until they cool and harden, so “pouring and ignoring” is the best strategy for success.
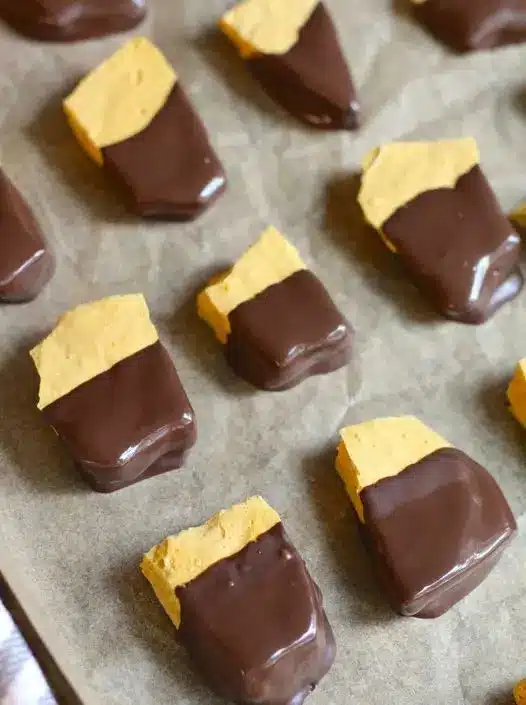
How to Serve Wisconsin Fairy Food Sponge Candy
Presentation is key when serving this regional treasure. Because the shards are irregular and rustic, they look beautiful stacked in a glass bowl or arranged on a marble serving board. This candy is traditionally served alongside a cup of strong coffee or a glass of cold milk, as the creaminess helps balance the intense caramelized sweetness of the honeycomb toffee.
Garnishes and Presentation
While the chocolate-dipped pieces are perfect on their own, you can elevate the presentation by drizzling a contrasting type of chocolate (like white chocolate) over the top in a decorative pattern. If you are serving this at a party, consider breaking a few pieces open to show off the intricate, golden interior—it’s a great conversation starter for those who haven’t experienced wisconsin fairy food sponge candy before.
Creative Ways to Serve It
Beyond snacking, crushed bits of this homemade chocolate covered candy make an extraordinary topping for vanilla bean ice cream or a chocolate mousse. The tiny air pockets provide a unique textural contrast to soft, creamy desserts. You can also fold small pieces into a batch of homemade brownies just before baking for a “hidden” crunch.
Storage and Make-Ahead
Storing Leftovers
Storage is the most critical part of maintaining the quality of your wisconsin fairy food sponge candy. Place the dipped pieces in a single layer (or separated by parchment paper) in a strictly airtight container. Store the container in a cool, dry place. Do not store this candy in the refrigerator, as the condensation will cause the sugar to weep and dissolve the honeycomb structure.
Making It Ahead
This candy is an excellent make-ahead option because it stays fresh for up to two weeks if kept in an airtight environment. In fact, many people find that the flavors “mellow” after a day or two, making it the perfect candidate for shipping to friends and family during the holiday season. Just ensure each piece is fully encased in chocolate to lock in that signature crunch.
Final Thoughts
Mastering the art of wisconsin fairy food sponge candy is a rite of passage for any serious home confectioner. It requires patience, a bit of bravery during the foaming stage, and a deep appreciation for Midwestern candy traditions. When you bite into that first piece and feel the golden center shatter into a million sweet shards, you’ll understand exactly why this treat has remained a local favorite for generations. Whether you are reliving a childhood memory or discovering this “fairy food” for the first time, the combination of light-as-air toffee and rich chocolate is a true culinary masterpiece.
Frequently Asked Questions
Is fairy food the same thing as sea foam candy?
Yes, while the names vary by region, wisconsin fairy food sponge candy is essentially the same confection as sea foam, cinder toffee, or honeycomb. The primary difference often lies in the coating; in the Midwest, a thick milk chocolate coating is the gold standard, whereas other regions might leave it plain or use different chocolate ratios.
Can I make this recipe without corn syrup?
Corn syrup is vital in this recipe because it acts as an interfering agent that prevents the sugar from crystallizing. While some recipes use honey or maple syrup, these can change the flavor profile significantly and may alter the stability of the foam. For the most authentic old fashioned sponge candy texture, dark corn syrup is highly recommended.
Why did my chocolate coating turn grey or streaky?
This is known as chocolate “bloom.” It happens when the chocolate isn’t tempered correctly or if it is subjected to temperature fluctuations. While it doesn’t affect the taste of your homemade chocolate covered candy, it can look unappealing. To avoid this, use high-quality melting wafers designed for dipping, or follow a strict tempering process for bar chocolate.
How long does sponge candy last?
If kept in a truly airtight container in a cool, dry environment, your candy will remain crisp for 2 to 3 weeks. However, if the seal isn’t perfect, humidity will eventually find its way in, causing the center to become chewy. Always check the seal on your storage container to ensure your honeycomb toffee stays at peak quality.
Can I freeze fairy food to make it last longer?
Freezing is generally not recommended for wisconsin fairy food sponge candy. The transition from the freezer to room temperature often creates condensation on the surface of the chocolate, which will quickly seep into the porous center and ruin the texture. It is best enjoyed fresh or stored in a dry, room-temperature pantry.
Wisconsin Fairy Food

Wisconsin Fairy Food, also known as sponge candy or honeycomb candy, is a beloved Midwestern holiday tradition. This recipe creates a light, airy, and crunchy toffee-like center that is traditionally dipped in rich milk or dark chocolate. The magical reaction between the hot syrup and baking soda creates the signature porous texture that fans of this confection adore.
- 1 cup granulated sugar
- 1 cup dark corn syrup
- 1 tablespoon white vinegar
- 1 tablespoon baking soda, sifted to remove lumps
- 16 ounces milk chocolate or dark chocolate melting wafers
- 1Line a 9x9-inch baking pan with parchment paper, ensuring it hangs over the sides for easy removal. Grease the parchment lightly.
- 2In a heavy-bottomed 3-quart saucepan, combine the sugar, dark corn syrup, and vinegar. Stir over medium heat until the sugar is fully dissolved.
- 3Clip a candy thermometer to the side of the pan and bring the mixture to a boil. Cook without stirring until it reaches 300°F (150°C), which is the hard-crack stage.
- 4Remove the pan from the heat immediately. Quickly whisk in the sifted baking soda. The mixture will foam up vigorously; continue to stir briefly until well combined.
- 5Quickly pour the foaming mixture into the prepared pan. Do not spread it or smooth the top, as this will crush the air bubbles. Let it settle naturally.
- 6Allow the candy to cool and harden completely at room temperature for at least 2 to 3 hours.
- 7Once set, lift the candy out of the pan using the parchment paper. Break it into irregular, bite-sized pieces using your hands or a knife.
- 8Melt the chocolate wafers in a microwave-safe bowl in 30-second intervals, stirring until smooth.
- 9Dip each piece of candy into the melted chocolate to coat entirely. Place on wax paper or parchment until the chocolate has fully hardened.
Keywords: Wisconsin fairy food, sponge candy recipe, honeycomb candy, seafoam candy, homemade candy, Wisconsin traditions


