
Green Chile Cheeseburger

The green chile cheeseburger is more than just a meal in the American Southwest; it is a culinary icon that defines the vibrant food culture of New Mexico. There is something deeply satisfying about the combination of a savory, salt-crusted beef patty and the smoky, lingering heat of fire-roasted chiles. This best green chile cheeseburger recipe captures that elusive balance of textures and flavors, offering a burger that is simultaneously juicy, spicy, and incredibly rich. Unlike a standard burger that relies on heavy sauces for moisture, this version lets the natural oils of the beef and the succulent flesh of the chiles do the heavy lifting, resulting in a burger that feels grounded in tradition and explosive in taste.
Mastering this recipe at home requires a focus on high-quality beef and the correct preparation of the chiles to ensure they don’t get lost among the other toppings. By using a New Mexico style burger approach, you focus on high-heat searing and the layering of ingredients to maximize the “umami” factor. This guide will walk you through the nuances of selecting the right beef-to-fat ratio, the best way to handle your chiles, and the technical steps necessary to achieve that perfect, crusty sear that every world-class burger deserves. Whether you are a heat-seeker or just looking to upgrade your next backyard cookout, this recipe provides the roadmap to a truly memorable meal.
Why This Recipe Is a Keeper
- Iconic Flavor Profile: The specific combination of roasted hatch green chiles and sharp cheese creates a complex flavor profile that hits salty, spicy, and savory notes all at once.
- Superior Texture: By focusing on a high-heat sear, you get a beautiful crust on the outside of the meat while keeping the interior incredibly juicy and tender.
- Customizable Heat: You have full control over the spice level by choosing mild, medium, or hot chiles, making this a crowd-pleasing option for any heat tolerance.
- Simplified Gourmet: Despite its high-end restaurant taste, the best green chile cheeseburger recipe relies on simple, accessible ingredients and straightforward techniques that any home cook can master.
Ingredients You’ll Need
To create a truly authentic experience, the quality of your base ingredients is paramount. We aren’t just stacking meat on bread; we are building layers of flavor that need to stand up to the robust, earthy punch of the green chiles. Choosing the right fat content for your beef and the right structural integrity for your bun makes the difference between a soggy mess and a masterpiece.
- Ground Beef (80/20): For a burger this bold, you need a 20% fat content. The fat provides the moisture and flavor needed to balance the heat of the chiles and ensures the patty doesn’t dry out during the sear.
- Roasted Green Chiles: Ideally, use roasted hatch green chiles for their distinct smokiness. If fresh aren’t in season, high-quality frozen or jarred whole chiles that you chop yourself offer the best texture.
- Cheese: Thick slices of sharp cheddar or American cheese provide the necessary creaminess. American cheese is particularly prized here for its superior melting capabilities, which help bind the chiles to the patty.
- Brioche or Potato Buns: These buns offer a soft, slightly sweet contrast to the savory beef. They are also sturdy enough to hold the juices without disintegrating.
- Kosher Salt and Black Pepper: Large grains of salt are essential for creating the crust. Do not be shy with the seasoning; a thick patty needs a generous hand to bring out the beefiness.
- Butter: Used specifically for toasting the buns, which creates a moisture barrier and adds a final layer of richness to each bite.
- Garlic Powder: A subtle addition to the beef that enhances the savory notes without overpowering the natural flavor of the meat or the chiles.
Simple Swaps and Variations
The Smoky Bacon Twist: While a classic New Mexico style burger is perfect on its own, adding thick-cut, applewood-smoked bacon provides a crunch and a salty depth that pairs beautifully with the roasted chiles.
Cheese Alternatives: If you want to lean into the Southwest theme, try using Pepper Jack for an extra kick or Monterey Jack for a milder, creamier melt that lets the chile flavor shine even brighter.
Slider Style: For parties, you can adapt this best green chile cheeseburger recipe into sliders. Use smaller dinner rolls and finely mince the chiles so they stay tucked inside the smaller buns.
Vegetarian Option: A thick, grilled portobello mushroom cap or a high-quality plant-based patty can serve as the base. Ensure you season the substitute heavily to mimic the savory intensity of the beef.
How to Make the Best Green Chile Cheeseburger Recipe
Step 1: Prepare and Chop the Green Chiles
If you are using whole roasted chiles, start by removing the stems and any excess seeds. While some seeds add heat, too many can make the texture gritty. Roughly chop the chiles into half-inch pieces. You want them large enough to have a presence but small enough to sit evenly on the patty. If the chiles are very wet, pat them slightly with a paper towel to prevent the burger from becoming soggy when assembled.
Step 2: Form the Beef Patties
Divide your beef into equal portions, usually about 6 to 8 ounces each. Gently shape them into rounds that are slightly wider than your buns, as they will shrink during cooking. Press a small indentation into the center of each patty with your thumb; this prevents the burger from “puffing up” in the middle and ensures a flat surface for the melted cheese and chiles to rest on later. Keep the meat cold until the moment it hits the heat to preserve the fat structure.
Step 3: Season for a Perfect Crust
Just before cooking, season both sides of the patties generously with kosher salt, black pepper, and a pinch of garlic powder. It is vital to wait until the last second to salt the meat, as salt can draw out moisture and change the texture of the beef if left to sit too long. This creates the foundation for a professional-grade sear that mimics a high-end steakhouse burger.
Step 4: Sear the Patties in a Cast Iron Skillet
Heat a cast iron skillet or griddle over medium-high heat until it is lightly smoking. Place the patties in the pan—you should hear a loud, immediate sizzle. Cook for 3 to 4 minutes without moving them to develop a deep, dark brown crust. If you prefer the smash burger method, use a heavy spatula to press the patty firmly into the hot surface during the first 30 seconds of cooking to maximize contact and browning.
Step 5: Add Chiles and Melt the Cheese
Flip the burgers and immediately top each one with a generous spoonful of the chopped green chiles. Place a slice of cheese over the chiles, which acts as a “blanket” to hold the chiles in place. For the best melt, add a teaspoon of water to the pan and cover it with a lid for about 30 seconds. The steam will perfectly melt the cheese around the chiles, fusing them to the beef in a glorious, gooey layer.
Step 6: Toast the Buns and Assemble
While the meat rests for a minute, spread butter on the cut sides of your buns and toast them in the pan or under the broiler until golden brown. Place the patty on the bottom bun, add your desired garnishes—though many purists insist that the best green chile cheeseburger recipe needs nothing more than the meat, chile, and cheese—and top with the other half of the bun. Serve immediately while the juices are at their peak.
Pro Tips for the Best Results
- Tip: Don’t Overwork the Meat. When forming your patties, handle the beef as little as possible. Overworking the meat leads to a dense, tough burger rather than one that is tender and light.
- Tip: Temperature Matters. For a juicy beef patty, aim for an internal temperature of 160°F for well-done or 145°F for medium. Using a meat thermometer takes the guesswork out of the process.
- Tip: Use Freshly Grated Cheese. While pre-sliced cheese is convenient, freshly grated cheddar melts more smoothly because it lacks the anti-clumping agents found in pre-packaged varieties.
- Tip: The Steam Secret. Always use the steam method (adding a drop of water and covering the pan) to melt your cheese. It ensures the cheese is fully melted before the beef overcooks.
- Tip: Toast Every Surface. Toasting the buns isn’t just for flavor; the crispy surface acts as a barrier that prevents the juices from the roasted hatch green chiles from making the bread mushy.
Troubleshooting Common Problems
Why Is My Burger Falling Apart?
If your patties are crumbling, it is likely because the meat was too lean or you didn’t let the pan get hot enough before adding the beef. The initial sear helps “bind” the exterior of the patty. Also, ensure you aren’t flipping the burger more than once; the more you move it, the more likely it is to break.
The Chiles Are Too Spicy
If the heat level is overwhelming, you can balance it by adding a dollop of sour cream or a few slices of avocado to the burger. The fats in these toppings help neutralize the capsaicin in the chiles. Next time, ensure you remove every single seed and the white inner membranes of the chiles, as that is where most of the heat resides.
The Bun Is Soggy
A soggy bun usually happens when the chiles haven’t been drained properly or the burger wasn’t allowed to rest. Give the meat 60 seconds to rest on a clean plate or wire rack before placing it on the bun. This allows the internal juices to redistribute into the fibers of the meat rather than running out onto the bread.
How to Serve This Recipe
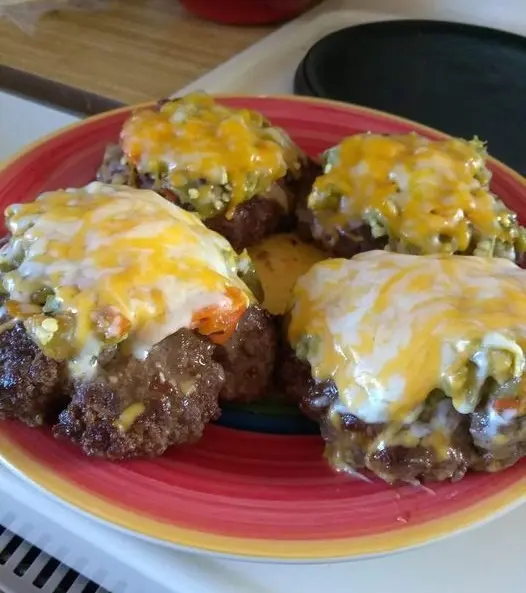
Presentation is key when serving the best green chile cheeseburger recipe. Because this is a hearty, rustic meal, it looks best served on a simple wooden board or a classic wax-paper-lined basket. The visual of the bright green chiles peeking out from under the golden melted cheese is usually enough to get everyone’s appetite going.
Garnishes and Toppings
While the green chile is the star, a few well-chosen garnishes can enhance the experience. Thinly sliced red onions provide a sharp crunch, while a few leaves of butter lettuce add freshness. In New Mexico, it’s also common to see these burgers served with a side of extra chiles for those who want to double down on the heat.
Classic Side Dishes
Nothing beats the classic pairing of crispy french fries or thick-cut onion rings. The saltiness of the potatoes complements the heat of the burger perfectly. For a lighter option, a vinegar-based coleslaw or a simple cucumber salad provides a cooling contrast to the summer grilling flavors of the main dish.
Storage and Make-Ahead
Storing Leftovers
If you have leftover cooked patties, store them in an airtight container in the refrigerator for up to three days. It is highly recommended to store the patties, chiles, and buns separately. Reassembling the burger later ensures that the textures remain as close to the original as possible.
Reheating
The best way to reheat a burger without drying it out is in a 250°F oven. Place the patty on a wire rack over a baking sheet and heat for about 10 minutes, or until the center is warm. Avoid the microwave if possible, as it tends to turn the beef rubbery and makes the bread tough.
Making It Ahead
You can prep the patties and chop the chiles up to 24 hours in advance. Store the formed patties on a tray covered tightly with plastic wrap in the fridge. This makes the actual cooking process incredibly fast, which is ideal for hosting a summer grilling event where you want to spend time with guests rather than prepping in the kitchen.
Final Thoughts
The best green chile cheeseburger recipe is a testament to the idea that a few high-quality ingredients, prepared with care, can create something truly extraordinary. It is a dish that rewards patience—waiting for that perfect sear, taking the time to roast your own chiles, and allowing the meat to rest. By following these steps, you are not just making a sandwich; you are creating a culinary experience that brings a taste of the Southwest right to your kitchen table. Once you have tasted the smoky, melted perfection of a properly made green chile burger, the standard cheeseburger will always feel like it’s missing something.
Frequently Asked Questions
Can I use canned green chiles for this recipe?
While you can use canned diced green chiles in a pinch, the flavor and texture won’t be as robust as roasted hatch green chiles. Canned chiles are often much softer and lack the smoky char that defines this burger. If using canned, make sure to drain them thoroughly and perhaps sauté them in a pan for a few minutes to concentrate the flavor before adding them to the burger.
What is the best cheese for a green chile cheeseburger?
Traditionalists often reach for American cheese because its low melting point creates a creamy sauce-like consistency that coats the chiles. However, a sharp white cheddar provides a more sophisticated flavor that stands up well to the beef. The most important thing is that the cheese melts thoroughly to lock the chiles in place on the juicy beef patty.
How do I make the burger spicy but not overwhelming?
The heat of a green chile burger is mostly determined by the variety of chile you buy. Hatch chiles come in various heat levels ranging from mild to extra hot. To control the spice, start with a mild variety and add a pinch of cayenne pepper to your beef seasoning if you want a little more kick. Always taste a small piece of the chile before adding it to the burger so you know what you are working with.
Should I grill or pan-sear my green chile cheeseburger?
Both methods work well, but a cast iron skillet on a stovetop or grill is often preferred for this specific recipe. The flat surface of the skillet allows for more “Maillard reaction” (browning) across the entire surface of the meat compared to the thin lines of a grill grate. This extra crust provides a savory counterpoint to the soft, spicy chiles.
Can I freeze the prepared patties?
Yes, you can freeze the raw beef patties. Place parchment paper between each patty to prevent sticking and store them in a heavy-duty freezer bag for up to three months. For the best quality, thaw them in the refrigerator overnight before seasoning and cooking. Do not freeze the patties with the green chiles already attached, as the moisture in the chiles will affect the freezing process of the meat.
Green Chile Cheeseburger

A quintessential New Mexico classic, this Green Chile Cheeseburger features juicy beef patties topped with smoky roasted green chiles and melted cheese on a toasted bun.
- 1 lb ground beef (80/20 lean-to-fat ratio)
- 4 hamburger buns, split and toasted
- 1 cup roasted green chiles, peeled, seeded, and chopped
- 4 slices sharp cheddar or American cheese
- 1 tsp garlic powder
- 1 tsp onion powder
- Salt and freshly ground black pepper to taste
- Optional toppings: lettuce, sliced tomato, red onion, and mayonnaise
- 1In a large bowl, combine the ground beef with garlic powder, onion powder, salt, and pepper. Gently mix until just combined, being careful not to overwork the meat.
- 2Divide the mixture into 4 equal portions and shape into patties about 1/2 inch thick, slightly larger than the diameter of the buns.
- 3Preheat a grill or cast-iron skillet over medium-high heat.
- 4Place the patties on the grill or skillet and cook for 3-4 minutes per side for medium doneness.
- 5During the last minute of cooking, top each patty with a generous spoonful of chopped green chiles and a slice of cheese.
- 6Cover the grill or skillet with a lid for 30-45 seconds to allow the cheese to melt completely.
- 7Place the patties on the toasted bun bottoms, add desired toppings, and cover with the bun tops.
Keywords: green chile cheeseburger, hatch chile burger, new mexico burger, spicy cheeseburger, grilled burger


