
Homemade Glazed Rolls

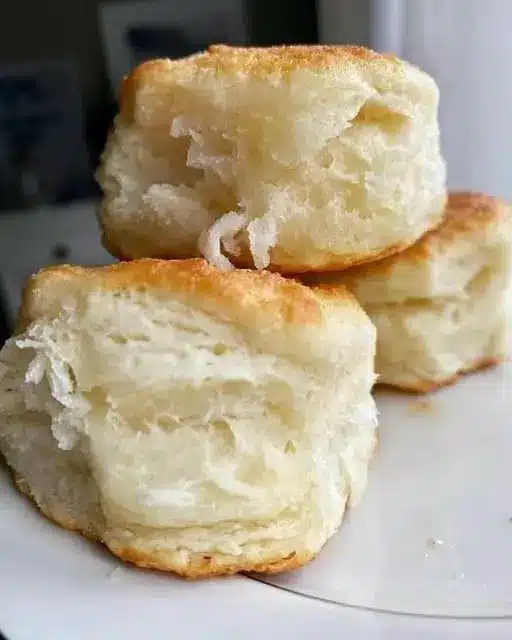
There is nothing quite like the aroma of fresh yeast bread wafting through the kitchen to make a house feel like a home. When you are looking for the best homemade glazed rolls recipe, you are likely searching for that elusive combination of a pillowy, cloud-like interior and a shimmering, sweet-and-salty finish. These rolls are the ultimate comfort food, offering a rich, enriched dough that pulls apart in delicate layers, topped with a signature glaze that sets them apart from your standard dinner fare.
The beauty of this recipe lies in its versatility and its foolproof technique. Whether you are a seasoned baker or a novice working with yeast for the first time, this guide ensures a successful rise and a perfect bake. By focusing on high-quality ingredients and a few simple sensory cues, you can create soft yeast rolls that rival any professional bakery or beloved steakhouse chain, making them a guaranteed hit at your next family gathering.
Why This Recipe Is a Keeper
- Irresistible Texture: The enriched dough creates fluffy dinner rolls with a tight, soft crumb that stays moist long after they come out of the oven.
- Perfect Flavor Balance: The subtle sweetness of the honey butter glaze perfectly complements the savory, buttery notes of the bread itself.
- Reliable Results: This method uses clear visual cues to help you master the fermentation process, ensuring your rolls rise beautifully every single time.
- Crowd-Pleasing Appeal: These rolls are the quintessential holiday side dish, but they are simple enough to elevate a casual Sunday roast or weeknight chicken dinner.
Ingredients You’ll Need
Creating the best homemade glazed rolls recipe requires a few pantry staples that work together to build structure, flavor, and that iconic golden-brown crust. Each component plays a vital role in the chemistry of the dough.
- All-Purpose Flour: This provides the necessary protein for gluten development while keeping the rolls tender enough to melt in your mouth.
- Active Dry Yeast: The leavening agent responsible for that classic yeasty flavor and the impressive rise of the dough.
- Whole Milk: Using milk instead of water adds fat and sugar, which results in a much softer, richer crumb and a deeper golden color.
- Unsalted Butter: Butter is incorporated into the dough for richness and used again in the glaze to provide a silky, decadent finish.
- Granulated Sugar: A small amount of sugar feeds the yeast and adds a hint of sweetness to the dough to balance the salt.
- Egg: An egg acts as an emulsifier, contributing to the “enriched” nature of the bread and helping the rolls rise taller and lighter.
- Honey: This is the star of the glaze, providing a floral sweetness and a sticky, glossy sheen that makes the rolls look professional.
- Fine Sea Salt: Salt is essential for regulating the yeast and enhancing the natural flavors of the butter and grain.
Easy Ways to Change It Up
- Garlic Herb Variation: Mix dried parsley and a pinch of garlic powder into the honey butter glaze for a more savory, aromatic profile.
- Cinnamon Sugar Glaze: For a brunch-style roll, swap the honey for maple syrup and add a dusting of cinnamon to the top after glazing.
- Whole Wheat Twist: Replace up to one-third of the all-purpose flour with white whole wheat flour for a nuttier flavor and a slightly heartier texture.
- Maple Glaze: Use pure maple syrup instead of honey in the final coating for a rich, autumnal flavor that pairs perfectly with sweet potatoes or ham.
How to Make the Best Homemade Glazed Rolls Recipe
Step 1: Activate the Yeast and Scald the Milk
Begin by gently warming your milk until it is lukewarm, roughly between 105°F and 115°F. In a large bowl, combine the warm milk with a tablespoon of sugar and sprinkle the yeast over the top. Let it sit for about five to ten minutes until it becomes frothy and fragrant. This step is crucial because it confirms your yeast is alive and ready to lift the dough. If the mixture doesn’t bubble, your yeast may be expired, and you should start over with a fresh batch.
Step 2: Mix the Enriched Dough
Add the melted butter, the remaining sugar, salt, and the egg to the yeast mixture. Whisk until well combined before gradually adding the flour. You want to add the flour one cup at a time until a soft, slightly sticky dough forms. Avoid the temptation to dump all the flour in at once, as the humidity in your kitchen can affect how much flour the dough actually needs. The dough should eventually pull away from the sides of the bowl but still feel tacky to the touch.
Step 3: Knead for Strength and Elasticity
Turn the dough out onto a lightly floured surface and knead it for about 5 to 7 minutes. You are looking for the dough to become smooth, elastic, and supple. You can test this using the “windowpane test”—stretch a small piece of dough; if it can become thin enough to see light through without tearing, the gluten is sufficiently developed. Proper kneading is what ensures your fluffy dinner rolls have the strength to hold those beautiful air bubbles.
Step 4: The First Rise
Place the kneaded dough into a lightly greased bowl, cover it with a clean kitchen towel, and let it rise in a warm, draft-free spot. This “bulk fermentation” usually takes about 60 to 90 minutes, or until the dough has doubled in size. The warmth helps the yeast thrive, creating carbon dioxide that expands the gluten structure. A slow, steady rise at room temperature produces the best flavor profile for your bread.
Step 5: Shape the Rolls and Second Rise
Gently punch down the risen dough to release excess air. Divide the dough into equal portions—usually 12 to 15 pieces—and roll them into smooth balls. Place the balls in a greased baking pan so they are just barely touching. Cover them again and let them rise for another 30 to 45 minutes. This second rise, or “proofing,” is vital for the final texture; the rolls should look puffy and feel light when poked gently with a finger.
Step 6: Bake and Apply the Glaze
Bake the rolls in a preheated oven at 350°F for 18 to 22 minutes. You are looking for a deep golden-brown color on top and a hollow sound when the center of a roll is lightly tapped. While the rolls are in the oven, whisk together melted butter and honey. As soon as the rolls come out, brush that honey butter glaze generously over the hot surfaces. The heat of the bread will help the glaze soak in slightly while leaving a beautiful, sticky shine on top.
Pro Tips for Success
- Tip: Use a kitchen scale to weigh your flour. Measuring by volume can lead to packing the flour too tightly, which results in dry, heavy rolls.
- Tip: Ensure your egg is at room temperature before adding it to the dough. A cold egg can shock the yeast and slow down the rising process significantly.
- Tip: Don’t over-flour your work surface during kneading. Too much extra flour will toughen the dough; use just enough to keep it from sticking to your hands.
- Tip: For the softest crust possible, place a shallow pan of water on the bottom rack of the oven during the first 10 minutes of baking to create steam.
- Tip: If your kitchen is cold, let the dough rise inside an oven that is turned off, with the oven light left on for a subtle, consistent warmth.
Troubleshooting Common Problems
Why Are My Rolls Dense and Heavy?
Dense rolls usually happen for two reasons: either the dough didn’t rise long enough, or too much flour was added during the mixing process. Ensure you allow the dough to truly double in size during both the first and second rises. Also, remember that the dough should remain slightly tacky; if it feels stiff like playdough before the first rise, it likely has too much flour.
Why Didn’t My Yeast Bubble?
If your yeast didn’t foam during the activation stage, the water or milk might have been too hot (killing the yeast) or too cold (not waking it up). Aim for a temperature that feels like warm bath water. Additionally, always check the expiration date on your yeast packet, as old yeast often loses its potency and won’t provide the necessary lift for soft yeast rolls.
How to Serve Glazed Rolls
These rolls are best served warm, ideally within thirty minutes of leaving the oven. The glaze is at its most flavorful and aromatic when the bread is still radiating heat. Arrange them in a linen-lined basket to keep them warm throughout the meal. The sweetness of the glaze makes them a fantastic accompaniment to salty proteins like roasted turkey, honey-glazed ham, or even a hearty beef stew.
Garnishes
For an extra touch of elegance, sprinkle a few flakes of Maldon sea salt over the rolls immediately after applying the glaze. The contrast between the crunchy salt crystals and the sweet honey is divine. You can also add a dusting of fresh thyme or rosemary if you are serving these alongside a savory holiday roast.
Creative Ways to Use Leftovers
If you find yourself with extra rolls the next morning, they make incredible sliders for breakfast. Split them open and fill them with crispy bacon and a fried egg; the sweet glaze acts like a built-in maple syrup element. They also work beautifully for mini ham and swiss sliders, where the honey in the glaze helps caramelize the sandwiches when toasted in the oven.
Storage and Make-Ahead
Storing Leftovers
Store any remaining rolls in an airtight container or a zip-top bag at room temperature for up to three days. Because these are enriched rolls, the fat from the milk and butter helps them stay softer longer than lean breads. Avoid refrigerating them, as the refrigerator environment can actually accelerate the staling process of the starch.
Freezing and Reheating
These rolls freeze exceptionally well. Once they are completely cool, wrap them tightly in foil and place them in a freezer bag for up to two months. To reheat, let them thaw at room temperature, then wrap them in foil and warm them in a 300°F oven for 10 minutes. This restores the fluffy dinner rolls texture and makes the glaze tacky and delicious once again.
Final Thoughts
Mastering the best homemade glazed rolls recipe is a rewarding culinary milestone that will change your dinner game forever. There is a profound sense of satisfaction in transforming simple ingredients like flour, milk, and honey into something so decadent and universally loved. These soft yeast rolls are more than just a side dish; they are often the part of the meal that guests remember most. By following the sensory cues and giving the dough the time it needs to develop, you’ll be rewarded with a professional-quality bake every time.
Frequently Asked Questions
Can I make the dough ahead of time?
Yes, you can absolutely do a cold ferment. After kneading the dough, place it in a greased bowl, cover it tightly with plastic wrap, and refrigerate it overnight. The cold environment slows down the yeast, allowing flavors to develop more deeply. The next day, let the dough come to room temperature for about an hour before shaping and proceeding with the second rise and bake.
Do I have to use a stand mixer?
While a stand mixer with a dough hook makes the process much easier and faster, you can certainly make this recipe by hand. You will need to knead the dough for about 10 to 12 minutes manually to achieve the same level of gluten development. It is a great workout and a wonderful way to get a feel for the texture of a properly developed enriched dough.
Can I use instant yeast instead of active dry?
You can use instant yeast in a 1:1 ratio. If using instant yeast, you do not technically need to “bloom” it in the warm milk first; you can mix it directly with the dry ingredients. However, blooming is still a good practice if you aren’t 100% sure your yeast is fresh. If you skip the blooming step, just ensure your milk is still warm to help the dough rise efficiently.
Why is my glaze soaking into the rolls?
It is normal for some of the honey butter glaze to absorb into the top layer of the bread, which actually makes the crust incredibly tender and flavorful. If you want a thicker, glossier look, wait about five minutes after the first application and brush the rolls with a second thin layer of the glaze. This creates a more defined, shimmery coating on the surface.
What type of honey works best?
A mild, light-colored honey like clover or wildflower is usually best for this recipe. These varieties provide sweetness without an overpowering floral or earthy flavor that might clash with the buttery dough. If you prefer a bolder flavor, an orange blossom honey can add a lovely, subtle citrus note to your best homemade glazed rolls recipe.
Homemade Glazed Rolls

Soft, fluffy, and perfectly sweet, these homemade glazed rolls are the ultimate comfort food. Brushed with a buttery sugar glaze, they are perfect for holidays or a special weekend treat.
- 4 cups all-purpose flour
- 1/4 cup granulated sugar
- 1 packet active dry yeast
- 1 tsp salt
- 1 cup warm milk
- 1/4 cup melted butter
- 1 egg
- Glaze:
- 1/2 cup powdered sugar
- 2 tbsp melted butter
- 1 tbsp milk
- 1/2 tsp vanilla extract
- 1In a large bowl, combine warm milk, sugar, and yeast. Let sit for 5 minutes until foamy.
- 2Add melted butter, egg, salt, and 2 cups of flour. Mix until smooth.
- 3Gradually add remaining flour until a soft dough forms. Knead for 5-7 minutes.
- 4Cover and let rise in a warm place for 1 hour or until doubled in size.
- 5Punch down dough and shape into 12-15 rolls. Place in a greased baking pan.
- 6Let rise for another 30 minutes. Preheat oven to 375°F (190°C).
- 7Bake for 15-20 minutes until golden brown.
- 8Whisk glaze ingredients together and brush over warm rolls.
Keywords: homemade rolls, glazed rolls, sweet dinner rolls, yeast rolls, baking


