
Cheesy Beef Sandwiches

There is something deeply satisfying about a hot, handheld meal that hits every savory note, and this easy cheesy beef sandwich recipe is the gold standard for comfort food. Whether you are coming home after a long day or looking for a way to upgrade your weekend lunch, this sandwich delivers a perfect balance of tender, seasoned beef and a rich, velvety cheese melt that ties everything together. The texture is a delightful contrast between the crusty exterior of a toasted roll and the juicy, flavor-packed interior that rivals any high-end deli or steakhouse offering.
What makes this quick weeknight dinner so approachable is how it prioritizes flavor without requiring complex techniques or hard-to-find ingredients. By focusing on a few high-quality components and a specific searing method, you can achieve a gourmet-level steak sandwich with cheese in less time than it takes to order takeout. This recipe is designed to be flexible, satisfying, and consistently delicious, making it a reliable staple in any home cook’s rotation.
Why You’ll Love This Recipe
- Flavor Explosion: The combination of savory seared beef, caramelized aromatics, and melted cheese creates a deeply layered taste profile that satisfies the strongest cravings.
- Extreme Efficiency: This is a true quick weeknight dinner that goes from the cutting board to the table in under thirty minutes, making it perfect for busy schedules.
- Customizable Comfort: While the base recipe is incredible, it serves as a canvas for your favorite toppings, different cheese varieties, or various bread types.
- Crowd-Pleasing Appeal: From kids to adults, the classic appeal of a melted cheese beef sub is universal, ensuring there are rarely any leftovers.
Ingredients You’ll Need
To create the best easy cheesy beef sandwich recipe, it is important to select ingredients that stand up to the heat of the skillet while maintaining their individual textures. Each component plays a specific role in building the ultimate bite, from the choice of protein to the sturdiness of the roll.
- Thinly Sliced Beef: Ideally ribeye or top sirloin, sliced against the grain to ensure every bite is tender rather than chewy. The fat marbling in these cuts provides essential moisture.
- Melting Cheese: Provolone, white American, or sharp cheddar are the best choices here. You want a cheese that turns silky and elastic when exposed to the residual heat of the beef.
- Hoagie or Sub Rolls: Look for rolls that are soft on the inside but have enough structural integrity to hold the juices of the beef without becoming soggy immediately.
- Onions and Peppers: Yellow onions provide a natural sweetness when sautéed, while green or red bell peppers add a mild crunch and a bright color contrast.
- Garlic Butter: Softened butter mixed with a hint of garlic powder is the secret to a perfectly toasted bun that adds an extra layer of savory depth.
- Worcestershire Sauce: Just a splash helps to deglaze the pan and heightens the umami characteristics of the beef during the final stages of cooking.
Variations and Smart Swaps
- Protein Substitutions: If you don’t have fresh steak, high-quality deli roast beef can be used. Simply warm it quickly in the skillet with the sautéed vegetables to absorb the flavors.
- Spice It Up: For those who enjoy a bit of heat, add sliced jalapeños or a dash of crushed red pepper flakes to the onion and pepper mixture while they cook.
- Different Cheese Profiles: Swap the provolone for pepper jack to add a spicy kick, or use a smoked gouda for a more sophisticated, earthy flavor profile in your steak sandwich with cheese.
- Mushroom Addition: Sliced cremini or button mushrooms sautéed along with the onions add a wonderful meaty texture and earthy flavor that complements the beef perfectly.
How to Make This Easy Cheesy Beef Sandwich Recipe
Step 1: Prep the Beef and Vegetables
The success of this sandwich starts with the prep work. To get the best results, place your beef in the freezer for about 15 minutes before slicing; this firms up the meat and allows you to get those paper-thin strips that cook quickly and remain tender. Slice your onions and peppers into thin, uniform strips so they cook at the same rate, ensuring no one bite is overwhelmed by a large piece of raw vegetable.
Step 2: Sauté the Aromatics
Heat a large skillet over medium-high heat with a tablespoon of oil. Add the onions and peppers, cooking them until they are softened and just beginning to develop golden-brown edges. This caramelization process is vital because it transforms the sharp bite of raw onion into a mellow sweetness that balances the salty cheese and savory beef. Once finished, move the vegetables to the side of the pan or a separate plate.
Step 3: Sear the Beef for Maximum Flavor
Turn the heat up to high and add the thinly sliced beef to the hot skillet in a single layer. Let it sit undisturbed for a minute to develop a deep, dark crust—this is where the flavor lives. Toss the meat and cook for another minute until it is just browned through. Avoid overcrowding the pan, as this causes the meat to steam in its own juices rather than searing, which can lead to a grey appearance and less flavor.
Step 4: Melt the Cheese and Toast the Buns
Reduce the heat to medium and mix the vegetables back in with the beef. Divide the mixture into portions roughly the size of your sandwich rolls. Lay the cheese slices over each mound of beef and cover the skillet with a lid for 30 seconds to facilitate a perfect melt. While the cheese is melting, spread garlic butter on your split rolls and toast them in a separate pan or under a broiler until golden and fragrant. Slide the melted cheese beef sub filling into the toasted rolls and serve immediately.
Pro Tips for Success
- Tip: Don’t overcook the beef. Because the slices are so thin, they only need a few minutes in the pan. Keeping them slightly underdone before adding the cheese prevents the meat from becoming tough.
- Tip: Use a cast-iron skillet if available. The superior heat retention of cast iron helps create a better sear on the meat and more consistent caramelization on the vegetables.
- Tip: Toast the buns thoroughly. A well-toasted bun creates a moisture barrier that prevents the bread from getting soft when the juices from the beef and melted cheese are added.
- Tip: Season at every stage. Lightly salt the vegetables as they cook, and season the beef generously just before it hits the pan to ensure the entire easy cheesy beef sandwich recipe is well-balanced.
- Tip: Let the cheese drape. For that classic steakhouse look, ensure the cheese completely covers the beef mounds in the pan before you scoop them into the bread.
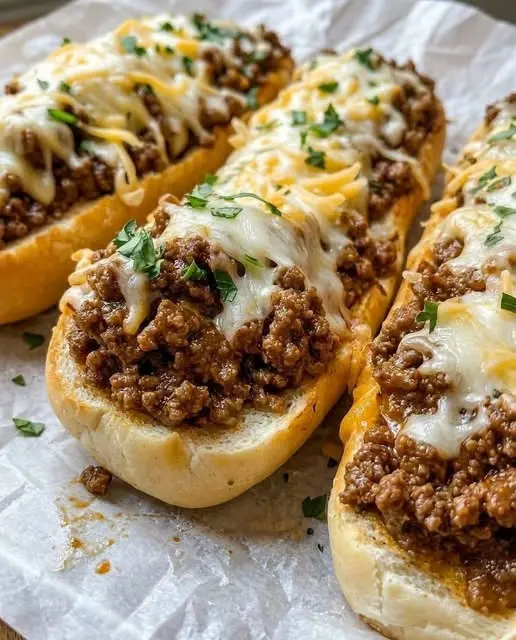
How to Serve Your Beef Sandwich
Serving this hearty lunch ideas option requires very little fanfare, as the sandwich itself is the star of the show. However, a few well-chosen sides can turn a simple sandwich into a complete and satisfying feast. The goal is to provide a refreshing or crunchy contrast to the rich, warm, and soft textures of the beef and cheese.
Garnishes
Fresh herbs like chopped parsley or chives can add a pop of color and a mild freshness. For an extra punch of acidity, serve the sandwich with a side of pickled banana peppers, pepperoncini, or even a few slices of spicy pickles to cut through the richness of the cheese.
Side Dishes
Classic pairings include crispy french fries, sweet potato wedges, or a simple potato salad. If you want something lighter, a crisp green salad with a sharp vinaigrette or a vinegar-based coleslaw provides a much-needed acidic balance that cleanses the palate between bites of the savory steak sandwich with cheese.
Storage and Make-Ahead
Storing Leftovers
If you have leftover filling, store it in an airtight container in the refrigerator for up to three days. It is highly recommended to store the beef and vegetable mixture separately from the rolls to prevent the bread from becoming soggy. When you are ready to eat, simply reheat the filling and prepare a fresh roll.
Reheating
The best way to reheat the beef and cheese mixture is in a skillet over medium heat with a tiny splash of water or beef broth to restore moisture. Avoid the microwave if possible, as it can make the beef rubbery and the cheese oily. Once the filling is hot, place it on a freshly toasted bun for the best experience.
Making It Ahead
You can prep the vegetables and slice the beef up to 24 hours in advance. Keep them in separate containers in the fridge. This makes the actual cooking process take less than 10 minutes, turning this into an incredibly quick weeknight dinner for those extra-busy evenings.
Final Thoughts
Mastering this easy cheesy beef sandwich recipe is a game-changer for anyone who loves high-impact, low-effort cooking. It proves that you don’t need a long list of ingredients or hours of prep time to create a meal that feels like a true indulgence. By focusing on the quality of the sear and the creaminess of the melt, you create a sandwich that is as comforting as it is impressive. Whether you’re feeding a hungry family or just treating yourself to a hearty lunch ideas favorite, this recipe is sure to become a frequent request in your kitchen.
Frequently Asked Questions
What is the best cut of beef for this sandwich?
The best cuts for a tender sandwich are ribeye, top sirloin, or flank steak. Ribeye offers the most flavor due to its fat content, while sirloin is a bit leaner but still very tender when sliced thinly against the grain. If you are on a budget, look for “shaved beef” or “sandwich steak” at the butcher counter, which is often pre-sliced for convenience.
Can I make this sandwich in a slow cooker?
While this specific easy cheesy beef sandwich recipe focuses on a quick skillet sear for texture, you can certainly use a slow cooker for a “French Dip” style variation. Cook a chuck roast with beef broth and onions on low for 8 hours, shred the meat, and then add the cheese to the sandwiches before a quick broil in the oven to melt it.
How do I prevent my sandwich from getting soggy?
The secret to avoiding a soggy sandwich is twofold: toast your bread thoroughly and drain any excess liquid from the beef and vegetables before assembling. Toasting creates a crisp crust that resists moisture, while a quick drain ensures that the natural juices of the meat don’t overwhelm the crumb of the bread.
Which cheese melts the best for a beef sub?
Provolone is the traditional choice for its mild flavor and excellent melting capabilities. However, white American cheese is widely used in many famous sandwich shops because it creates an incredibly smooth, creamy texture that coats every piece of beef. If you prefer a sharper taste, a high-quality Monterey Jack or a mild white cheddar also works beautifully.
Can I make a dairy-free version of this sandwich?
Absolutely. You can substitute the traditional cheese with a high-quality dairy-free provolone or mozzarella alternative. To ensure it melts well, you may need to cover the pan with a lid for an extra minute and add a teaspoon of water to the pan to create steam, which helps plant-based cheeses soften more effectively.
Is this sandwich freezer-friendly?
It is best to freeze only the cooked beef and vegetable mixture. Place the cooled filling in a freezer-safe bag for up to two months. When ready to eat, thaw the mixture in the fridge overnight and then reheat in a skillet. Always use fresh bread and fresh cheese slices for the best texture and flavor upon serving.
Cheesy Beef Sandwiches

These Cheesy Beef Sandwiches feature thinly sliced roast beef and melted provolone cheese, all tucked into buttery, toasted rolls. Perfect for a quick dinner or game day snack.
- 1 lb thinly sliced roast beef
- 8 slices provolone cheese
- 12 slider buns
- 1/2 cup melted butter
- 1 tablespoon Worcestershire sauce
- 1 teaspoon garlic powder
- 1 tablespoon dried parsley
- 1Preheat your oven to 350°F (175°C).
- 2Place the bottom halves of the buns in a baking dish.
- 3Layer the roast beef and provolone cheese over the buns.
- 4Place the bun tops over the cheese.
- 5Whisk together melted butter, Worcestershire sauce, garlic powder, and parsley.
- 6Brush the butter mixture generously over the tops of the buns.
- 7Cover with foil and bake for 15 minutes, then remove foil and bake for an additional 5 minutes until golden and cheese is melted.
Keywords: beef sliders, cheesy sandwiches, party food, quick dinner


