
Homemade Cheese Recipe

Stepping into the world of dairy fermentation and curd separation might feel like a daunting task reserved for artisanal creamery owners, but this easy homemade cheese making guide is designed to prove that anyone can transform a simple gallon of milk into something spectacular. There is a primal sense of satisfaction that comes from watching liquid milk transform into delicate, snowy-white curds right on your stovetop. Unlike store-bought varieties that often contain stabilizers and preservatives, making your own cheese at home allows you to control the texture, salt content, and freshness, resulting in a flavor profile that is remarkably clean and creamy.
Whether you are a complete novice or a seasoned home cook looking to expand your repertoire, mastering a simple cheesemaking technique is a rewarding skill. This process requires minimal equipment and just a handful of staple ingredients, making it an approachable weekend project that yields professional-quality results in under an hour.
Why You’ll Love This Recipe
- Pure Flavor: By using high-quality milk and fresh citrus, you achieve a bright, milky flavor that outshines any mass-produced plastic tub from the grocery store.
- Total Control: You can customize the texture of your fresh ricotta cheese by adjusting the draining time, ranging from a spreadable dip to a firm, crumbly topping.
- Kitchen Magic: The scientific process of watching the milk separate into curds and whey is a fascinating educational experience for both adults and children.
- Budget Friendly: Creating a large batch of fresh cheese at home is often significantly more cost-effective than purchasing premium artisanal brands.
Ingredients You’ll Need
To succeed with this easy homemade cheese making guide, you only need a few high-quality components. Because there are so few ingredients, the quality of each one directly impacts the final taste and texture of your cheese, so choosing the best available dairy is the secret to success.
- Whole Milk: This is the foundation of your cheese. Use pasteurized milk, but avoid “ultra-pasteurized” (UHT) milk, as the high heat treatment prevents the proteins from forming strong curds.
- Heavy Cream: Adding a bit of cream increases the butterfat content, resulting in a much silkier, richer mouthfeel that mimics high-end Italian ricotta.
- Lemon Juice or White Vinegar: This acts as the coagulant. The acid causes the milk proteins to clump together and separate from the liquid whey.
- Kosher Salt: Salt is essential for flavor. It enhances the natural sweetness of the dairy and helps preserve the cheese for a few extra days.
- Optional Herbs: Freshly cracked black pepper, lemon zest, or chopped chives can be folded in at the end for a customized savory spread.
Variations and Smart Swaps
- The Acid Choice: While lemon juice provides a faint citrus note, white distilled vinegar is more neutral. You can also use apple cider vinegar for a slightly fruity undertone.
- Goat Milk Version: Swap the cow’s milk for goat’s milk to create a tangier, softer fresh cheese that pairs beautifully with honey and figs.
- Low-Fat Adjustment: You can omit the heavy cream for a lighter version, though the resulting cheese will be slightly less creamy and more granular.
- Herbed Cheese: Fold in roasted garlic or dried Italian seasoning during the draining process for a homemade dairy staple that is ready for a charcuterie board.
How to Make Easy Homemade Cheese
Step 1: Gently Heat the Dairy Base
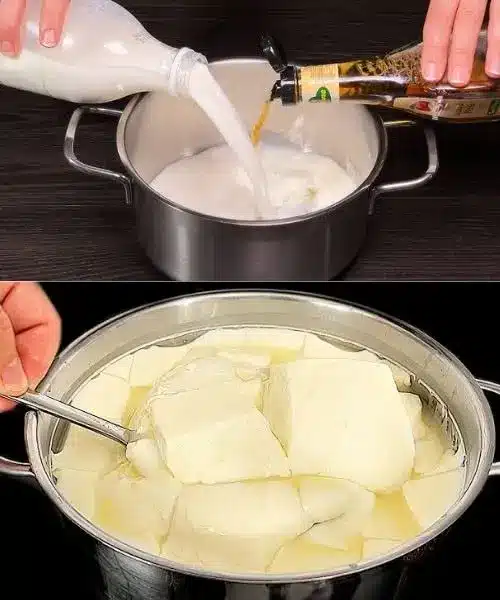
In a large, heavy-bottomed pot, combine your whole milk, heavy cream, and a pinch of salt. Set the burner to medium-low heat and stir occasionally with a silicone spatula to prevent the milk from scorching on the bottom. You want to bring the mixture to a gentle simmer, just until small bubbles begin to form around the edges and steam rises from the surface. Using a thermometer is helpful here; you are aiming for approximately 185°F to 190°F. Heating the milk slowly ensures that the proteins don’t burn, which would ruin the delicate flavor of your simple cheesemaking project.
Step 2: Coagulate the Proteins with Acid
Once the milk reaches the target temperature, remove the pot from the heat. Pour in your lemon juice or vinegar and give it one or two very gentle stirs. Do not over-mix, as this can break up the delicate curds before they have a chance to form. Let the pot sit undisturbed for about 10 to 15 minutes. During this time, the acid will work its magic, and you will see thick, white clouds of curds and whey begin to separate. The liquid should turn from opaque white to a translucent, yellowish-green color, signaling that the separation is complete.
Step 3: Drain the Curds Through Cheesecloth
Line a fine-mesh colander with several layers of damp cheesecloth and place it over a large bowl or in the sink. Use a slotted spoon to gently lift the large curds into the cloth, then pour the remaining liquid through. The bowl will catch the whey, while the cheesecloth holds the precious curds. Allow the cheese to drain for at least 5 to 10 minutes for a moist, creamy consistency. If you prefer a firmer cheese for stuffing pasta or crumbling over salads, let it drain for 30 to 60 minutes until the desired thickness is achieved.
Step 4: Season and Cool
Once the cheese has reached your preferred consistency, gather the corners of the cheesecloth and gently squeeze out any remaining excess moisture if necessary. Transfer the fresh cheese to a bowl and fluff it gently with a fork. This is the perfect time to taste for seasoning; add a little more salt or some fresh herbs while the cheese is still slightly warm. You can serve it immediately for the best flavor, or transfer it to an airtight container and chill it in the refrigerator to allow the texture to set firmly.
Pro Tips for Success
- Tip: Always use a heavy-bottomed stainless steel or enameled cast iron pot. Thin pots have “hot spots” that can easily burn the milk, leaving a scorched taste in your cheese.
- Tip: Avoid “Ultra-Pasteurized” milk at all costs. The high-heat processing changes the protein structure so significantly that it will not form solid curds, leaving you with a cloudy mess.
- Tip: Rinse your cheesecloth in cold water before lining the colander. This prevents the curds from sticking to the fibers and makes cleanup much easier.
- Tip: Don’t throw away the leftover whey! It is packed with protein and can be used in smoothies, bread baking, or even as a nutrient-rich addition to garden soil.
- Tip: For the creamiest results, don’t press the cheese. Let gravity do the work of draining the moisture to maintain those light, fluffy curds.
Troubleshooting Common Problems
Why Didn’t My Milk Curdle?
If your milk hasn’t separated after adding the acid, it usually means the milk wasn’t hot enough or you didn’t add enough acid. Simply put the pot back on the stove, heat it slightly more, and add an extra tablespoon of lemon juice or vinegar. Ensure you aren’t using ultra-pasteurized milk, which is the most common reason for curdling failure in simple cheesemaking.
Why Is My Cheese Rubbery?
Rubbery cheese is often the result of boiling the milk or over-stirring once the acid has been added. High heat can toughen the proteins. Next time, use a thermometer to stay around 190°F and be extremely gentle when stirring in the coagulant to keep the curds tender and soft.
How to Serve Homemade Cheese
The beauty of following an easy homemade cheese making guide is the incredible versatility of the finished product. Freshly made cheese is a culinary blank canvas that can lean toward either sweet or savory applications depending on your mood.
Savory Ideas
Spread a thick layer of your fresh ricotta cheese onto charred sourdough toast and drizzle with high-quality extra virgin olive oil and a sprinkle of flaky sea salt. It also makes an exceptional topping for homemade pizza or a creamy dollop on top of pasta with marinara sauce. For a quick appetizer, whisk the cheese with roasted garlic and spread it on crackers topped with sun-dried tomatoes.
Sweet Applications
For a sophisticated dessert or breakfast, top a bowl of the cheese with fresh berries, a drizzle of honey, and a handful of toasted pistachios. You can also use it as a filling for crepes or cannoli, whisking in a bit of powdered sugar and vanilla extract for a light, airy treat that isn’t overly sweet.
Storage and Make-Ahead
Storing Leftovers
Because this is a fresh dairy product without preservatives, it should be stored in an airtight container in the refrigerator immediately. It will stay fresh and delicious for about 4 to 5 days. You may notice a small amount of liquid pooling at the bottom of the container over time; this is normal and can be stirred back in or drained off.
Making It Ahead
You can easily make this cheese a day or two in advance. In fact, the flavor often settles and the texture becomes slightly firmer after a night in the fridge. If the cheese becomes too firm after chilling, let it sit at room temperature for 15 minutes and give it a quick whisk with a splash of milk or cream to restore its spreadable consistency.
Final Thoughts
Mastering this easy homemade cheese making guide is a game-changer for any home cook. The process is incredibly fast, and the result is a product that tastes far superior to anything found in a grocery store aisle. Once you realize how simple it is to turn a carton of milk into creamy, fresh curds, you may never go back to the pre-packaged version again. It is a rewarding, delicious, and surprisingly easy way to bring a touch of artisanal flair to your kitchen table.
Frequently Asked Questions
Can I use skim milk for this recipe?
While you can technically use skim milk, the yield will be very low and the texture will be quite dry and grainy. For the best results and a decent amount of cheese, whole milk is highly recommended. The fat in the milk is what provides the creamy texture and rich flavor that makes fresh ricotta cheese so appealing.
Do I need to buy a special thermometer?
While you can eyeball it by looking for the “shiver” in the milk and small bubbles, a digital kitchen thermometer is the best way to ensure consistent results. Heating the milk to exactly 185°F-190°F ensures the proteins are ready to coagulate without burning, making your easy homemade cheese making guide much more foolproof.
What can I do with the leftover whey?
Leftover whey is highly nutritious! Use it as a liquid replacement in bread recipes, add it to soup bases for a slightly tangy depth, or use it to soak grains and beans. Some people even use it as a protein-rich addition to their morning smoothies or as a facial toner due to its acidic properties.
Is homemade cheese safe to eat?
Yes, as long as you use fresh, pasteurized milk and clean equipment, homemade fresh cheese is perfectly safe. Since it is a fresh cheese and not aged, it does not have the same risks associated with mold or improper fermentation that harder cheeses might have. Just be sure to store it in the refrigerator and consume it within five days.
Can I freeze homemade ricotta cheese?
Freezing is not recommended for fresh cheeses like this one. The freezing and thawing process breaks down the delicate cell structure of the curds, which often results in a watery, grainy texture once thawed. It is best enjoyed fresh or used within a few days of making it for the highest quality experience.
Easy Homemade Farmer’s Cheese

A simple, creamy, and delicious homemade farmer's cheese made with just milk, lemon juice, and salt. Perfect for salads, spreading on toast, or as a base for savory dishes.
- 1 gallon whole milk (preferably not ultra-pasteurized)
- 1/4 cup fresh lemon juice or white vinegar
- 1 teaspoon sea salt
- 1Heat the milk: Pour the milk into a large, heavy-bottomed pot. Heat over medium heat, stirring frequently to prevent scorching, until it reaches about 190°F (88°C) or is just about to boil.
- 2Curdle: Remove the pot from heat. Slowly stir in the lemon juice or vinegar. You should see the curds (white clumps) separate from the whey (yellowish liquid) immediately. Let it sit undisturbed for 10 minutes.
- 3Drain: Place a colander over a large bowl and line it with two layers of damp cheesecloth. Carefully pour the contents of the pot into the colander.
- 4Season: Sprinkle the salt over the curds and gently stir.
- 5Shape and Set: Gather the corners of the cheesecloth and tie them together. Hang the bag over a sink or a bowl to drain for 30 to 60 minutes, depending on how dry you want the cheese.
- 6Store: Remove the cheese from the cloth and store in an airtight container in the refrigerator for up to 5 days.
Keywords: homemade cheese, farmer's cheese, simple cheese recipe, ricotta alternative, DIY dairy


