
Chocolate Cream Pie

There is something undeniably nostalgic about a towering slice of best homemade chocolate cream pie sitting in a refrigerated bakery case or on a grandmother’s Sunday dinner table. This classic American dessert relies on a delicate balance between a crisp, buttery crust and a deeply decadent dessert filling that is both rich and airy. Unlike store-bought versions that often rely on artificial thickeners and oils, a true homemade version uses real dairy and high-quality cocoa to create a silky chocolate pudding center that melts the moment it hits your tongue.
Mastering this recipe is less about complex chemistry and more about patience and technique. By following a few simple editorial cues—like watching for the perfect bubble in your custard or ensuring your crust is properly blind-baked—you can achieve a professional-grade result in your own kitchen. This guide will walk you through every sensory detail to ensure your pie sets up perfectly every single time, providing that iconic, clean-cut slice you’re looking for.
Why This Recipe Is a Keeper
- Unmatched Texture: The combination of a blind-baked pie crust and a cooked custard creates a sophisticated contrast between the flaky, salty base and the lush, creamy filling.
- Deep Flavor Profile: By using a mix of high-quality cocoa powder and real vanilla, the chocolate notes are intensified rather than being masked by excessive sugar.
- Make-Ahead Convenience: Because this pie requires a long chill time to set properly, it is the perfect candidate for entertaining, as all the work is done the day before.
- Crowd-Pleasing Appeal: Whether it’s a holiday gathering or a simple weeknight treat, the universal love for chocolate and homemade whipped cream makes this a guaranteed success.
Ingredients You’ll Need
The beauty of this pie lies in its pantry-staple simplicity. While the ingredients are basic, their quality directly impacts the final flavor. Aim for high-fat dairy and a Dutch-processed cocoa if you prefer a darker, smoother chocolate experience.
- Pre-baked Pie Shell: You can use a classic flaky pastry or a crushed cookie crust. It must be fully baked and cooled before adding the filling to prevent the bottom from becoming soggy.
- Whole Milk: Provides the necessary fat for a creamy mouthfeel. Avoid skim or 1% milk, as the custard will lack the structural integrity needed for a clean slice.
- Egg Yolks: These are the “glue” of the silky chocolate pudding. They provide richness, a golden undertone, and a thick, stable texture that cornstarch alone cannot achieve.
- Granulated Sugar: Sweetens the cocoa without adding additional moisture, allowing the chocolate to remain the star of the show.
- Unsweetened Cocoa Powder: Provides the deep chocolate base. Sifting it beforehand is crucial to ensure there are no bitter lumps in your finished custard.
- Cornstarch: Acts as the primary thickening agent. It must be cooked until it “plops” or bubbles to neutralize the starchy taste and activate its thickening power.
- Unsalted Butter: Whisked in at the very end, the butter adds a professional gloss to the filling and a hit of richness that rounds out the cocoa.
- Heavy Whipping Cream: Used for the topping. Whipping it to stiff peaks ensures the pie looks as good as it tastes when it’s finally sliced.
Simple Swaps and Variations
The Cookie Crust Variation: If you aren’t a fan of traditional pastry, swap the pie shell for an Oreo or chocolate wafer crust. This doubles down on the chocolate flavor and adds a nice crunch that contrasts with the pudding.
Mocha Infusion: For a more “grown-up” flavor profile, whisk a teaspoon of espresso powder into the dry ingredients. This doesn’t make the pie taste like coffee; instead, it amplifies the chocolate notes significantly.
Salted Dark Chocolate: Use a dark cocoa powder and add a generous pinch of flaky sea salt to the top of the whipped cream just before serving. This balances the sweetness and elevates the best homemade chocolate cream pie to a gourmet level.
Dairy-Free Adaptation: While traditional custard relies on cow’s milk, you can substitute full-fat canned coconut milk. The result will have a slight coconut undertone but will maintain the necessary fat content for setting.
How to Make the Best Homemade Chocolate Cream Pie
Step 1: Prepare the Dry Base and Temper the Eggs
Start by whisking together your sugar, cocoa powder, cornstarch, and a pinch of salt in a heavy-bottomed saucepan. Gradually whisk in the milk until the mixture is smooth and free of cocoa lumps. In a separate small bowl, have your egg yolks lightly beaten and ready. You don’t want to add the yolks to the cold milk immediately; instead, you will cook the chocolate mixture first and then “temper” the yolks by adding a small amount of the hot liquid to them. This prevents the eggs from scrambling when they hit the hot pan.
Step 2: Cook the Custard to Proper Thickness
Place the saucepan over medium heat and whisk constantly. This is the most critical stage of the recipe. You must ensure the whisk reaches the corners of the pan to prevent the sugar from burning. As the milk heats up, the cornstarch will begin to thicken the liquid. Continue cooking until the mixture begins to bubble gently. Once it reaches a “boil” (large bubbles popping on the surface), cook for exactly one minute more. This ensures the silky chocolate pudding is fully stabilized and won’t weep later.
Step 3: Emulsify with Butter and Vanilla
Remove the pan from the heat immediately. Stir in the cold butter and the vanilla extract. The butter will melt into the hot custard, creating a beautiful glossy sheen and a velvet-like texture. If you notice any small lumps or bits of cooked egg, you can pour the filling through a fine-mesh sieve into a clean bowl. This extra step is the secret to a professional-grade best homemade chocolate cream pie.
Step 4: The Essential Chill and Set Time
Pour the warm chocolate filling into your prepared blind-baked pie crust. Smooth the top with a spatula. To prevent a “skin” from forming on the pudding, press a piece of plastic wrap directly onto the surface of the filling. Allow the pie to cool at room temperature for about 30 minutes, then transfer it to the refrigerator for at least 4 to 6 hours, though overnight is best. If you cut into the pie too early, the filling will run, and you’ll lose those beautiful, distinct layers.
Step 5: Top with Fresh Whipped Cream
Just before serving, whip your heavy cream with a bit of powdered sugar and vanilla until stiff peaks form. Stiff peaks mean that when you lift the whisk, the cream stands straight up without drooping. Spread the cream generously over the chilled chocolate layer. You can use a spoon to create decorative swirls or a piping bag for a more formal look. This homemade whipped cream serves as the perfect airy cloud to balance the dense chocolate underneath.
Pro Tips for the Best Results
Tip: Always use a heavy-bottomed saucepan. Thin pans have hot spots that can scorch the chocolate custard before it has a chance to thicken properly.
Tip: Don’t skip the tempering step. Adding cold eggs directly to a hot pot almost always results in tiny bits of cooked egg whites or yolks, which ruins the silky chocolate pudding texture.
Tip: Use cold butter at the end. The temperature difference between the hot pudding and the cold butter helps create a better emulsion, leading to a shinier finish.
Tip: Ensure your pie crust is completely cold before adding the filling. A warm crust will absorb moisture from the pudding, leading to the dreaded “soggy bottom.”
Tip: For the cleanest slices, dip your knife in hot water and wipe it dry between every single cut. This prevents the whipped cream from dragging into the chocolate layer.
Troubleshooting Common Problems
Why Is My Filling Too Runny?
This usually happens if the cornstarch wasn’t cooked long enough. Cornstarch needs to reach a full boil to activate its thickening proteins. If you stop whisking the moment it gets thick but before it bubbles, it may lose its structure as it cools. Additionally, make sure you used whole milk, as lower fat percentages don’t set as firmly.
Why Did My Pie Crust Get Soft?
A soft crust is often the result of not blind-baking it long enough or not letting it cool completely. When you make a best homemade chocolate cream pie, the crust must be “shatteringly” crisp before the moisture-heavy pudding is added. If the crust is still pale or soft when it comes out of the oven, it won’t stand up to the filling.
Why Is There Liquid Pooling at the Bottom of the Pie?
This is known as “weeping.” It can happen if the pie is stored in a refrigerator that is too cold, or if the custard was overcooked. It can also happen if you don’t put the plastic wrap directly on the custard while it cools, allowing condensation to form and then drip down into the crust.
How to Serve This Pie
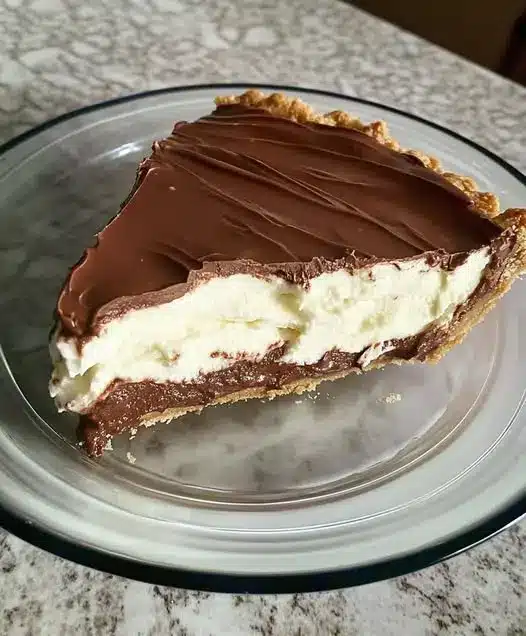
Presentation is half the joy of serving a decadent dessert like this. Once the pie is fully set and topped with cream, consider adding a few garnishes to hint at the flavor inside. Chocolate shavings, a dusting of cocoa powder, or even a few chocolate curls made with a vegetable peeler and a Hershey bar can make the pie look like it came from a high-end bistro.
This pie is best served cold, straight from the refrigerator. Because of the high dairy content in both the custard and the homemade whipped cream, it should not sit out at room temperature for more than 30 minutes. If you are serving this at a summer barbecue, keep it in the cooler or fridge until the very moment you are ready to slice and serve.
For a complete dessert experience, pair a slice with a strong cup of black coffee or a glass of cold milk. The bitterness of the coffee cuts through the richness of the chocolate beautifully, while the milk enhances the creamy profile of the dish.
Storage and Make-Ahead
Storing Leftovers
Leftover pie should be kept in the refrigerator at all times. Use toothpicks to tent plastic wrap over the whipped cream so it doesn’t get squashed. The pie will remain delicious for up to 3 days, though the crust will gradually lose its crispness the longer it sits.
Making It Ahead
This is an ideal make-ahead dessert. You can bake the crust and cook the chocolate filling up to 24 hours in advance. In fact, the flavor often improves after a night in the fridge. However, wait to add the whipped cream topping until the day you plan to serve it, as whipped cream can begin to deflate or weep after 12 hours.
Freezing Instructions
While you can freeze the blind-baked pie crust, the chocolate custard filling does not freeze well. The freezing and thawing process often causes the cornstarch structure to break down, resulting in a grainy, watery mess. For the best experience, always enjoy this pie fresh or refrigerated.
Final Thoughts
Creating the best homemade chocolate cream pie is a rewarding culinary project that reminds us why classic desserts never go out of style. By focusing on a smooth silky chocolate pudding and a perfectly crisp base, you create a treat that far surpasses anything you can find in a box or a frozen aisle. It is a testament to the power of simple ingredients treated with care. Whether you are celebrating a special occasion or just want to treat your family to something special, this pie is sure to become a requested favorite in your kitchen.
Frequently Asked Questions
Can I use chocolate chips instead of cocoa powder?
While you can use chocolate chips, cocoa powder provides a more stable structure for a cream pie. If you choose to use chips, you will need to adjust the cornstarch and sugar levels significantly to account for the added fat and sweetness in the chocolate. For a consistent, sliceable pie, cocoa powder is generally the more reliable choice.
What is the best way to prevent a skin on the pudding?
The only foolproof way to prevent a skin is to place plastic wrap directly on the surface of the hot custard. Make sure the wrap is touching every inch of the chocolate. This prevents air from reaching the surface, which is what causes the proteins to dry out and form that tough, chewy layer.
Can I use a store-bought crust?
Yes, you can certainly use a store-bought frozen crust or a refrigerated roll-out crust. Just ensure you follow the package directions for a “fully baked” shell. You must prick the bottom with a fork (docking) and potentially use pie weights to ensure the crust doesn’t puff up or shrink while baking.
How do I know when the custard is thick enough?
The custard should be thick enough to coat the back of a metal spoon. If you run your finger through the coating on the spoon, the line should stay clean and not fill back in. Most importantly, you must see at least a few large bubbles “plop” to the surface to ensure the cornstarch has reached its full thickening potential.
Why did my whipped cream turn into butter?
If you over-whip heavy cream, the fat globules will clump together and separate from the liquid, eventually turning into butter. Stop whipping the moment the cream holds its shape and looks matte. If it starts to look grainy or curdled, you have gone too far. You can sometimes fix slightly over-whipped cream by gently folding in a tablespoon of fresh, un-whipped cold cream.
Old-Fashioned Chocolate Cream Pie

A rich and silky chocolate custard filling in a buttery flaky crust, topped with homemade whipped cream and chocolate shavings.
- 1 (9-inch) pie crust, baked and cooled
- 1 1/2 cups granulated sugar
- 1/4 cup cornstarch
- 1/4 teaspoon salt
- 3 cups whole milk
- 4 large egg yolks
- 6 ounces bittersweet chocolate, chopped
- 2 tablespoons unsalted butter
- 1 teaspoon vanilla extract
- 1In a medium saucepan, whisk together sugar, cornstarch, and salt.
- 2Gradually whisk in milk and egg yolks until the mixture is completely smooth.
- 3Cook over medium heat, whisking constantly, until the mixture thickens and begins to bubble.
- 4Remove from heat; stir in chopped chocolate, butter, and vanilla until the chocolate is melted.
- 5Pour the filling into the prepared pie crust and smooth the top.
- 6Press plastic wrap directly onto the surface and refrigerate for at least 4 hours.
Keywords: chocolate pie, cream pie, dessert, chocolate custard, homemade pie


