
Chocolate Peanut Clusters

There is something timeless about the combination of rich, velvety chocolate and crunchy, salted peanuts. It is a pairing that hits every sensory note—sweet, salty, creamy, and crunchy—all in one bite. This easy chocolate peanut cluster recipe is the ultimate solution for anyone who needs a high-impact treat without spending hours in the kitchen. Whether you are prepping for a holiday cookie tray or just satisfying a late-night craving, these clusters deliver a professional confectionary result with minimal effort.
The beauty of this no-bake dessert lies in its simplicity. By focusing on the quality of the chocolate and the roast of the peanuts, you create a homemade candy that often tastes better than anything found in a store-bought box. Because there is no need for candy thermometers or complex tempering stages, it is an approachable project for beginners and a reliable standby for seasoned bakers. In just a few minutes of active prep time, you will have a batch of treats ready to set and enjoy.
Why You’ll Love This Recipe
- Minimal Preparation: You only need a handful of basic ingredients and about ten minutes of hands-on work to get these treats onto the tray.
- Perfect Texture: The contrast between the smooth, snappy chocolate coating and the firm, roasted peanuts creates a satisfying holiday treat experience.
- Excellent for Gifting: These clusters hold up well at room temperature, making them an ideal candidate for decorative tins or gift bags during the festive season.
- Highly Customizable: You can easily swap the chocolate types or add extra mix-ins to tailor the flavor profile to your specific preferences.
Ingredients You’ll Need
Choosing the right ingredients is the secret to making this easy chocolate peanut cluster recipe stand out. Since the ingredient list is short, each component plays a vital role in the final flavor and structural integrity of the candy.
- Chocolate Chips or Melting Wafers: Semi-sweet or milk chocolate provides the classic base. Using high-quality chips ensures a smoother melt and a better “snap” once the clusters have cooled.
- Roasted Salted Peanuts: These provide the essential crunch. The salt on the peanuts is crucial as it balances the sugar in the chocolate, preventing the treat from becoming cloyingly sweet.
- White Chocolate or Almond Bark (Optional): Many versions incorporate a bit of white chocolate or almond bark to help the clusters set firmly and add a subtle creamy undertone to the homemade candy.
- Peanut Butter or Coconut Oil: Adding a small amount of fat helps thin the chocolate to a dippable consistency and adds a beautiful glossy sheen to the finished product.
Variations and Smart Swaps
- Dark Chocolate Sea Salt: For a more sophisticated palate, use 70% dark chocolate and sprinkle a tiny pinch of flaky sea salt over the top of each cluster before they set.
- Mixed Nut Medley: Swap half of the peanuts for roasted almonds, cashews, or pecans to create a more complex texture and a variety of nutty flavors.
- White Chocolate Cranberry: Use white chocolate as your base and stir in dried cranberries along with the peanuts for a festive, tart twist on the traditional recipe.
- Butterscotch Swirl: Melt a small amount of butterscotch chips along with the chocolate to add a deep, toasted caramel note to your no-bake dessert.
How to Make an Easy Chocolate Peanut Cluster Recipe
Step 1: Melt the Chocolate Base
The first step is to gently melt your chocolate. You can use a microwave-safe bowl, heating in 30-second intervals and stirring in between to prevent scorching. If you prefer a more hands-off approach, you can create crockpot candy by placing the ingredients in a slow cooker on low heat. The goal is a completely smooth, liquid consistency with no remaining lumps. If the chocolate feels too thick to stir easily, adding a teaspoon of coconut oil can help achieve that perfect, pourable texture.
Step 2: Incorporate the Roasted Peanuts
Once the chocolate is smooth and glossy, pour the roasted peanuts directly into the bowl. Fold them in gently with a spatula until every single peanut is thoroughly coated in chocolate. It is important to ensure there are no “dry” spots, as the chocolate acts as the glue that holds the cluster together. You want a high ratio of nuts to chocolate so that the clusters are chunky and substantial rather than just flat puddles of chocolate.
Step 3: Portion and Scoop the Clusters
Line a large baking sheet with parchment paper or a silicone mat. Using a small cookie scoop or two spoons, drop rounded mounds of the mixture onto the paper. Aim for roughly tablespoon-sized portions to keep the treats bite-sized. Spacing them about an inch apart ensures they don’t fuse together as they set. This is also the time to add any decorative toppings, like sprinkles or extra salt, while the chocolate is still wet and tacky.
Step 4: Allow the Candy to Set
Patience is key during this final stage. Let the clusters sit at room temperature until the chocolate has fully hardened. If your kitchen is warm, you can slide the tray into the refrigerator for 20 to 30 minutes to speed up the process. The easy chocolate peanut cluster recipe is finished when the candy is firm to the touch and releases easily from the parchment paper without leaving any residue behind.
Pro Tips for Success
- Avoid Water Contact: Ensure your bowls and spatulas are completely dry. Even a single drop of water can cause the chocolate to “seize,” turning it into a gritty, unworkable paste.
- Use Roasted Nuts: If you only have raw peanuts, toast them in a dry pan or the oven for a few minutes first. The roasting process develops the oils and deepens the flavor of the homemade candy.
- Check the Expiration: Old chocolate chips may develop “bloom” (white streaks) or lose their ability to melt smoothly. Use fresh chocolate for the best visual results.
- Uniform Scooping: Using a spring-loaded scoop ensures all your clusters are the same size, which makes for a much more professional presentation on a dessert platter.
How to Serve Your Peanut Clusters
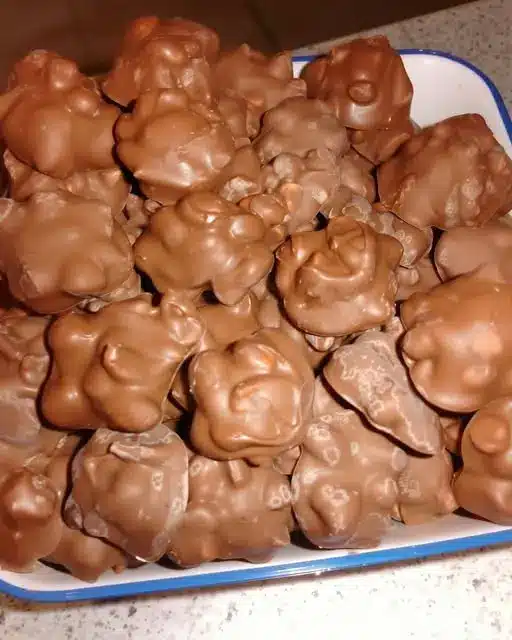
These clusters are versatile enough for any occasion. For a casual family gathering, simply pile them into a rustic bowl and let everyone dig in. Their sturdy nature makes them a fantastic “finger food” that doesn’t require plates or utensils. If you are serving them as part of a formal holiday treats spread, place each individual cluster into a mini paper cupcake liner. This prevents them from sticking to each other and adds a touch of elegance to the presentation.
For a more decadent dessert experience, try crumbling a few clusters over a bowl of vanilla bean ice cream or using them as a garnish for a chocolate cheesecake. The saltiness of the peanuts cuts through rich dairy perfectly. They also pair wonderfully with a hot cup of coffee or a glass of cold milk, making them a great afternoon pick-me-up.
Storage and Make-Ahead
Storing Leftovers
Once the clusters have completely set, transfer them to an airtight container. They can be stored at room temperature in a cool, dry place for up to two weeks. If your home is particularly warm, keep them in the refrigerator to prevent the chocolate from softening or blooming. Layering the candy with parchment paper in the container will keep them looking pristine.
Freezing and Making Ahead
This easy chocolate peanut cluster recipe is incredibly freezer-friendly. You can freeze the set clusters in a freezer-safe bag for up to three months. This makes them an excellent make-ahead option for busy seasons; simply thaw them in the fridge overnight before you plan to serve them. The flavor and crunch remain remarkably consistent even after being frozen.
Final Thoughts
Mastering this easy chocolate peanut cluster recipe gives you a reliable, delicious treat that never goes out of style. It proves that you don’t need a pantry full of complicated ingredients or hours of free time to create a satisfying no-bake dessert. The balance of textures and flavors makes these clusters a universal favorite among kids and adults alike. Keep a batch in your kitchen, and you’ll always be ready for unexpected guests or a quick sweet craving.
Frequently Asked Questions
Can I use different types of nuts in this recipe?
Absolutely. While peanuts are the traditional choice for this homemade candy, you can easily substitute them with almonds, walnuts, or macadamia nuts. Just ensure that the nuts you choose are roasted and preferably salted to maintain that classic flavor balance. If you have raw nuts, be sure to toast them beforehand to bring out their natural oils and crunch.
Why did my chocolate turn white after sitting?
This is known as “chocolate bloom.” It usually happens when the chocolate is exposed to temperature fluctuations, causing the cocoa butter to separate and rise to the surface. While it might look unappealing, the holiday treats are still perfectly safe to eat. To prevent this, store your clusters in a stable, cool environment and avoid moving them frequently between the fridge and a warm counter.
How can I make these clusters more glossy?
The secret to a glossy finish in an easy chocolate peanut cluster recipe is often a small amount of added fat. Stirring in a teaspoon of coconut oil or a tablespoon of creamy peanut butter into the melted chocolate helps create a smooth, shiny exterior. Additionally, avoiding overheating the chocolate during the melting process ensures the fats don’t break down, which helps maintain that professional sheen.
Can I make these in a slow cooker?
Yes, making crockpot candy is a very popular method for large batches. You simply layer your chocolate and nuts in the slow cooker on low heat for about an hour, stirring occasionally until everything is melted and combined. This is a great “set it and forget it” method if you are making multiple batches for gifts or a large party.
Is it possible to make these dairy-free?
You can easily adapt this into a dairy-free no-bake dessert by using high-quality dark chocolate chips that do not contain milk solids. Many semi-sweet varieties are naturally dairy-free, but always check the label. Combine them with roasted peanuts and a bit of coconut oil for a result that is just as rich and satisfying as the original version.


