
Soft Dinner Rolls

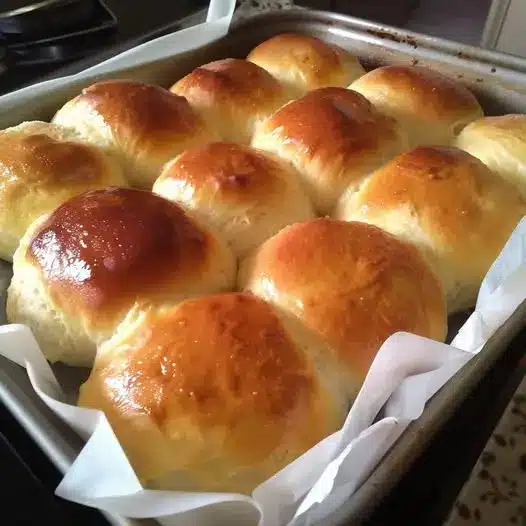
There is nothing quite like the intoxicating aroma of fresh bread wafting through the kitchen to make a house feel like a home. Whether you are preparing a massive Thanksgiving feast or a simple Sunday roast, these best homemade soft dinner rolls are the ultimate comfort food. They feature a cloud-like interior with a golden, buttery crust that practically melts in your mouth. Unlike store-bought versions that can be dry or overly processed, these fluffy yeast rolls rely on a rich, enriched dough that stays soft for days, making them the gold standard for any bread basket.
Mastering the art of yeast bread might seem intimidating, but this easy bread recipe is designed to be approachable for bakers of all skill levels. By understanding a few key techniques—like how to properly bloom your yeast and the importance of a warm proofing environment—you can achieve professional-quality results right in your own oven. This guide will walk you through every sensory cue, from the tacky feel of the dough to the hollow sound of a perfectly baked roll, ensuring your holiday side dish is the star of the table.
Why You’ll Love This Recipe
- Unmatched Texture: These rolls achieve a pillowy, soft-as-air crumb thanks to the addition of whole milk and butter, creating buttery dinner rolls that surpass any bakery version.
- Reliable Results: The recipe uses a straightforward enrichment process that provides a sturdy yet tender structure, making it a dependable choice for high-stakes holiday meals.
- Make-Ahead Friendly: You can easily prepare the dough in advance or freeze the shaped rolls, allowing you to enjoy fresh bread without the stress of same-day preparation.
- Versatile Flavor: While they are savory enough for gravy and roasted meats, they have a subtle sweetness that makes them equally delicious with a smear of honey or jam.
Ingredients You’ll Need
To create the best homemade soft dinner rolls, you need ingredients that provide both structure and richness. Each component plays a specific role in ensuring the dough rises beautifully and tastes decadent.
- Whole Milk: The fat and sugar content in whole milk tenderizes the crumb and helps the crust brown beautifully during the baking process.
- Active Dry Yeast: This is the leavening agent that gives the rolls their height. It requires “blooming” in warm liquid to ensure it is active and ready to work.
- Granulated Sugar: Beyond adding a touch of sweetness, sugar acts as food for the yeast, helping it produce the carbon dioxide needed for a high rise.
- Unsalted Butter: Incorporating softened butter into the dough creates that signature “pull-apart” texture and a rich, buttery flavor that defines buttery dinner rolls.
- Large Egg: An egg adds protein for structure and fat for richness, resulting in a more brioche-like, tender interior.
- All-Purpose Flour: This provides enough protein to develop gluten for a good chew without making the rolls as tough as bread flour might.
- Fine Sea Salt: Salt is essential for regulating yeast activity and enhancing the natural flavors of the butter and grain.
Variations and Smart Swaps
Herb-Infused Rolls: Mix one tablespoon of dried rosemary, thyme, or Italian seasoning into the dry ingredients for an aromatic twist that pairs perfectly with roasted chicken or turkey.
Garlic Parmesan Version: After the second rise, brush the tops with garlic butter and sprinkle with freshly grated Parmesan cheese before sliding them into the oven.
Honey Wheat Swap: Replace half of the all-purpose flour with whole wheat flour and substitute the granulated sugar with an equal amount of honey for a heartier, nuttier roll.
Dairy-Free Adaptation: You can use unsweetened almond or soy milk and a high-quality vegan butter stick substitute to make these rolls accessible for those with dairy sensitivities.
How to Make the Best Homemade Soft Dinner Rolls
Step 1: Bloom the Yeast and Activate the Base
Start by warming your milk to between 105°F and 110°F; anything hotter will kill the yeast, while cooler liquid won’t activate it efficiently. Stir in a tablespoon of the sugar and sprinkle the yeast over the top. Let it sit for about 5 to 10 minutes until it becomes foamy and fragrant. This step is a crucial insurance policy for your easy bread recipe, as it proves the yeast is alive before you add the rest of the ingredients.
Step 2: Mix the Enriched Dough
Add the remaining sugar, melted butter, egg, and salt to the yeast mixture. Gradually incorporate the flour, one cup at a time, using a stand mixer fitted with a dough hook or a sturdy wooden spoon. Continue adding flour until the dough begins to pull away from the sides of the bowl. It should feel slightly tacky to the touch but shouldn’t stick aggressively to your fingers, which ensures your fluffy yeast rolls remain moist.
Step 3: Knead for Gluten Development
Knead the dough on a lightly floured surface or in your mixer for about 8 to 10 minutes. You are looking for the “windowpane test” result, where a small piece of dough can be stretched thin enough to see light through it without tearing. Proper kneading creates the elastic framework that traps air bubbles, leading to the best homemade soft dinner rolls with a uniform, soft crumb.
Step 4: The First Rise
Place the dough in a lightly greased bowl, cover it with a clean kitchen towel or plastic wrap, and let it rise in a warm, draft-free spot. This bulk fermentation should take about 60 to 90 minutes, or until the dough has doubled in size. This is where the flavor develops and the yeast works its magic to create a light, airy base for your holiday side dish.
Step 5: Shape the Rolls
Gently punch down the risen dough to release excess air. Divide it into 12 to 15 equal portions. To shape each roll, tuck the edges underneath to create a smooth top and roll it against the counter in a circular motion with your palm. Place the rounds into a greased 9×13 baking dish, spacing them evenly so they have room to expand and eventually touch, which helps them rise upward rather than outward.
Step 6: Second Proof and Bake
Cover the shaped rolls and let them rise again for 30 to 45 minutes until they look puffy and have filled the gaps in the pan. Bake in a preheated 350°F oven for 20 to 25 minutes. You are looking for a deep golden-brown color on top. Immediately upon removing them from the oven, brush the tops with melted butter to keep the crust soft and give them a professional, glossy finish.
Pro Tips for Success
Tip: Always measure your flour by spooning it into the measuring cup and leveling it off with a knife. Packing the flour directly from the bag often leads to using too much, resulting in dense, heavy rolls.
Tip: Use a kitchen scale if you have one. Weighing the dough allows you to divide it into perfectly equal portions, ensuring that every roll bakes at the same rate and looks uniform in the pan.
Tip: If your kitchen is cold, proof the dough in the oven with the light turned on. The small amount of heat from the bulb creates a perfect micro-climate for the yeast to thrive.
Tip: Don’t skip the second rise. While it’s tempting to rush into the oven, the second proof is what gives buttery dinner rolls their signature lightness and prevents them from being “bready” or tough.
Troubleshooting Common Problems
Why Are My Rolls Dense and Heavy?
This usually happens if the dough didn’t rise enough or if too much flour was added. Ensure your yeast is fresh and that you allow the dough to double in size during both proofing stages. Also, keep the dough as soft and slightly tacky as possible during the kneading process to maintain moisture.
The Rolls Didn’t Rise at All
The most common culprit is liquid that was too hot, which kills the yeast instantly. Always use a thermometer to check that your milk is around 110°F. Alternatively, if your kitchen is very cold, the rise may simply take twice as long as the recipe suggests.
How to Serve the Best Homemade Soft Dinner Rolls
Presentation is key for a holiday side dish. Serve these rolls warm, ideally within 30 minutes of baking, to experience their peak texture. Placing them in a basket lined with a linen napkin helps retain their heat throughout the meal.
Garnishes and Spreads
While a simple brush of salted butter is traditional, you can elevate the experience by serving them with a small bowl of whipped honey butter or a compound butter mixed with fresh parsley and sea salt. A sprinkle of flaky Maldon salt on top just before serving adds a delightful crunch and highlights the buttery flavor.
Creative Ways to Serve It
These rolls are sturdy enough to be used as sliders the next day. They make incredible vessels for leftover turkey or ham sandwiches. You can also split them, toast them lightly, and use them as the base for a decadent eggs Benedict or a savory breakfast sandwich.
Storage and Make-Ahead
Storing Leftovers
Once completely cooled, store the rolls in an airtight bag at room temperature for up to 3 days. To restore that “just-baked” feel, wrap them in foil and warm them in a 300°F oven for 5 to 7 minutes.
Freezing
These rolls freeze beautifully. You can freeze the baked rolls for up to 3 months. Simply thaw at room temperature and reheat in the oven. Alternatively, you can freeze the shaped, unrisen dough balls. When ready to bake, let them thaw and rise in a greased pan for several hours before following the standard baking instructions.
Making It Ahead
For a stress-free morning, you can perform the first rise in the refrigerator overnight. The cold environment slows the yeast, developing a more complex flavor. The next day, shape the cold dough, let the rolls proof for about 60 to 90 minutes until they reach room temperature and puff up, then bake as directed.
Final Thoughts
Creating the best homemade soft dinner rolls is one of the most rewarding projects you can undertake in the kitchen. There is a deep sense of satisfaction that comes from transforming humble ingredients like flour, water, and yeast into something so universally loved. Whether you are a seasoned baker or this is your first attempt at fluffy yeast rolls, the key is patience and paying attention to the sensory cues of the dough. Once you taste that first warm, buttery bite, you’ll never go back to store-bought rolls again.
Frequently Asked Questions
Can I use instant yeast instead of active dry yeast?
Yes, you can substitute instant yeast in a 1:1 ratio. The main difference is that instant yeast does not technically need to be bloomed in liquid; you can mix it directly with the dry ingredients. However, blooming it anyway won’t hurt, and many bakers prefer doing so to ensure the yeast is still fresh and active before proceeding.
What is the best way to reheat rolls without drying them out?
The best method is to wrap the rolls in aluminum foil and heat them in a 300°F oven for about 10 minutes. The foil traps the moisture inside, preventing the edges from becoming crusty or hard. Avoid using the microwave if possible, as it can make the bread turn rubbery or tough once it cools back down.
Can I make this dough in a bread machine?
Absolutely. Add the wet ingredients first, followed by the dry ingredients, and then the yeast. Use the “Dough” setting on your machine. Once the cycle is complete, remove the dough, shape it into rolls in your baking dish, let them rise for the second proof, and bake them in a conventional oven as instructed for the best crust.
How do I know if I have kneaded the dough enough?
The dough should be smooth, elastic, and spring back quickly when poked with a finger. The most reliable test is the windowpane test: pull a small piece of dough and stretch it. If it stretches thin enough to be translucent without snapping, the gluten is sufficiently developed. If it tears immediately, continue kneading for another two to three minutes and test again.
Why are my rolls pale instead of golden brown?
Pale rolls are often the result of an oven temperature that is too low or a lack of sugar/dairy in the dough. Since this recipe uses milk, sugar, and an egg, they should brown well. If they are still pale, check your oven temperature with a thermometer or try brushing the tops with an egg wash (one egg beaten with a teaspoon of water) before baking for a deeper shine.
Soft Homemade Dinner Rolls

These incredibly soft and fluffy dinner rolls are a staple for any holiday table. Made with simple pantry ingredients, they come out buttery and tender every single time.
- 1 cup warm milk (110°F)
- 1/4 cup granulated sugar
- 2 1/4 tsp active dry yeast
- 1 tsp salt
- 1/4 cup unsalted butter, melted
- 1 large egg, room temperature
- 3 1/2 cups all-purpose flour
- 1In a large bowl, whisk together the warm milk, sugar, and yeast. Let the mixture sit for about 5-10 minutes until it becomes foamy.
- 2Stir in the melted butter, salt, and egg until well combined.
- 3Add 2 cups of flour and mix until a shaggy dough forms. Gradually add the remaining flour while kneading.
- 4Knead the dough on a lightly floured surface for 5 to 7 minutes until it is smooth and slightly tacky but not sticky.
- 5Place the dough in a greased bowl, cover with a damp cloth, and let rise in a warm, draft-free area for 1 hour or until doubled in size.
- 6Gently punch down the dough and divide it into 12 equal-sized pieces. Shape each piece into a smooth ball.
- 7Arrange the rolls in a greased 9x13-inch baking dish. Cover and let rise for another 30-45 minutes.
- 8Preheat oven to 350°F (175°C). Bake for 18-22 minutes or until the tops are golden brown.
- 9Brush the tops with additional melted butter immediately after removing from the oven for a soft crust.
Keywords: dinner rolls, yeast rolls, homemade bread, soft rolls, thanksgiving recipes


