
Perfect Baked Potato

There is a profound difference between a standard spud thrown in the oven and a truly perfect oven baked potato recipe. Most people settle for a potato with a papery, soft skin and a dense, somewhat gummy interior, often because of the common mistake of wrapping them in aluminum foil. However, when done correctly, a baked potato becomes a culinary masterpiece of textures: a salty, shatteringly crispy skin on the outside that protects a light, steaming, and incredibly fluffy interior that melts the moment it hits a pat of butter.
Mastering this side dish is less about complex culinary skills and more about understanding the science of moisture and heat. By following a specific sequence of temperature adjustments and timing the application of fats, you can transform the humble tuber into the best baked potato you have ever tasted. This guide will walk you through the essential techniques to ensure your potatoes come out consistently excellent every single time you cook.
Why You’ll Love This Recipe
- Unbeatable Texture Contrast: This method prioritizes a high-heat finish that ensures the skin is thin and crisp while the inside remains airy and light rather than heavy or wet.
- Budget-Friendly Satisfaction: Using simple pantry staples, you can create a filling and nutritious meal or side dish that feels like a luxury steakhouse treat without the high price tag.
- Low Maintenance Prep: Aside from a quick scrub and a mid-bake oil rub, the oven does almost all the heavy lifting, making this perfect for busy weeknights or hosting.
- Ultimate Versatility: A well-executed potato serves as a blank canvas for everything from simple sea salt and butter to elaborate toppings like buffalo chicken or roasted vegetables.
Ingredients You’ll Need
To achieve the perfect oven baked potato recipe, you only need a handful of items. However, the quality and type of these ingredients are what dictate the final success of the dish, particularly the variety of potato chosen.
- Russet Potatoes: These are non-negotiable for a classic baked potato. Their high starch content and low moisture levels allow the inside to become “mealy” and fluffy, while their thick skin crisps up beautifully.
- Extra Virgin Olive Oil: This acts as a heat conductor during the final stage of baking. It fries the skin slightly in the oven’s heat, creating that coveted crunch and a rich, savory flavor.
- Kosher Salt: The coarse grains of kosher salt provide a better crust than fine table salt. It draws out any remaining moisture from the skin and provides a lovely seasoned finish.
- Freshly Cracked Black Pepper: While optional, adding a bit of pepper to the skin along with the salt adds a layer of earthy heat that complements the earthy flavor of the potato.
Variations and Smart Swaps
The Garlic Herb Crust: For a more aromatic experience, mix your olive oil with a half-teaspoon of garlic powder and dried rosemary before brushing it onto the potatoes. This creates an infusion of flavor directly into the crispy skin.
Spicy Seasoned Skin: If you enjoy a bit of kick, add a pinch of smoked paprika or cayenne pepper to the salt rub. This gives the exterior a beautiful reddish hue and a subtle smoky heat that pairs well with sour cream.
The Bacon Fat Method: For an old-fashioned, decadent flavor, swap the olive oil for rendered bacon fat. The high smoke point and savory depth of the pork fat make the russet potatoes taste incredibly rich.
How to Make the Perfect Oven Baked Potato
Step 1: Scrub and Thoroughly Dry the Potatoes
The first step in achieving a perfect oven baked potato recipe is starting with a clean, dry surface. Use a vegetable brush to remove any dirt from the russet potatoes under cold running water. Once clean, use a kitchen towel or paper towels to dry them completely. Any moisture left on the skin will turn to steam in the oven, which prevents the skin from getting truly crisp. Let them air dry for another five minutes if you have the time to ensure they are bone-dry.
Step 2: Pierce for Steam Release
Using a sharp fork, prick each potato about 6 to 8 times all over the surface. This is a critical safety step; potatoes contain a significant amount of water, and as that water turns to steam, pressure builds up. Piercing the skin creates “vents” that allow the steam to escape. Without these vents, you risk the potato bursting inside your oven, creating a messy cleanup and a ruined side dish.
Step 3: The Initial Dry Bake
Place the potatoes directly on the oven rack in a preheated 400°F oven. Do not use foil. Baking them directly on the rack allows hot air to circulate 360 degrees around the potato, ensuring even cooking. During this first 45-minute phase, the heat is working to cook the fluffy interior and dry out the skin. If you apply oil too early, it can actually trap moisture inside the skin, making it tough rather than crisp.
Step 4: The Oil and Salt Application
After the initial 45 minutes, carefully remove the potatoes from the oven using tongs or a mitt. Increase the oven temperature to 425°F. Brush the entire surface of each potato with olive oil and then sprinkle generously with kosher salt. The oil will now react with the high heat to “fry” the outer layer of the skin, while the salt adds flavor and texture. Return them to the oven for an additional 10 to 15 minutes.
Step 5: The Temperature Check and Fluff
The best baked potato is done when the internal temperature reaches between 205°F and 212°F. You can check this with an instant-read thermometer. Once reached, remove them and immediately cut a longitudinal slit down the center. Use a fork to gently mash and fluff the white flesh inside. Opening them immediately allows the final burst of steam to escape, which prevents the potato from becoming heavy or gummy as it sits.
Pro Tips for the Best Results
- Tip: Never use foil. Wrapping a potato in foil steams the skin, resulting in a wet, soggy texture rather than a crisp one. Foil is for keeping things moist; for a baked potato, we want the opposite.
- Tip: Check for Doneness with a Probe. If you don’t have a thermometer, a metal skewer should slide into the center with zero resistance. If there is any “crunch” or firmness in the middle, it needs more time.
- Tip: Size Consistency Matters. Try to select potatoes that are roughly the same weight and shape. This ensures they all finish cooking at the same time, preventing some from being overcooked while others remain hard.
- Tip: The Bottom Rack is Best. Placing your potatoes on the lower-middle rack puts them closer to the primary heat source, which helps the bottom of the skin crisp up just as well as the top.
Troubleshooting Common Problems
Why is the skin of my potato soft?
This usually happens for two reasons: either the potato was wrapped in foil, or it wasn’t dried thoroughly after washing. Moisture is the enemy of a crispy skin. Ensure the potato is dry and that the oil is only applied during the final stage of baking so it doesn’t soak into the skin too early.
Why is the center of my potato still hard?
If the interior is hard, the potato simply hasn’t cooked long enough, or the oven temperature was too low. Russet potatoes are dense and require sustained heat to break down the starch. Always aim for an internal temperature of at least 205°F to guarantee that melt-in-your-mouth texture.
Why did my potato skin taste too salty?
If you used fine table salt, it can easily over-season the skin because the small grains cover more surface area and dissolve quickly. Use coarse kosher salt or sea salt flakes, which provide a targeted “pop” of saltiness without overwhelming the palate.
How to Serve Your Baked Potato
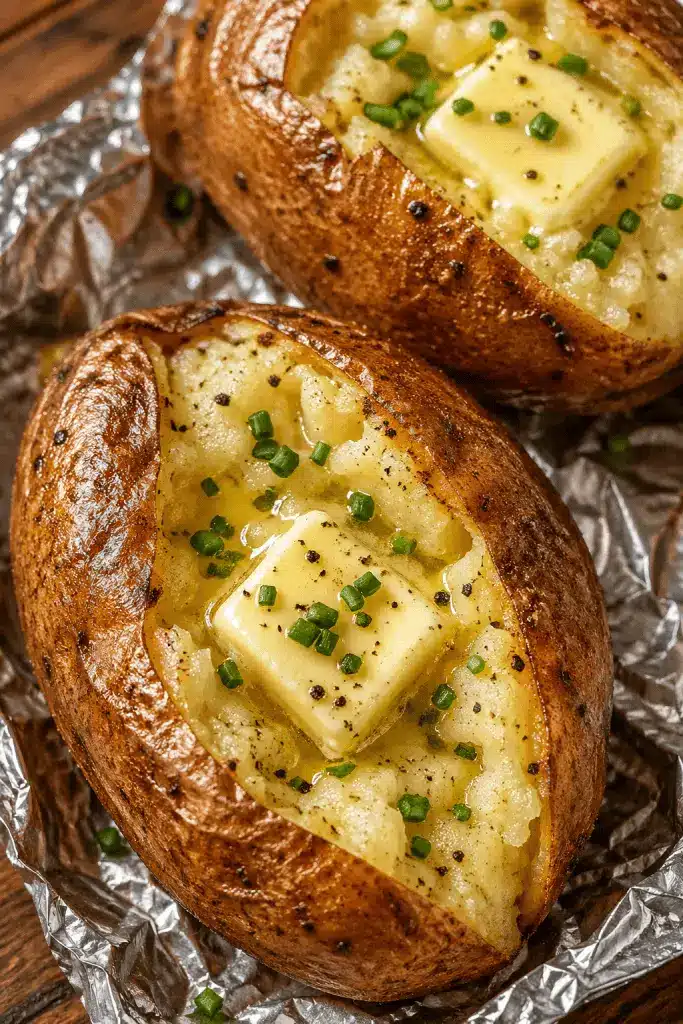
The beauty of the perfect oven baked potato recipe is how it accommodates different tastes. Once you have fluffed the interior, the traditional way to serve it is with a generous knob of salted butter, a dollop of cold sour cream, and a sprinkle of fresh chives. The contrast between the hot, steaming potato and the cold cream is a classic culinary pairing.
Garnishes and Toppings
To take it a step further, consider adding crispy bacon bits, shredded sharp cheddar cheese, or even pickled jalapeños for a bit of acidity. If you want to turn the potato into a full meal, toppings like beef chili, broccoli and cheese sauce, or pulled pork work wonderfully. The crispy skin provides enough structural integrity to hold even the heaviest toppings without falling apart.
Side Dish Pairings
A baked potato is the quintessential companion to a seared steak, roasted chicken, or a rack of BBQ ribs. For a lighter meal, serve it alongside a crisp Caesar salad or roasted asparagus. Because the potato is quite starchy and rich, it balances well with acidic dressings or bright green vegetables.
Storage and Make-Ahead
Storing Leftovers
If you have leftover baked potatoes, let them cool completely before placing them in an airtight container in the refrigerator. They will stay fresh for up to 4 days. Do not wrap them in plastic wrap while they are still warm, as the condensation will make the skins very mushy.
Reheating
To revive the crispy skin, avoid the microwave. Instead, place the leftover potato back in a 350°F oven or an air fryer for 10-15 minutes. This will dry out the skin again and heat the center through without making the potato rubbery.
Making It Ahead
While potatoes are best served immediately after fluffing, you can bake them up to an hour in advance. If you must keep them warm, do not wrap them in foil. Instead, leave them in a turned-off oven with the door slightly ajar. This keeps them warm while allowing steam to escape.
Final Thoughts
Achieving a perfect oven baked potato recipe is a rewarding skill that elevates every meal it touches. By focusing on the quality of your russet potatoes and mastering the two-stage baking process, you move beyond the mediocre and into the realm of professional-quality side dishes. Remember that patience is key—giving the potato enough time to reach its ideal internal temperature is the only way to ensure that cloud-like, fluffy interior. Once you taste the difference that a properly salted and oiled skin makes, you will never go back to boiling or foil-wrapping your potatoes again.
Frequently Asked Questions
Can I use Yukon Gold potatoes for this recipe?
While you can bake Yukon Golds, they will not produce the same result as russet potatoes. Yukon Golds are waxy and have a thinner skin, meaning they will stay creamy and dense rather than becoming light and fluffy. For the classic best baked potato experience, Russets are the superior choice.
Do I really need to use a thermometer?
While not strictly necessary, an instant-read thermometer is the most reliable way to ensure perfection. Since potatoes vary in size and oven temperatures can fluctuate, checking for 205°F-212°F guarantees that the starch has fully hydrated and the interior is as fluffy as possible.
Is it okay to bake potatoes at a lower temperature for longer?
You can bake potatoes at 350°F for about 75-90 minutes, but you won’t get the same crispy skin. The higher temperature (400°F-425°F) is necessary to trigger the Maillard reaction on the skin and to ensure the internal moisture evaporates quickly enough to create an airy texture.
Why do some recipes say to soak the potatoes in salt water first?
Soaking can help dissolve some of the surface starches, which some believe leads to a crispier skin. However, in our perfect oven baked potato recipe, we find that thorough drying and the late-stage oil application provide a superior crunch without the extra time required for soaking.
Can I make these in an air fryer?
Yes, an air fryer is essentially a high-powered convection oven. You can follow similar steps, though you may need to reduce the temperature to 390°F and shorten the cooking time. The air fryer is excellent for achieving a very crispy skin due to the intense air circulation.
Perfect Baked Potato

Achieve the ultimate baked potato with a salty, crispy skin and a light, fluffy interior. This simple method ensures perfect results every time using high heat and a touch of oil.
- 4 large Russet potatoes, scrubbed and dried
- 1 tablespoon extra-virgin olive oil
- 1 tablespoon kosher salt
- Optional toppings: butter, sour cream, chives, bacon bits, or shredded cheese
- 1Preheat your oven to 425°F (220°C).
- 2Using a fork, prick the potatoes several times all over to allow steam to escape during baking.
- 3In a small bowl, rub each potato thoroughly with olive oil until evenly coated.
- 4Generously sprinkle kosher salt over the skin of each potato.
- 5Place the potatoes directly on the middle oven rack. For easier cleanup, you can place a baking sheet on the rack below to catch any drips.
- 6Bake for 45 to 60 minutes, or until the skin is crisp and a fork easily pierces the center.
- 7Remove from the oven, slice open immediately, and fluff the insides with a fork before adding toppings.
Keywords: baked potato, side dish, russet potatoes, crispy skin, easy dinner


